DIY L-Plate / L-Bracket

DIY L-bracketIn the following article Trevis Thomas (Flickr) shows us how to make an L-bracket - A useful Tripod mod that allows you to mount your camera vertically on the tripod.

I was in the market for a new joystick style-ball head and I thought that the design of the head would be limiting if I wanted to shoot with my camera in portrait orientation. Then I remembered watching a pod cast by Scott Bourne where he showed his camera mounted to a fancy L-Bracket. I thought that that would be the perfect solution and went on the hunt for a custom bracket for my Pentax K20D.

The cheapest one and honestly the only one, that I could find was the one by Kirk Photo. The thing looks great but its 130 dollars. I couldn’t see spending that much on the L-bracket. I mean that’s more money than I planned to spend on the head.

After posting a thread to the twipphoto flicker group asking for other options, nothing turned up. I did find out that Bogen makes a generic L-Bracket (called Bogen - Manfrotto Junior Elbow Bracket) but its 60 dollars and it looks enormous. I really didn’t want a bracket that covered my battery door. Having to remove it all the time would be a pain.

I wasn't content with the idea of spending 60 to 130 dollars for what is basically just a piece of aluminum with a couple of holes in it. I guess I have Scott to thank for this because he mentioned that there would be a lot of cost involved with making a custom design and using a milling machine to fabricate a custom bracket, which is true. But the more I thought about it the more I realized, that I don't really care that much what it looks like as long as it does the job, fits my camera and doesn't block my battery door. The wheels were in motion to figure out what I could do and how cheaply I could solve the problem.

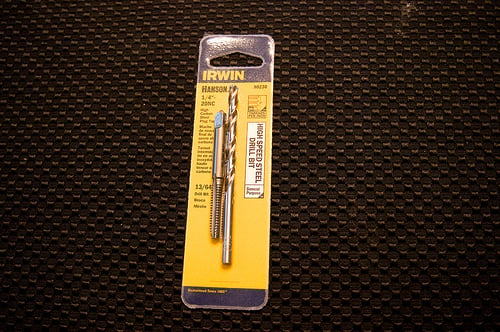
After some Google searches I found this cool site called speedymetals.com who said that they would sell any quantity of metal I needed. No matter how small.

I ordered two pieces of 1/4 x 3 x 4 inch Angle 6061-T6 Aluminum cut to 1.5 inches thick.

www.speedymetals.com/pc-2203-8344-3-x-4-x-14-angle-6061-t...

The metal cost about 14 dollars with shipping. Actually the metal was only a few bucks the shipping was like 11 dollars of the cost. When they say speedy they’re not kidding. I had my metal in less than 5 days. For my 14 bucks this is what I got:

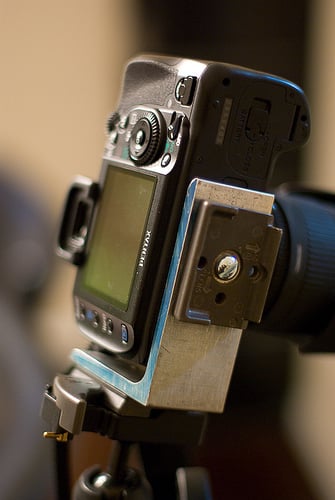
My simple design was to drill a 1/4 inch hole through the long part so that I could run one screw through my Bogen quick release plate, through the metal and into the camera's tripod mount. And then tap a hole in the short side threaded to 1/4-20 (standard tripod screw mount size and threading) so that I could screw another quick mount plate on to the side of my camera.

To do this I needed to buy the tap and a taping tool. That cost about 11 dollars or so from Home Depot.

To connect the quick release plate through the 1/4 inch piece of aluminum into the camera I needed a longer screw. So I got two 5/8 1/4-20 screws (about 98 cents, also from home depot)

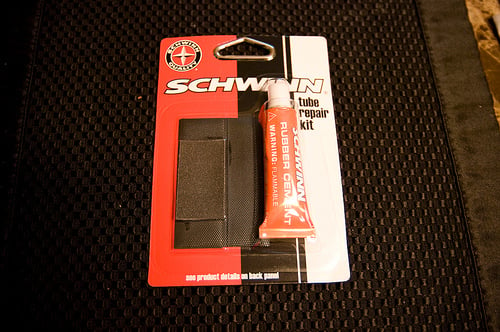
To help the metal resist slipping, and to protect the bottom of my camera, I decided to attach some rubber to the part of the bracket that would make contact with the camera. My wife had a brilliant idea and suggested the rubber from a bicycle tire repair kit. So for another two dollars I got a kit like this:

I don’t have ready access to a drill press and I didn’t have an appropriate clamp either. And since I wanted to do this as cheaply as possible I took some scrap wood and fashioned a little wedge to hold the aluminum still. Basically I took two thin strips of pine and attached them to a piece of two foot long piece of 2x10, 1-1/2 inches apart so that I could drill into the aluminum without it spinning around. After reading a blog post on how to use the tapping tool I went into the garage and 30 minutes later I had what I wanted, an L plate for less than 30 dollars.:

Well actually I have the material to make two of them, and if I want to make more they would cost even less. If I could find a local place to buy the aluminum I could actually make more of them less than 5 dollars.

To mount the Bogen 3157N Quick Release Plate this way I needed to remove their handy thumb screw and attach my much longer screw so that it would be long enough to go through both the QR plate and my L-Bracket. The 5/8 inch screw was the perfect length. If you look at the 3157N plate you’ll see that their screw is held in place by a C-clamp. Just pop that off and the screw will fall right out allowing you to insert whatever screw you want. I’m still looking for a 5/8 inch long 1/4-20 thumb screw but so far I haven’t found one. That would make this even nicer since I could remove it from the camera without any tools.

It's not going to win any beauty contests but, hey, it works! And now I can spend my money on other, far more difficult to fabricate gear like a monopod and a joystick head...

Get the DIYP greatness via RSS, newsletter and Twitter
Connect with the community: Facebook Page, Discussions
Share Ideas, Setups, Images and Projects on DIYP's Flickr, visit Readers Photos

Comments

So my question is, with the

  • December 19, 2008
  • Will

So my question is, with the ball head he has shown in the photos, why go through all that trouble when there are two notches cut into the head for the exact purpose of shooting vertically?

The reason is that the ball

  • December 19, 2008
  • Jeff

The reason is that the ball head isn't really meant to be used that way. When you tilt it into that notched position, you unbalance the tripod- making the weight go off to the side. The other reason is when you put it into that notch you loose the flexibility that you want with a ballhead.

Do this instead of using the notches in the ballhead...

...because you have way more flexibility to set up your shot when you can use the full range of the ballhead instead of only being able to tilt it up and down or spin it right and left. Basically Using an L-plate (or a tripod collar on a big lens) lets you turn the camera in any direction on all three axes instead of just 2.

My God! You're

  • December 19, 2008
  • Goggz

My God! You're right!

However, some of us don't have the balls, so we'd need something like this on our cheap & cheerful tripod heads.

It occurs to me that this mod could also have a useful role as the support arm for a DIY panoramic head...

Because...

It allows you to rotate your camera 90 degrees without tilting the tripod. You can take a vertical immediately after a horizontal and keep the camera pointing the exact same direction, it doesn't change the lens axis. When you tilt it, it changes the angle.

---Alex
http://MooreALX.com

Reply

He was looking to get a different head. Specifically the grip type head, those dont like shooting vertically.

wing nut

Just epoxy a washer into the slot of the screw. Instant wing nut :-)

cheers

Barry

Wrong colour

  • December 20, 2008
  • GrantC

Don't forget to hit it with a coat of black spraypaint, or plasti-dip so it looks more like camera equipment. ;)

-G

Anodising

  • December 29, 2008
  • Anonymous

You can always anodise the aluminum to get any color you want. It also helps with corrosion prevention.

$35 L Bracket

Check out: http://www.stereoscopy.com/jasper/slide-bars.html

They have an L bracket for $35. It's designed to be used with a stereoscopic rig, but works just fine by itself.

Another metal supplier

Another option for purchasing metal online for little fab projects like this is Online Metals. They've always been good to me when I've needed small quantities for one-off items, and when I can't find something at one site, the other usually has what I'm looking for.

(For the angle aluminum you used, you'd want to check here; it looks like it's $3.99, so pretty close on price. As you saw with Speedy, shipping is the part that gets you.)

Milling RC2 clip into bracket

Something else I'll mention (which the original poster alluded to): if you have access to a mill, and have a few extra minutes, you can get a little fancier with this: mill in a rudimentary version of the shape of the RC2 mount into both the bottom and side of the bracket, so that you don't even need the extra quick-release plates, bringing the cost down even more.

A further upshot is that it will still sit well on a flat surface when you set the camera down, something you can't do very nicely with a normal quick-release plate.

I made pretty much the same

  • December 27, 2008
  • Helios35966

I made pretty much the same thing a few years back,using steel "L" brackets from the hardware store. The work pretty well for this,but the downside is that they are very heavy.
I used the self-stick "Foamies" from Walmart to keep the camera from twisting on the bracket

IKEA has a similar part...

  • December 29, 2008
  • Anthony_G

Looks kind of like the Kvartal L Bracket - It might do in a pinch:

http://www.ikea.com/us/en/catalog/products/60079364

The difficulty is drilling

  • December 29, 2008
  • Joseph

The difficulty is drilling and tapping threads straight. 1. you need a drill press to get the hole square and 2 you need a good eye when you start tapping your threads. I made a lot of metal projects and tapping straight holes has always been the toughest obstacle. Looks like you did it well.

Bogen's L bracket is $60, as opposed to the $30 for DIY.

You should take orders for your bracket, charge $30 and mass order your supplies. This will drive the cost way down + you already have the drill & tap set. You may even be able to anodize your parts black.

Square tapping

  • November 25, 2011
  • Laurent

Very interesting subject !!

I do quite a bit of metal working, and the best trick I found to do tapping square is to put the tap in the drill press's chuck to start tapping... after a few turns the tap will remain square and I finish in the vise.

Great Idea. Thanx. But, just

  • December 30, 2008
  • Anand

Great Idea. Thanx. But, just out of curiosity, don't you need "two" quick release plates? Or do you under the quick release plate and then move it to the horizontal position?

Yes you do need 2 plates...

  • December 31, 2008
  • Anonymous

Did same thing for my back screen door

  • January 3, 2009
  • Anonymous

I did the same this past summer, mounting a 32 inch wide screen door onto a 39 inch length of 2x2 aluminum L angle stock to fit in a 34 inch wide doorway. I purchased the screen door at Home Depot for 1 cent on clearance. The 2x2 L angle stock I had cut to spec at Pacific Industrial Supply and cost me about $18. I mounted the L stock to the door jamb with hanger bolts and wing nuts. I have and old Craftsman corded 3/8 inch drill mounted onto a Wolfcraft 3408 drill press stand that I used to drill straight holes. I have been wondering about other things I could do with L angle stock.

Great Effort!

Some people would turn their nose up at using something other than a big-brand L Plate, but I think it's great! They are simple and you probably wouldn't see much of a difference building one yourself.

Certainly doable

  • June 16, 2009
  • Stephen

My little ball head doesn't like portraits, it slips and the camera rotates down during long exposures. I'm working on a similar L bracket. My first attempt is sheet steel (because it was free) but it was too thin and the rig vibrates too much. I may have to buy Aluminium but I was hoping to do it for free. A couple of ideas:
1. Mount your bracket with the camera on the right (opposite to the photo above), as the weight of the lens turns the camera the screw will become tighter.
2. Let the camera rest on the bottom of the bracket, two contact points is more sturdy than one and there will be less weight on the screw.

Another choice

  • July 9, 2009
  • Jake

You could also build something like this using a length of 1" wide X 1/4" thick aluminum bar stock (available at Home Depot, Menards, etc.) You'd need a reasonably large vise to hold one end while you bent it and a carpenters square or similar to check when your bend was exactly 90 dgr, and also that you had not imparted any twist in the bending process. Steel bar stock would be even stiffer, but you'd likely need some heat when bending it.

I made a rig similar to this with two 90 bends in a "C" shape to mount a camera upside down. I was photographing the instrument panels of small aircraft and needed to get the camera looking downward from as close to the headliner of the cockpit as possible and still be able to see thru the viewfinder to line up the shot. (This was back in the "film days" - life is sure simpler now!)

A further upshot is that it

A further upshot is that it will still sit well on a flat surface when you set the camera down, something you can't do very nicely with a normal quick-release plate

interesting in deed ...

  • March 17, 2011
  • Lucas, Ibiza, (spain)

yep, very interesting ....!!!

I was looking around to "do-myself" an L bracket, and this post has shown me

"the way to do it"..

..in my own way ...


thank's, guys ..!!

Great idea, I will get the pieces cut at local metel supply

  • May 20, 2011
  • Larry L Wittmer

If you have a drill press, rotate the table for close quoters drilling on the edge for good 90s. using 4X3X1/4, there should be room to clamp the metal. Can't wait to get started:  Larry

Wow! that was a fun project.

  • May 26, 2011
  • Larry L Wittmer

Called around to local metal fab. shops, and gave specks. Went to pick the alum. up and he had it cut to size. ( I love the south) Ask how much and he told me no charge. Try that in Brooklyn. I drilled 3 holes, two threaded 1/4 20 for the quick release mounts and one 1/4" countersunk for a stainless 1/420 screw, for mounting to camera. Buffed the whole thing on the wire wheel to remove slick surface so it could be painded with a high quality black satin spray paint. The whole job took about 2 hrs. and it looks just like store bought. Thanks again for this great little project. Oh! be sure to mount your plates dead center with the lens, so your axis will not move when flipping. :  Larry 

DIY L-Plate / L-Bracket

  • June 6, 2011
  • tomgm36

I love this concept & you can't beaat the cost!!,... however how will my cables work with this bracket, like my shutter release remote cable? I have a Canon 7D for my main camera and that is the side for my cables.

Great project

  • June 7, 2011
  • JohnF

This is a great article. I'm sorting out the parts to make one myself. Funny how there's nothing like this commercially available. Manfrotto's one is too clunky and RRs's one is mega-bucks.

Tomgm36 - You'll need to use a longer piece of metal, so as to allow space for the remote release etc. to plug in.


Great idea! I just finished mine.

  • October 8, 2011
  • Barela Imaging

After months of collecting the parts and tools, I too am the proud owner/ builder of my very own L-plate. Thank you so much Trevis Thomas for this great article. Oh, i do think it will win a beauty contest or two.

David,

barelaimaging.com

I enjoy the topics. I built a

  • November 26, 2011
  • Rick

I enjoy the topics. I built a pvc ballhead with hollow round door knob and acrylic plastic sheet stock. Weighs 1 lb and holds my Sony a900 with zeiss 24-70 lens rock solid.

I built one last night, and I

  • December 22, 2011
  • Matt

I modified mine so I could

  • January 7, 2012
  • Matt

I modified mine so I could still use my R-Strap


http://www.flickr.com/photos/mwgiesbrecht/6638625237/

Post new comment

The content of this field is kept private and will not be shown publicly.
CAPTCHA
This question is for testing whether you are a human visitor and to prevent automated spam submissions. It is not case sensitive
1 + 3 =
Solve this simple math problem and enter the result. E.g. for 1+3, enter 4.