


DIY Three Strobes Bracket Will Triple Your Light
Oct 15, 2010
Udi Tirosh
Udi Tirosh is an entrepreneur, photography inventor, journalist, educator, and writer based in Israel. With over 25 years of experience in the photo-video industry, Udi has built and sold several photography-related brands. Udi has a double degree in mass media communications and computer science.
Share:
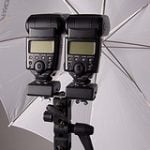
 We’ve had our share of dual strobe mounts before, but this is a first for a triple mount. And you’d need every bit of that light if you are shooting a big modifier like the Westcott’s 28″ Apollo monster.
This tutorial shows you how to make one (or print it out and go to the local shop so they make one).
The detailed instructions were written by Eric Au (Flickr), Calgary based photographer and industrial designer. Always helps to have a Shop at the garage… I wonder how many comments will persuade Eric to go and make this into something you could buy at B&H.
Traditionally, during this time of year, there is a lull in work flow. Not a lot of contracts are signed during late September and October. Things pick up again in November. Typically, I use this time to hone some new technique or try out some new gear. A tiny bit of hackground (pun intended) for you readers, I am photographer and an industrial designer and it was inevitable when those two would collide. I’ve been hacking and developing my own brackets and equipment ever since I could hold a saw.
I use a lot of off camera flash for location work, I sought out to design and develop something that is the size of a palm, but have every feature and the strength of the Lightware Foursquare. Although I currently own and use a Foursquare, it is still not compact enough to throw into my bag (taking into account the handle assembly which makes it work really well).
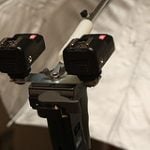
Instead of trying to copy and reduce the size of a Foursquare, I decided to subtract some light, using 3 instead of 4 Speedlights (I use only Nikon Sb800s). I started with the largest hex, t6160 aluminum I could source locally, 2”. A piece of hex stock offered 6 open, flat sides to mill into features to mount the flashes, the spigot and umbrella thumb screw.

After deciding and marking where things would go, it was off to the metal mill.

The first material removal was a half inch pocket for the Woodruff Keyway cutter to get into. This pocket is made deep enough for the plastic insert to be shaped in a later step. The next step was to use the Woodruff cutter to make the slot for the flash shoe to slide into. The thickness of the cutter is the same thickness as the foot of a Speedlight (I think it’s a number 304).

A quick test fit and it was time to rotate the piece and repeat this material removal and slot cutting 3 more times (my original design was an attempt to hold a PocketWizard, it didn’t fit but I decided to put the slot in anyways).

Slicing off a .75 inch chunk of the newly minted bracket, I moved it to the metal lathe to make the faces of the slice flat and machine tool mark free. This is also where I drilled a 8.5mm hole to accept any standard size photo umbrella, reflective or shoot through.

A 3/8 16 thread was made on one of the faces to screw in the 6” extended spigot. This is not a necessary addition but it make turning and tilting the Threesome bracket a lot easier. It would also be a future place for a handle to be added. The remaining face would have a .25” hole with the last half of the hole with a 1/4 20 thread. This hole is drilled straight through to the middle whole that is the umbrella mount.

A test fit of strobes and umbrella worked really well so it was time to make the strobe sit securely. Ignore the tiny umbrella, it’s a lucky find in the backroom of a photography equipment store in Hong Kong. ONWARDS!

Since I wasn’t to concerned with how this thing looked, yet, I crafted some crude inserts from some black nylon I had lying around in the shop. 3, 6--32 threaded holes where made to accept the inserts. A small hole was drilled in the insert so that the locking pin of the SB800s would drop in and make for a solid connection.

A test fit again yielded great results, now more secure. The mini umbrella makes another appearance.

Almost immediately finishing MKI of the Threesome, I began with MKII, with the intention of cleaning up the appearance of it and streamlining the profile.

In addition to flush mounting the inserts (with only cap screws on hand) I also developed a nice little thumbscrew for the umbrella mount. For all intended purposes, the Threesome Bracket is alive.(It is fits nice inside Westcott’s Mini Apollo)

Future developments for MKIII and it’s final production model will include:
1. A second umbrella mount for a clamshell umbrella technique

2. More durable flush mounted plastic inserts, possibly limited runs with my favorite wood, walnut.
3. An additional bracket mounted on the rear of the Threesome to mount a traditional 4 spine softbox, called the PiggyBack.

A place to mount a radio trigger, basically a fourth cold shoe.
5. A removable handle for voice activated light stand action
Hope this keeps you all interested!
The whole set for the build is here.
Remember: 1 is the loniest number, 2 is love, 3 is a ménage and 4 is a party.
HACK ON!

Udi Tirosh
Udi Tirosh is an entrepreneur, photography inventor, journalist, educator, and writer based in Israel. With over 25 years of experience in the photo-video industry, Udi has built and sold several photography-related brands. Udi has a double degree in mass media communications and computer science.


Join the Discussion
DIYP Comment Policy
Be nice, be on-topic, no personal information or flames.