


How to make a motorised camera slider with an Arduino and a stepper motor for $75
Mar 2, 2017
John Aldred
John Aldred is a photographer with over 25 years of experience in the portrait and commercial worlds. He is based in Scotland and has been an early adopter – and occasional beta tester – of almost every digital imaging technology in that time. As well as his creative visual work, John uses 3D printing, electronics and programming to create his own photography and filmmaking tools and consults for a number of brands across the industry.
Share:

Despite the proliferation of sliders, motorised ones are still quite expensive. Without motors, they’ve dropped to ridiculously low prices. But it’s really not that difficult or expensive to convert a standard manual slider into a motorised one.
This video from Max Maker demonstrates how to turn a very inexpensive slider into a more practical and useful one. It takes a little machining and a few parts, but it’s fairly straightforward. It just takes a little planning and a few tools.
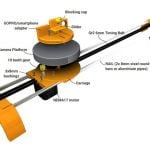
The slider is modified using a stepper motor, a belt drive, and a custom made (but simple) bracket. Like many DIY motorised systems these days, the brains of the unit is an Arduino.
- Any camera slider – Max used this one
- An Arduino Micro
- 4 small toggle switches
- A 12Volt battery pack
- A timing belt and 2 pulley
- A stepped drill bit
- A soldering Iron – Max recommends this one. It is an investment, but it pays out in the long run.
- A4988 stepper driver. In theory you only need one, but its easier to troubleshoot if you have multiple.
- A 12V stepper motor
- A centre punch
- A metal saw or angle grinder
- A drill press or handheld drill
Assuming you already have the tools, or can at least borrow some, the total cost for all the components specific to this project is only about $75. And you can probably pick them up for a lot less if you shop around. The Arduino Micro listed, for example is $25. That’s a third of the total price. But you can find clones for as low as $5 if you look hard enough.
Once you’ve figured out which end the motor’s going on, the first step is to measure & mark the positions of the holes to mount it to the slider. the easiest way to do this is with masking tape. Simple place it around the top of the motor and mark the holes with a pencil. Then, peel off the tape in one big chunk, stick it onto the slider and use a centre punch to mark the holes for drilling.
![]()
Max also cut a larger hole for the motor’s spindle. A belt pulley is attached to the spindle, but it needs to be recessed or it interferes with the slider carriage.

A flat piece of metal is belt and drilled to mount the pulley at the other end of the slider. You’ll need to drill a couple more holes in your slider track, too. To adjust the height of the pulley to match the one on the motor, you can shim it with washers.

With the mechanical bits done, it’s time to move onto the electronics. This is also fairly straightforward. All you need is some form of Arduino or clone, a stepper motor driver, some toggle switches and a way to power it all.

In this case, the switches are used to change the speed of the sliding motion. 4 switches offers 16 different speed combinations. But you can modify this to create any kind of control input you wish. You could swap out the switches for dials, for example. Or you could get really fancy by attaching an LCD for a menu driven UI with a bunch of buttons. A 3D printed case finishes off the look and makes the switches easy to access.

One thing that was particularly interesting about this slider modification is the camera mount. Max used a drone camera stabiliser to help eliminate some of the motor vibration from affecting the camera. Well, it works for drones, so why not?
Of course, such a modification will limit the size & weight of camera you can use. They’re not exactly perfect for DSLRs. Great for phones and action cameras, though.
You can see the complete detailed instructions and download the Arduino sketch code over on Instructables.
[via Instructables]

John Aldred
John Aldred is a photographer with over 25 years of experience in the portrait and commercial worlds. He is based in Scotland and has been an early adopter – and occasional beta tester – of almost every digital imaging technology in that time. As well as his creative visual work, John uses 3D printing, electronics and programming to create his own photography and filmmaking tools and consults for a number of brands across the industry.
Related Posts
 This Arduino-powered DIY camera slider has a joystick remote control
 How to 3D print your own DIY motorised tracking 2-axis camera slider
 This motorised DIY camera slider can be built for under $100 and lets you track objects as it moves
 Slidee is probably the cheapeast non-motorised automatic DIY camera slider you can make yourself
Join the Discussion
DIYP Comment Policy
Be nice, be on-topic, no personal information or flames.
2 responses to “How to make a motorised camera slider with an Arduino and a stepper motor for $75”
Jonas Siro
Apo Dyukay