


Make a DIY Big Dome Port Underwater Housing for your DSLR for less than $50
Jan 10, 2017
David Wahlman

We love it when our readers get in touch with us to share their stories. This article was contributed to DIYP by a member of our community. If you would like to contribute an article, please contact us here.
Share:

If you’ve done research into underwater housing (and their cost), you’ll know how expensive they can be. In some instances, they cost more than the camera. Certainly, when you pay the premium price you’re also purchasing assurance, functionality, size, etc. However, rebel that I am, I didn’t want to pay the premium, so I built my own. They make cheaper underwater bags which I’ve used before, but the reason that didn’t meet my needs is I specifically wanted a big-dome port. Since they don’t sell those in any version except expensive housing cases, I knew my only option was to DIM (Do It Myself).
This post shows you how I built it, and some sample images that have since come from it on two different shoots. I’ve been quite pleased considering it cost me less that $50 and has had no issues with water leaks.
First, the materials I used. Run to a few local stores and pick up supplies (images below). Such supplies include:
- A sealable container (I got some Tupperware from Wal-mart that I measured to know was big enough for my camera and hand simultaneously. It was thick enough to maintain stability (unlike some types of Tupperware would have been), yet thin enough to cut with box cutters and drills. I could have bought a more expensive pelican case or something, but I was on a budget, on a time crunch, and wanted to be able to see the back of the camera.
For extra sealing security, rub a bit of Vaseline along the rubber gasket before using. - Extra lid or flat plastic. The Tupperware I got was a set of 3, so I had an extra lid. This will be cut to be the extension that attaches the 6″ dome port to the 4″ NBS.
- 4″ NBS or PVC male adapter and female adapter. This is for the lens port. I measured my lens and 4″ was the best option for what I was using. You could also use piping and cut it to length, but I wanted to used threaded pieces so I could screw and unscrew the big dome port for if I wanted to collapse it better for travel. Mine were a white and black only because they didn’t have both in black. Wish they did though.
- 3″ NBS or PVC pipe, cut to your appropriate length. You could also use an adapter again if it’s the length you need. This piece is where your hand and glove inserts. 4″ would have been too big, so 3″ gave more flexibility in location placement and fit the glove better.
- Chemical glove. This is where your hand will insert to function the camera. Getting a Chemical glove or similar is important, because you don’t want it leaking or puncturing. Don’t use a thin or non-water proofed glove.
- Plumbing fastener/gear clamp. This will go around the outside of the 3″ NBS piece to hold the folded glove in place.
- Silicone, this is what I used to seal edges and joints
- 6″ Big dome port (not pictured till later). I got this product off Amazon and could have gotten a 9″. Not too sure if one would be better than the other, but I wanted the 6″ so it would fit better with my setup. From my understanding, the larger 9″ dome would help achieve better above-below images. But don’t quote me on that. I need to experiment more first.

The majority of supplies used for my DIY underwater housing
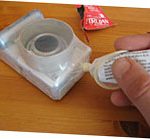
Once the tools are assembled, figure out what holding position is going to be most comfortable and starting cutting holes. I used a sharpie and box cuter for my holes. I didn’t want to use any kind of jig saw due to how flimsy the plastic would be with that. Also, I know that I’m a meticulous and detailed person, so I knew my cuts wouldn’t be sloppy. Make these holes as perfect, snug, and precise as possible. The goal of the silicone isn’t to fill large gaps, but to seal and hold a tight fit. Also, I wouldn’t suggest siliconing pieces in place yet. I waited to have everything together and tested before securing it.
You can also see here how the glove works. Insert into the 3″ piping and fold over the end. I rubbed a thin layer of silicone under the folded section before putting the clamp on and tightening. Also, as you insert the pieces, be testing with the camera to see how far pieces should be inserted to be comfortable and in proper position. If the 3″ piece was too far in, it would squish my hand while holding the camera, but if it’s too far out, I wouldn’t be able to hold the camera properly. These adjustments are why I wouldn’t silicone anything yet.

Once the dome port arrived two days later, I took the extra lid and cut two circumferences from it; one for the 6″ dome port and one to go over the 4″ NBS.

Once pieces are ready to assemble and have been tested, we can begin siliconing. One thing I did to ensure a better adhesion is I scraped and made a rough surface for the silicone to grip. That way it’s not adhering to a perfectly smooth surface. You could used a rough file for this or just a blade like I did.

Now add silicone to all joints, ensure a tight seal, and let dry. I gave a full 2 days of drying just to be sure before testing.
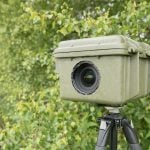
After testing in the sink and tub to ensure it was safe to put my camera in, I used it for some actually shoots. Although I may not be able to access all buttons at any moment and it is big and clunky, it was still almost $1,950 cheaper and has produced some neat images thus far. The way I function it inside the case is by putting it on manual focus, a larger aperture for good depth of field since above and below the water will be different focal planes, and I have used it in both Manual and Aperture priority. I turn on the live view and can trigger the shutter whenever I please.

Here are a few images from shoots to show it’s results. Thanks for reading.


If you have any comments, thoughts, improvements, corrections, etc., I’d love to hear them.
About the Author
David Wahlman is an outdoor photographer, a life-long outdoorsman, a creative and an educator. If you’d like to see more of his work, you can visit his website, like his Facebook page, follow him on Instagram and Twitter. This article was also published here and shared with permission.
We love it when our readers get in touch with us to share their stories. This article was contributed to DIYP by a member of our community. If you would like to contribute an article, please contact us here.


Join the Discussion
DIYP Comment Policy
Be nice, be on-topic, no personal information or flames.
4 responses to “Make a DIY Big Dome Port Underwater Housing for your DSLR for less than $50”
If I am putting my DSLR underwater, I want a properly built casing, not something I built. I don’t want to kill my dslr.
Depends on if your camera is worth more or less than the casing, now doesn’t it? When a housing costs $1900 + $400 for a lens port, it’s pretty easy to weigh the pros and cons of making a $100 housing and just buying a $400 camera with a kit lens. You’ll be able to see if it leaks, anyway. It’s not like he’s SCUBA diving, here.
Nice article, I really like the idea of using the rubber gloves to access the buttons. You could even add a second glove so that you’ve got full access to all the camera controls (at the risk of adding another leak point, obviously.
I use an ikelite rig with 8” dome and separate 100mm flat port macro setups. I can definitely say the the bigger the dome the easier for split shots. The dome curvature restores the wide angle field of view which is important for split shots as the wider the better :-)