


iPad + iPhone Picture in Picture In 8 Easy Steps
Jan 10, 2011
Udi Tirosh
Udi Tirosh is an entrepreneur, photography inventor, journalist, educator, and writer based in Israel. With over 25 years of experience in the photo-video industry, Udi has built and sold several photography-related brands. Udi has a double degree in mass media communications and computer science.
Share:
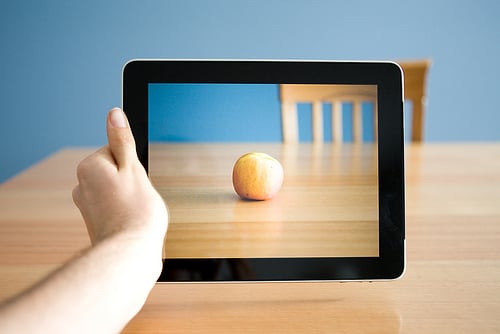
 Lying in bed one night reading a Photography eMag on my iPad I was drawn to a photography competition for a Picture in Picture. Instantly and idea shot into my head to use the iPad for a Picture in Picture photo where it appears as if the iPad screen is transparent. I decided that a shot of an apple on the kitchen table would keep the scene easy but also add a bit of reason.
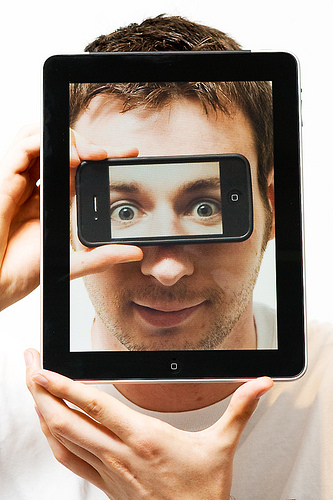
The photo turned out well and after sharing it on Facebook one of my friends presented me with another challenge, to also include an iPhone in the photo giving it a third level. The iPad iPhone Picture in Picture was born.
I decided to make a self-portrait using the iPhone to display my eyes and the iPad to display the majority of my face (or as much of my big head as would fit).
Ingredients
To recreate the photo you will need the following equipment.
- An Apple iPad.
- An Apple iPhone, preferably an iPhone4 as the screen is much clearer.
- A DSLR Camera.
- A Wireless off-camera Flash. (Optional)
- An Assistant to take the photos for you and help you line up the iDevices
- A plain backdrop, I used a white wall in my house.
Step 1 – Photographing The Eyes
Take a Photo of yourself using your DSLR, zooming and focusing on the eyes. It is best to also use the off-camera flash to evenly light you and your backdrop.
This is important because the light coming from the iPad in most cases will be brighter than the available ambient light, you will need to boost the ambient light to match.
If you don’t have a flash then you can adjust the brightness on both your iPad and iPhone. In my case I set the flash up camera left and pointed it straight into the white ceiling which gave a fairly even light across me and the background.
Step 2 – The First Crop
Open the picture of your eyes in your favorite picture editor and resize/crop to 960 x 640 pixels, this will match the screen resolution on the iPhone.
Step 3 – The First Sync
Transfer this photo to your iPhone. You can sync the photo using iTunes or if you have a Drop Box account and application on your iPhone you can transfer it using that (for more information visit www.dropbox.com).
Step 4 – Photographing The Face
With the photo of your eyes on your iPhone screen hold the iPhone in front of your eyes and take another photo using the DSLR. Have your assistant help you line up the phone.
Step 5 – The Second Crop
Open the picture of you holding the iPhone in your favorite picture editor and resize/crop to 1024 x 768 pixels, this will match the screen resolution of the iPad.
Step 6 – The Second Sync
Transfer the photo to your iPad, either syncing with iTunes or using Drop Box. (You really want to get a drop box account for this, trust me)
Step 7 – The Final Shot
With the photo of you holding your iPhone on the screen of the iPad hold it in front of your face and have your assistant help you line it up, also remember to place you hand that should be holding the iPhone behind the iPad. It may take a few goes to get this right so remember to be patient.
Step 8 – Wrap up
The final photo is finished. If you choose to you can now make any slight adjustments to color, contrast or brightness in your favorite photo editor.
Thanks for reading my walk-through, I hope it can be an inspiration for you to try yourself and I encourage you to share your images on Flickr in the “Picture In iPad” Group.
This guest post was written by Dave Polette a 26 years old passionate photographer (and IT manager) based in Albany Western Australia. His inspiring Couch Photo project can be found here.

Udi Tirosh
Udi Tirosh is an entrepreneur, photography inventor, journalist, educator, and writer based in Israel. With over 25 years of experience in the photo-video industry, Udi has built and sold several photography-related brands. Udi has a double degree in mass media communications and computer science.
Related Posts
 Skylum announces its first iPad app: Luminar for iPad
 Photographer Takes an iPhone 5s, iPhone 6, & iphone 6+ to Iceland: This Is How They Compared
 New macOS bug chews through your storage space when importing photos from iPhone and iPad
 Accsoon’s SeeMo turns your iPhone or iPad into an HDMI on-camera field monitor
Join the Discussion
DIYP Comment Policy
Be nice, be on-topic, no personal information or flames.