


If you have no money for a macro lens, the kit lens can be a great option
Jul 3, 2018
Mithun M. Das

We love it when our readers get in touch with us to share their stories. This article was contributed to DIYP by a member of our community. If you would like to contribute an article, please contact us here.
Share:

I am in no way a professional photographer: my gear includes a Nikon D5200 body, with the Nikkor 18-55mm VR II kit lens, the Nikkor 55-300mm VR zoom lens, and the latest addition, the Nikkor 50mm 1.4G prime lens. My favorite combo is still the Nikon D5200 body + Nikkor 18-55mm VR II – no offense to the other lenses. The reason why I decided to write this article is because I have seen a lot of newbies considering the kit lens as just a piece of glass with no merits at all. That is not entirely true – it’s one of the best lenses to start with, and with the right technique you can achieve a lot with the so-called kit lens!
Before I begin, let me point out one fact: I am not an expert, and all I am going to share is what I understood myself while using the lens. It’s in no way the final word, but my suggestions for you to make the best out of a kit lens.
Now, about the 18-55mm lens: mine is Nikkor, but I guess what I am about to share is true for the kit lenses of the same focal length made by different manufacturers. Let me start with the focal lengths, 18mm through 55mm. 18mm is a pretty decent wide angle for your landscape photography needs. Remember the fact that 18mm on a crop sensor camera gives an effective focal length of around 28mm, but it’s still a decent wide angle. Moving to the other end, 55mm on a crop sensor DX camera gives an effective focal length around 75mm. I am more interested in that end, the zoomed-in end, because 55mm is a great focal length for macro photography. You have to understand the fact that a kit lens is in no way comparable to a dedicated macro lens. I am talking about the scenario where you could use your 18-55mm kit lens for macro photography when you don’t have a dedicated macro lens.
There are a few things to understand before you make the most of your 18-55mm kit lens.
- Focal length and focusing.
- Aperture control.
- Bringing out the background blur.
1. Focal length and focusing
Macro photography demands you to get as close to the subject as possible. So focal length should be set at 55mm unless you want to change it for a wider frame. And about the focusing part, autofocus works very well with this lens, but for taking macro shots with it, manual focus is a better choice. From what I have experienced, autofocus doesn’t let you get to that closest point.
Talking about the mechanical part of the Nikkor 18-55mm lens, when the focus ring is rotated the front piece of the lens moves back and forth. When it’s the least extended it’s focusing at the farthest point, when its completely extended that is the closest focusing point of the lens. The autofocus “plays it safe,” meaning that the AF motor never really attains that position when the front element of the lens is completely extended. It always stops two steps back. That is the thing you will have to bypass first, and manual focusing is the way out.
Rotate the focus ring so that the front element of the lens is completely extended, then move the camera closer to the subject until you get perfect focus. Once you attain it, trust me, that’s the closest that the lens can go. To be sure, staying in that same position and try switching to autofocus. Try focusing at the same subject; you will see that the autofocus is struggling to get focus, eventually giving up the fight. So with the lens zoomed up at 55mm and with the manual focus, you will succeed in getting as close to the subject as possible.
2. Aperture control
I have read somewhere that every lens has a particular sweet spot: a particular f-number/aperture value at which you get the sharpest photos possible with that lens. For my Nikkor 18-55mm, it’s around f/7.1 to f/9. But that doesn’t make it generally true. It varies for each 18-55mm out there, and variations are a result of those minor differences that happen during the lens’ glass elements assembly.
So, how to get a hold of your lens’s sweet spot? The method is pretty old school: “go out and shoot more!” Taking a lot of pictures at different aperture values will make you understand the sweet spot of your 18-55mm. From most of the pics that I have clicked, I have arrived at a conclusion that the sweet spot of my 18-55mm is around f/7.1 through f/9. So I would strongly suggest that you start around those values.
Now, why take all this pain to find that sweet spot? Because you might have to crop the photos, so the crispier/sharper the pics are, the better! On a side note, shoot in RAW + JPEG format, because RAW gives you more control over the photos in post-production.
3. Bringing out the background blur.
Let me start with a term called “relative distance.” So, as the word suggests: it’s a relative entity. To understand it further let me mention the two distances that decide on the amount of a background blur.
1. The distance between the front end of your lens and the subject you are shooting, say a spider. Let’s name it LS (L for the lens and S for the subject)
2. The distance between the subject and the background. Let’s name it SB (well I guess you know how I named it).
So now you know what the distances LS and SB mean, the difference of these two distances is called relative distance. The background gets smoother and smoother when the SB-LS value increases. In simpler terms, shoot as close to the subject as possible with the background as far away from the subject as possible. Sounds easy, but it isn’t always so. It’s going to take a lot of clicks to finally get it right. But trust me, this technique will let you get a decent background blur. Get creative and experiment, and once you get the idea, you will be able to get those smooth backgrounds.
And something to remind you people: “A camera has never helped in getting a photograph more than a pen have helped in writing a story. Gear doesn’t matter a lot, it is the one behind it that does.”
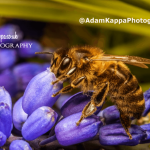
Here below, I am sharing a few macro shots that I got with my Nikkor 18-55mm lens.


All these pictures were cropped and basic corrections were made. But the background blur and bokeh are straight out of camera, no edits were made. So do try these techniques and make the most out of the so-called kit lens.
About the Author
Mithun M. Das is a young engineer and a hobbyist photographer from Kerala, India. He sees photography as a passion and that’s what he believes will be doing for the rest of his life. You can see more of his work on his Facebook page and Instagram profile. You can also contact him here.
We love it when our readers get in touch with us to share their stories. This article was contributed to DIYP by a member of our community. If you would like to contribute an article, please contact us here.


Join the Discussion
DIYP Comment Policy
Be nice, be on-topic, no personal information or flames.
5 responses to “If you have no money for a macro lens, the kit lens can be a great option”
Sorry if i missed it but are these photos not taken using reverse lens technique? Great photos btw
I think it doesn’t reverse the lens, he is using post processing for final results.
I think they are just cropped to get up close. It is not a bad plan as even with a macro lens you can get much more depth if field that way. The sheer number of megapixels these days means it is fine for images for the web
I can’t even imagine 1855 lens could get that closer, awesome
Nikon 70-300mm works quite well for me for macro. It’s may not be as good as a dedicated macro lens, but when you practice more you will get better results. This pic is one of the sample that I clicked.
https://www.instagram.com/p/CEYSIUwMKeW/