


How To Transform Any Bag Into A Stylish Camera Bag
Jul 17, 2015
Jota Barros

We love it when our readers get in touch with us to share their stories. This article was contributed to DIYP by a member of our community. If you would like to contribute an article, please contact us here.
Share:

You can choose between many camera bags – we assume that you carry your camera at all times and need a bag for it, so a camera bag is a must. The offering is huge – many sizes, colors and shapes: backpacks, belt pouches… There are camera bags that say loud and clear that they contain photography gear, and others are very discreet. And yes, sometimes having a camera bag that does not look like a camera bag is a good thing, not only so you don’t get marked for stealing your gear, but also not to draw attention to yourself when you are trying to “steal” a photo.
But… What if we want to carry our camera inside a bag or a backpack that you already own, even if it was not designed for carrying cameras? Today I´ll show you how to use any bag to carry with you a small or medium size camera, safe and discreetly.
You will be able to use what you already have, instead of spending more money for a camera bag that say “Hey, look at me! I´ve got plenty of expensive equipment here, HEY! this guy is a photographer!!”.
Ready? Let´s go.
Make a case to transport your camera inside any bag
All you need is
- A pair of 5mm thick mouse pads. If your camera is bigger than mine you can use two pieces of foam, cut them big enough so that they can contain your camera within them
- Double-sided carpet tape, a very adhesive tape with an inner textile structure, this is probably the most important element of all: the better and more adhesive the tape is, the better the outcome will be
- Three pieces of fabric, the size depends on the dimensions of the mouse pads (or the foam pieces) and the width of the tape (45mm in my case), more information below
- A permanent marker and scissors

The pieces of fabric should be sewed up. I used two that were at home, and asked my mother in law to sew them up with her sewing machine to prevent fraying. Maybe you are skilled enough to do it by yourself… It is not my case! ;)
The size of the fabric strips should match the size of the foam pads on one dimension and the tape width on the other.

The total amount of money for this was less than 10$: two (5mm thick) mouse pads, maybe you have them somewhere at your home, 3 cloths and some tape.
Let´s go with the (very easy) steps.
Paste the first side of the tape to the fabric
Leave the mouse pads for now; we are going to work with the tape and the cloths. Unwind a portion of tape, a bit longer than your longer cloth.

Spread it on the table (adhesive side upwards)

Start by applying the cloth on the tape. Start and end with a pull so that you don´t get any nasty wrinkles. If your cloths have a better and a worse side, leave the good side visible so you can see it.

You can now understand why the cloth and the tape should have exactly the same width: spread the first one over the tape so it’s completely covered.

Cut the tape at both ends.

Your first cloth is ready.

Repeat this procedure with the others.

When cutting the tape, be careful not to cut the fabric, you don´t want to damage the stich.

Allrighty, your three cloths are covered with tape and ready to be pasted. You can still see the plastic on the other side, once you remove it, this side will be adhesive too once you pill it off.

Paste the cloths along three edges of the mouse pads
Place one mouse pad on the other, so that they have a precise fit.

We are going to paste the cloths so that they are centered.

The cloth will bend this way, linking both mouse pads.
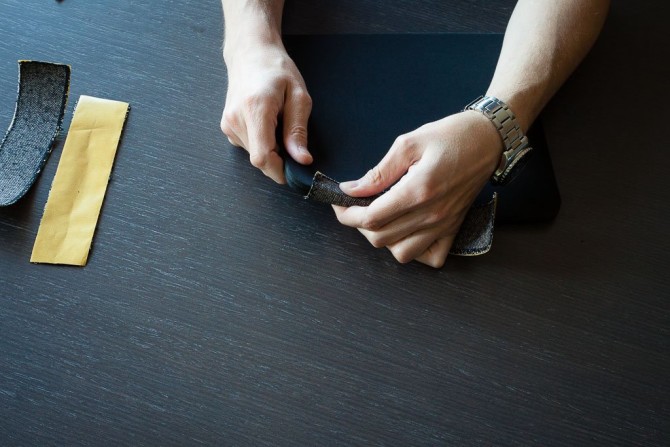
Let’s start with the longest side. Remove the plastic from the longest cloth, so that you can see the second adhesive side.

Extend it on the table (with the adhesive side upwards). Instead of pasting it by guesswork, we are going to use a trick to get a better outcome.

Cut a little piece of plastic (from the one you have removed from the tape).

Bend it over both mouse pads (make sure they are one on the other) so that it is perfectly centered (you should see the same length over both mouse pads).

With the marker, mark the points where the plastic bends.

Put the plastic next to the fabric, and mark it in the same points.

Do the same on the other end. It will make it easier for you to paste the pad in the right position.

Now take both mouse pads, put them just above the first pair of points, with the cloth perfectly centered about them.

Press so that the mouse pad below and the tape are perfectly glued.

Without moving the mouse pad above (it should be exactly aligned with the one below), take the cloth and paste it along the long edge of both pads.

Bend the fabric and paste it on the other mouse pad.
alrighty, the longest side is finished.

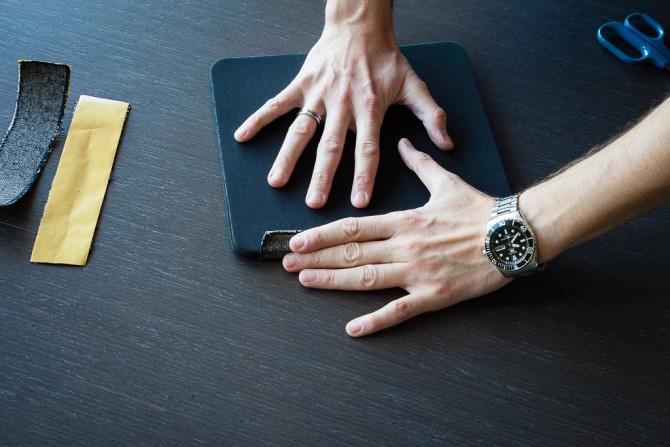
Repeat with the short sides. Once again, use the piece of plastic to mark the points where the cloth should bend.

Center the mouse pads about the long side of the fabric, once you have removed the plastic cover. Make it so that the edge of the mouse pads is just above the first pair of marks.

Paste the cloth on the pads, press gently and bend the fabric over the mouse pads.

Paste the cloth on the mouse pad above.

The second edge is finished.

Do the same with the third one.

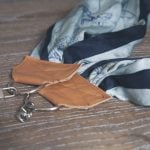
It’s ready!
You have just made a FOAM cover to put your camera in and carry it inside any bag!

Just try it…
Put it, with your camera inside, into your favorite bag. This one was a gift, my wife gave me that bag many years ago so it has an special value for me, from now onward, in addition, I can use it to carry my camera everywhere…

And nobody can say that there is a camera inside!

About the Author
Jota Barros is photography lover who writes, records videos, designs and takes photos for Rubixephoto.com.
You can follow more of his work on Facebook, Twitter, Youtube and G+:
We love it when our readers get in touch with us to share their stories. This article was contributed to DIYP by a member of our community. If you would like to contribute an article, please contact us here.


Join the Discussion
DIYP Comment Policy
Be nice, be on-topic, no personal information or flames.
8 responses to “How To Transform Any Bag Into A Stylish Camera Bag”
You made a bag to put a camera that was already inside a bag into another bag! Is that a bag bag bag? :)
:) Of course not. I made a bag to carry my camera inside a bag that was not designed to carry a camera inside. ;) bag bag :D
I got a cheap canvass one off eBay and a padded insert.
£25 the lot and have a nice retro bag that doesn’t look like it’s got £££££ of kit in. :)
That´s another (good) solution for the same problem. :)
Regards!
Jota
rubixephoto.com
Loving these posts of resourcefulness
Thank you, my pleasure!
Jota.
This looks like something I can use to add extra protection to what I use to carry one or two of my cameras to work.
I use a Subzero insulated lunch bag. It doesn’t scream “Camera Gear!” It can fit two film SLRs: Canon A-1 and F-1N with FD 28mm f2.8 and FD 50mm f1.8 or a Canon 5D Mk III with 24-105 F4L lens.
Glad to read it is useful! :)
Regards.
Jota. :)
rubixephoto.com