


How to make a cheap, but stylish DIY shoulder rig out of wood
Aug 10, 2017
Dunja Đuđić Kalinin
Dunja Djudjic is a multi-talented artist based in Novi Sad, Serbia. With 15 years of experience as a photographer, she specializes in capturing the beauty of nature, travel, concerts, and fine art. In addition to her photography, Dunja also expresses her creativity through writing, embroidery, and jewelry making.
Share:

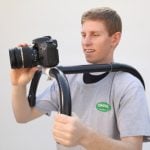
If you need a shoulder rig, but your budget is super-low, young filmmaker Mike Fink has a cheap, yet totally stylish DIY solution. He made his own shoulder rig out of wood and shared the details of the build in his latest video. The rig he made traveled with him across the country, and he shared some photos with DIYP. So, if you wanna feel like Robin Hood, but shoot videos instead of arrows, check out this DIY rig.
https://www.youtube.com/watch?v=kIc81huNMKo
You will need
Some of the items you can order online, but nuts, bolts and wood are easy to find at Lowe’s or Home Depot.
- Mounting plate for rail system
- Lanaparte 15mm threaded rods
- 2 x 8 wood
- 4 x 4 wood
- 2 x 7inch hex bolts
- 2x 5inch 3/4 width galvanized nipple
- 2x M12 – 1.75 x 35mm bolts
- 2x 1/2inch nuts
- 2x 1/2inch washers
- bicycle grips
Tools
- A saw
- A power drill with 1/2inch drill bit
- A ruler/tape measure
- A pen
- Table grinder/sandpaper
How to make
The front
Start by cutting a 20inch section of the 2×8 wood. Take the ruler and pen and draw a trapezoid that will be the basic shape of your rig. These are the measures Mike used, but I believe they are subject to slight changes (and pardon my horrible drawing):

Once you draw the shape, it’s time to cut it out with the saw. After this, drill the holes for the handlebars.

When this is done, put the rods through the mount. Press them up against the front of the rig and mark the spots where they’re going to be. Mark that with the pen, and then drill the holes for the rods. Finally, draw a curved line at the bottom of the rig, and cut out the piece of the wood to give your rig a nice, curved shape.

When the drilling and cutting are done, it’s time to grind the edges. You can do it by hand, but it will probably take forever. So if you have the table grinder (or a nice friend who’ll borrow you one), it’s a better option.
The shoulder piece
You noticed the 4 x 4 wood I mentioned above? You’ll use it to make the shoulder piece. Cut out a 6.5inch section of it, and cut out a divot for your shoulder. Drill the holes for the rods just like you did with the front part. Grind the wood to make it nice and smooth, and now it’s time to assemble everything together.

Assembling the rig
Fit the rods with the mounting plate through the front part of the rig. Attach them with the 1.75 x 35mm bolts and washers.
For the bicycle handles, slide them on top of the galvanized nipples. Add the 7inch bolts through them, and then slide everything through the holes. Attach the handles with the bolts.
Finally, slide the other end of the rods through the shoulder piece.
Test the rig before you go shooting with it, because if something breaks, it’s better that it happens at home so you have time and materials to fix it.
To make your Robin Hood rig look even fancier, you can stain it and add some foam to the shoulder piece to make it more comfortable. And voila, you’re ready to shoot!
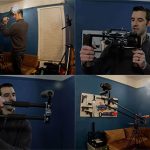
Here’s how it turned out for Mike, and as he told us, it took him about a day and a half to make the rig. You can see the example footage, along with the process of making, in the video above.


About Mike Fink
Mike Fink is a 26 year old filmmaker from Tennessee who has been making films since grade school. He makes his own short films and works as a self-employed videographer. You can check out his short films on his YouTube channel, and connect with him on Twitter and Instagram.

Dunja Đuđić Kalinin
Dunja Djudjic is a multi-talented artist based in Novi Sad, Serbia. With 15 years of experience as a photographer, she specializes in capturing the beauty of nature, travel, concerts, and fine art. In addition to her photography, Dunja also expresses her creativity through writing, embroidery, and jewelry making.


Join the Discussion
DIYP Comment Policy
Be nice, be on-topic, no personal information or flames.
One response to “How to make a cheap, but stylish DIY shoulder rig out of wood”
Jonatan Ramsey