


How to DIY your own budget studio flag/reflector clamps
Sep 6, 2023
Jake Hicks
Jake Hicks is an award winning editorial and fashion photographer who specializes in keeping the skill in the camera, not just on the screen. For more of his work and tutorials, check out his website. On Jake’s Facebook page, you can also tune in for a live stream every other Tuesday night. You can also sign up for the Jake Hicks Photography newsletter to receive Jake’s free Top Ten Studio Lighting Tips and Techniques PDF and be sure to download his free 50-page studio lighting book.
Share:

We all know there is a seemingly limitless amount of gear we can get for the studio, and clamps seemingly make up a large part of that.
We have the crab, duck bill, platypus, Quaker, super, mini… the list goes on and on, and although these clamps all do different things, they all have one thing in common – they can be pricey!

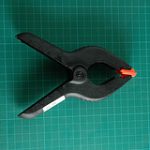
So to save a few quid, here’s an easy-to-find alternative to the somewhat pricey Platypus clamp. All you need to look out for is a ‘locking pliers metal clamp’. As to be expected, these have a ton of various names such as ‘vice-grips’, ‘mole-grips’, ‘self-grips’ and more, so if you’re looking for them, be sure to try those keywords as well to find the one you’re after.
The ‘metal clamp’ portion isn’t to signify you’re looking for one made out of metal, but instead, it refers to the nose on these pliers, which is designed to hold metal sheets for welding.
Granted, these metal sheet-holding clamps don’t have the same size jaws as a true platypus clamp, but if you don’t need to hold large poly-boards on set, these far-cheaper alternatives should have you covered.
What are these platypus clamps for?
What can we use these budget platypus clamps for? Really, anything flat that requires being held in place. For example, black-flags on set, reflectors, mirrors and even the product itself if you’re shooting still life.

Why not use a regular clamp instead?
The huge benefit of these particular clamps is the locking capability of the jaws themselves, as you can adjust the width at which they clamp down on something and this is the reason these pliers are favoured over simply using a regular clamp. Ordinarily, a clamp would grip something by applying pressure to the two very small contact points on either side of the object. The locking pliers are designed to spread that pressure over the surface of its jaws which makes them ideal for holding large flat objects without you crushing them in the clamp or them slipping or falling out, which is usually what would happen with regular clamps.
Grip-Heads

The only other thing we need to make these work on set is a ‘grip-head’. These grip heads are often found on your C-stands and are extremely common and usually plentiful in all studios, but if you need some, you can buy them separately. Personally, though, I’d recommend saving a bit more money and getting a full-blown C-stand that usually comes with 2 of these as well as boom included.
To make the clamp work with your grip-head, simply slot the perfectly shaped and sized handle of the clamp in the boom slot of the grip-head. Job done. This actually works surprisingly well as the clamps tightening screw results in a rounded handle on one side, and it’s this somewhat cylindrical handle that fits perfectly and snuggly in the grip-head.
From here, you can then attach that grip-head to any light stand you have, but for the best results and the most flexibility in terms of movement, a C-stand and boom is the best option.

As I started to light bigger sets and light on location, I’ve been using this budget clamp combo for years and as I mentioned at the top, as long as you don’t need to hold huge poly boards up high on set, this little DIY clamp will cover most things flat and is likely a must for many still-life shooters that need to clamp backgrounds or reflectors etc.
It’s certainly not a big investment, so it may well be worth grabbing one or more to have around, especially if you already have the c-stands and grip-heads, this is a no-brainer!

Purchasing options
There are, of course, lots of places you can purchase these from, here are a couple after I did a quick Google. At the very least, it’ll give you an idea of what you should be searching for.
Welding Clamps Locking Grips C Clamps Locking U Clamp Sheet Metal Fasteners ($14.99)

255mm/10″ Sheet Metal Locking Clamp ($25.97)

Welding Clamp Flat Blade Type Quick Release Locking Holder Clasp 10″ ($22.20)

Grip Head
2.5” Replacement Stainless Steel Grip Head For C-Stands ($19.95)


Jake Hicks
Jake Hicks is an award winning editorial and fashion photographer who specializes in keeping the skill in the camera, not just on the screen. For more of his work and tutorials, check out his website. On Jake’s Facebook page, you can also tune in for a live stream every other Tuesday night. You can also sign up for the Jake Hicks Photography newsletter to receive Jake’s free Top Ten Studio Lighting Tips and Techniques PDF and be sure to download his free 50-page studio lighting book.


Join the Discussion
DIYP Comment Policy
Be nice, be on-topic, no personal information or flames.