


How to create amazing double exposures using Blend if
Feb 17, 2023
Alex Baker
Alex Baker is a portrait and lifestyle driven photographer based in Valencia, Spain. She works on a range of projects from commercial to fine art and has had work featured in publications such as The Daily Mail, Conde Nast Traveller and El Mundo, and has exhibited work across Europe
Share:
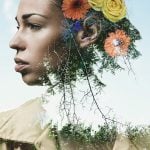
Double exposure photography is an interesting technique, and there are several ways of achieving this look. You can do it the old-school way of running film through your camera twice or rewinding one negative and taking two exposures. Or you can take advantage of the double exposure feature in most modern DSLRs and mirrorless cameras. This will allow you to either choose which image you want to use as a base layer or it will show you how the double exposure overlay will look as you take the image.
Finally, the third option is to take two separate images and overlay the two in Photoshop. This can give you a lot more options, however, and there are a lot of tools available to create different looks. In this video, Blake Rudis from f64 Academy walks you through using the command Blend If in Photoshop to create these awesome double exposures.
By using the Blend If slider, you can decide if you want to protect either the highlights or the shadows. It will give you a lot more options for getting the image exactly how you wish.
From there, you can then either use layer masks to reveal the parts of the image you want to keep clean, or you can change blend modes.
Another great use for Blend If is to add a background texture easily. Once again, Blend If does a great job and saves you lots of time without having to draw selections and masks painstakingly. Of course, to refine it further, you can still use masks if you wish.
Multiple exposures can create interesting moods in photographs that you can’t easily create otherwise. It’s an awful lot of fun, have a look at the video and see what you can make!

Alex Baker
Alex Baker is a portrait and lifestyle driven photographer based in Valencia, Spain. She works on a range of projects from commercial to fine art and has had work featured in publications such as The Daily Mail, Conde Nast Traveller and El Mundo, and has exhibited work across Europe
Related Posts
 How to create stunning double exposures in Photoshop in a few very easy steps
 Spectre is a new iOS app using AI to create amazing long exposures with your smartphone
 How to blend multiple exposures together in Photoshop the easy way
 This 3D printed doohicky lets you shoot split double exposures with the Instax Mini 90
Join the Discussion
DIYP Comment Policy
Be nice, be on-topic, no personal information or flames.