


How To Make a Home Brew Smartphone Film Scanner
Nov 19, 2013
Udi Tirosh
Udi Tirosh is an entrepreneur, photography inventor, journalist, educator, and writer based in Israel. With over 25 years of experience in the photo-video industry, Udi has built and sold several photography-related brands. Udi has a double degree in mass media communications and computer science.
Share:
If you have been shooting for more than a few years there is a good chance that you have a few archiving albums (you’re neat) or shoe boxes (you’re human) filled with old films.
Digitizing film is a tedious task and we have shared a great comprehensive tutorial on it before, but sometimes you need something quick and dirty (but not as dirty as a TP roll)

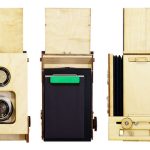
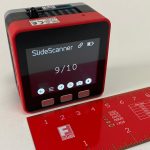
Lomography has a clever smartphone film scanner which is perfect for the job. Instructables user ASCAS has a DIY version of it.
You would need a project box, a few LEDs (the project uses singles, but you can use strips like we did with our light table) and some acrylic “glass”.

The acrylic provides some diffusion and backlight coming from the LEDs. The film gets back lit, while the project box provides some height for the phone camera to be able to focus.

If you are scanning slides, just click away, but if you are scanning negatives, remember to switch your phone’s camera to inverse exposure.

You can watch the entire process in the video below or head over to the Instructables page for the full build. (I am also including a vidoe of the Lomography scanner to get a good grasp on using the device).
[DIY Smartphone Film Scanner | ASCAS]

Udi Tirosh
Udi Tirosh is an entrepreneur, photography inventor, journalist, educator, and writer based in Israel. With over 25 years of experience in the photo-video industry, Udi has built and sold several photography-related brands. Udi has a double degree in mass media communications and computer science.


Join the Discussion
DIYP Comment Policy
Be nice, be on-topic, no personal information or flames.
One response to “How To Make a Home Brew Smartphone Film Scanner”
Only problems I can think of with Lomography’s scanner:
-My iPhone 4s Lens has scratches on it, and that will translate into the scan.
-You probably don’t have as many options with Lomography’s software as you would with professional scanners. I have an Epson scanner that I use, and the software allows me to remove dust, and choose the ending image size and resolution. My scanner can scan as high as 3200 DPI. I doubt you will get that kind of resolution with Lomo’s software. Perhaps good enough to print 8×10’s, but nothing larger.
-I shoot 35mm, but I also shoot 120. Anybody who shoots medium/large format would not find any use with this product.
I love the convenience and the portability of this product, but at the end of the day it is the tool of an amateur. It also costs $59. I paid $65 for my professional scanner.
Save yourselves.