


How I restored this beat up old Pelican case to its former glory
Feb 6, 2020
Athol Hill

We love it when our readers get in touch with us to share their stories. This article was contributed to DIYP by a member of our community. If you would like to contribute an article, please contact us here.
Share:

In a previous blog post, I mentioned I was embarking on a Pelican 1550 repair project. I was looking to buy one, but someone offered the case for free, and I thought it was worth trying to refurbishment.
At worst, I could buy a new case later, and it would cost me nothing other than my time on the refurb. At best, I’d save a couple of hundred dollars on a new case and help recycle something that might have otherwise found its way to the dumps.
Step 1 – The initial cleanup
The bag arrived in a pretty dirty state, not surprising given it’s been stored outdoors. I got it free, I can’t complain about the condition. The photos below show the original uncleaned state.
I know some people like having this wear and tear on their bags, like a badge you can wear. I don’t feel it’s authentic to walk around with a bag that looks like you’ve trekked across the 4 corners of the earth.
When the bag has earned this wear and tear with me, it’ll stay on the bag.

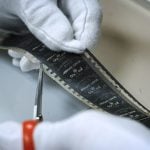
First off was to give it a bit of a cleanup to get rid of the spider webs, dirt and some live spiders. Quite a few had made it their home in the various tiny holes on the bag, the handle, the hinges and the holes for padlocking the bag.
For those who don’t know Australia, it was engineered by God to kill you at every conceivable turn. 5 metre (18 foot) crocodiles that swim in saltwater, killer jellyfish, 21 of the 25 most deadly snakes in the world live here, and not surprisingly, some of the spiders are deadly.
I started with a bit of a rinse before hitting it with some heavy-duty detergent and a scrubbing brush. Once I had done the initial clean, I discovered the plastic colour wasn’t as severely faded as I expected.
I don’t think it had been left in the sun for extended periods. The foam was partially reusable, but I was planning to put in a Trekpak system, so there was no reason to retain the foam.
Structurally, the case was perfect. No cracks or damage. Some deep gouges and it was a little dented in on the outer cover, probably from having heavier objects on top of it.
Step 2 – Restoring the colour with a heat gun
I wasn’t sure how much luck I would have restoring the colour, so I decided to start with a heat gun, and if that didn’t, I’d give the bumper restore option a go. If you have a heat gun, it’s the cheapest option to trial as it requires no purchase.
I can’t claim my stake as the originator of this idea. It started out as a process of searching for the best way to paint a Pelican until I discovered this post on Reddit where the suggestion came up.
If you haven’t seen the heat gun technique, there are plenty of videos showing it on youtube with car bumpers. This video shows the process, although they take this a step further by treating it with a bumper treatment option.
If you’re too lazy to watch the video, start with a heat gun at low heat, about a third to half power and take your time. I use the heat gun on an area about two inches in size, moving the heat gun back and forth across the two-inch area until the area darkens.
The first patch takes a little longer to darken as the heat gun and the plastic heat up. Subsequent areas are a little quicker. Overall, I’d say it should take about half an hour to do the entire bag, depending on whether you stop to allow one side to cool down.

The heat gun worked very well and has restored most of the darkness. This image shows a small area that has been heated compared to the colour of the rest of the case just as I started the process.
This is what the final result looks like with just the heat gun treatment. I will take another before and after photo when I do the treatment, so both photos are taken under the same conditions.

Next steps
I have “Forever Black Trim Restorer” on order as I wanted to trial how significant the improvement will be. I’ll treat the case when it arrives and I should be able to show if it makes much of a difference it makes in part 2 when my Trekpak kit comes.
My choice of product, in this case, isn’t necessarily based on experience, I’ve seen it in a 5-year-old post on advrider.com in my search for potential solutions. I can’t comment on its suitability over other products. If you have anything similar, it would be worth trying first.
The below photo was the outcome from that post on advrider so it seems to have fairly similar outcomes to my own experiences with the heat gun. The question now is what sort of impact the combination will have.

I could probably stop without the “Forever Black” treatment. It does look good enough for me to be happy with the outcome, but I have already ordered it, so it seemed pointless to let it go to waste.
At least other people reading this will have the opportunity to review my outcomes before making the purchase.
After that, I’ll also be adding a Trekpak kit (which I have already ordered) and I’m expecting in the next couple of days.
About the Author
Athol Hill, also known as The Overrated Photographer, is a Melbourne, Australia-based photographer covering a wide range of photography from portraits to sports. You can find out more about Athol on his website and follow his work on Instagram. This article was also published here and shared with permission.
We love it when our readers get in touch with us to share their stories. This article was contributed to DIYP by a member of our community. If you would like to contribute an article, please contact us here.
Related Posts
 This is how 100-year-old film is restored back to its original glory for future generations to enjoy
 Upgrade Your Pelican Case With a Backpack Attachment For (Almost) Free
 MDX Lid Organizer helps you organize gear and fit more of it in your Pelican case
 Photographer got stopped at the airport three times because he had a Pelican case
Join the Discussion
DIYP Comment Policy
Be nice, be on-topic, no personal information or flames.
One response to “How I restored this beat up old Pelican case to its former glory”
Could have just used “back to black” aerosol spray. You can find it at just about any auto parts store. And you don’t rush damaging the box.