


How To Build A PVC Soft Screen
Jun 14, 2013
Udi Tirosh
Udi Tirosh is an entrepreneur, photography inventor, journalist, educator, and writer based in Israel. With over 25 years of experience in the photo-video industry, Udi has built and sold several photography-related brands. Udi has a double degree in mass media communications and computer science.
Share:
If you need a big, nice soft light source one of the cheaper options is to use a small light combined with a diffusion panel, which is basically just a huge sheet of fabric. The question is how to support this mess of fabric that only wants to sit crumbled on the floor.

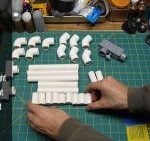
Kevin Kobota has a pretty slick tutorial on building a soft diffusion panel a-la Dean Collins style, very similar to Photoflex’s LitePanels. Unlike the $350 LitePanel the DIY version only costs about $20 and an afternoon. The video covers the uses, materials, and build constructions + some interesting philosophy on transitioning from DIY gear to Pro.
P. S. Waaaay back when DIYP was just starting out, we shared one of Dean Collins’s rigs build by Brian Zimmerman.
P.P.S. Build two of those panels to make a wall of light.
[The D.I.Y. panel diffuser for photographers via ISO 1200]

Udi Tirosh
Udi Tirosh is an entrepreneur, photography inventor, journalist, educator, and writer based in Israel. With over 25 years of experience in the photo-video industry, Udi has built and sold several photography-related brands. Udi has a double degree in mass media communications and computer science.
Join the Discussion
DIYP Comment Policy
Be nice, be on-topic, no personal information or flames.
13 responses to “How To Build A PVC Soft Screen”
Nice video!
Hey Beavis, he said stiffer. heheheheh
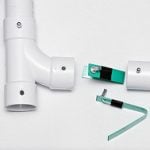
If you glue the tees to the horizontal cross member (instead of the verticals), you will find it practically assembles itself when you unfold it. Just lift it by the top bar and it naturally sets everything into proper alignment.
Here’s what I did. I glued the fittings to the horizontal pieces, top, bottom, and middle:
http://blog.sundayschildsnapshots.com/wp/2013/02/diy-kubota-panels/
I dont get how not using bungee cord stopped you from snapping panels together
The bungee did not stop me from putting the panels together, at least not in this form. I left the bungee out so I could reconfigure the pieces to build a cube for making a table top light tent.
Because if the pain in working with loose pieces, I did eventually bungee together one panel. The bungee does make assembling the frames incredibly easier – it all just comes together. I have not bought some more bungee so I can do more…
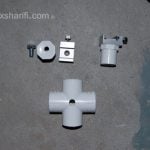
What is the device on the lightstand that is holding up the light panel? Great DIY!
Ditto on what type of bracket is being used to mount the frame to the lightstand?
Also, does the white rip-stop fabric also work well as a reflector, or would a different fabric be better as? I’m thinking of the space saving attributes of this “device” as opposed to a V-flat (bookend).
It seems like any fabric could be used, and in many instance used as a background for head shots.
great video! Thanks
The bracket looks like an off brand copy of a Photoflex LitePanel Accessory / Main & T Clamp, with the “C” opening turned away from the camera. You can clearly see the angles in the C if you watch closely.
http://www.estudiolighting.com/photoflex_litepanel_accessory_main_t_238_prd1.htm
Another similar setup:
http://www.calumetphoto.com/eng/product/calumet_light_stand_clamp/rm7250
parece muito no link abaixo
http://www.2salgueiros.com/blog/?p=5263#more-5263
If you’re looking for a cheap bracket ($2) to hook this to a light stand consider:
http://www.homedepot.com/p/FIMCO-3-4-in-Snap-Saddle-9026SP/202534479#.Ub3Vk-fvt8E plus
http://www.homedepot.com/p/Orbit-1-2-in-x-2-in-PVC-Riser-38082/100156878#.Ub3Z9efvt8E plus
http://www.homedepot.com/p/Mueller-Streamline-3-4-in-x-1-2-in-PVC-Schedule-40-Pressure-90-Degree-S-x-FPT-Reducing-Elbow-407-101HC/100159955#.Ub3aWufvt8E
plus a short length of scrap 3/4″ pvc to slide down on the light stand.
I made a similar http://www.2salgueiros.com/blog/?p=5263#more-5263