


Five tips to record better quality sound with your shotgun microphone
Nov 13, 2019
John Aldred
John Aldred is a photographer with over 25 years of experience in the portrait and commercial worlds. He is based in Scotland and has been an early adopter – and occasional beta tester – of almost every digital imaging technology in that time. As well as his creative visual work, John uses 3D printing, electronics and programming to create his own photography and filmmaking tools and consults for a number of brands across the industry.
Share:
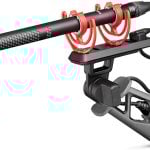
Shotgun microphones are the go-to for many filmmakers when recording audio. Whether it’s on-camera or boomed overhead of your subject, they offer a great ability to isolate the subject from the environmental noise around them.
But a lot of people don’t have great experiences with shotgun mics, because they’re not sure on exactly how to use them. Sure, it might be better than they’d get with the in-camera mics, but it can still be made even better. In this video, Kai Wong offers up five tips to help improve your shotgun mic recordings.
1. Wear good headphones
It’s not always possible to wear headphones all the time while filming, particularly if you’re vlogging. But if you’re off-camera, just watching what’s going on, or operating a boom microphone over the head of a subject, good headphones are a must. As Kai mentions, it’s easy to see if the video’s screwed up, because you’ve got an LCD right there on the camera showing you. But with audio, if you’re not listening to it while you’re recording, then you don’t know until you get back home.
Even if you’re vlogging, though, it’s worth having a good pair of headphones so that you can play recordings back while you’re still at the location to see if you need to do another take. You could pick up interference from your phone or radio waves, the battery in your microphone or audio recorder might die, or you might just want to see how good a job your microphone is doing at picking up your voice from what’s going on around you.
2. Set the right levels
We all know how easy it is to blow highlights on photographs and video if we’re not careful with our exposure. Clipping the audio can happen just as easily if you’re not careful. Set the level too high, and even though it might sound good when you’re talking quietly into the microphone, it’s could clip very easily when you get into your “video voice” mode or get a little excited and loud.
Kai aims to have his levels cap out at -12dB, which is a pretty common goal. This might sound a little quiet at first, but it means that if you do get loud (of course, nobody would accuse Kai of that) you’ve got a little headroom to capture it without it turning into a noisy distortion fest. You can always bring the levels up in post if you need to (and you’ll need to).
3. Proximity
With all microphones, but especially shotguns, getting the microphone as close to the source of the sound is very important. The closer it is, the louder the volume of that sound is relative to everything that’s going on around it.
If your microphone is far away from what you’re recording, you’ll get increased noise from everything else, and if you’re far away and indoors, you’ll pick up reverb as the sound bounces off the walls and other items in the room around you.
You do want to keep the Proximity Effect in mind, though.
4. Microphone placement
As mentioned above, indoors it’s easy to pick up reflections of your voice bouncing off the walls and other hard flat surfaces, and depending on the placement of the microphone, even if you’re close to it, it can still pick up reflections and reverb if you’re not careful.
So, place it in such a way that it’s as far away from those reflective surfaces as you can get it. Ideally, you’d have it boomed overhead, pointing down towards your chest. Assuming you’re not topless, your shirt will diffuse most reflected sound coming towards it and the microphone won’t pick it up.
Also, tip 5
5. Pad your room
Add soft furnishings. If there’s enough soft material around you, it will diffuse the sound and prevent audio reflections from coming back. So, your microphone won’t hear them, and you’ll not get any of that nasty reverb.
And if it’s a room you’re going to be shooting in regularly, and it doesn’t need to stay looking like a regular room in your house, look into covering those reflective surfaces with some non-reflective material, like acoustic foam.
What are your top shotgun microphone tips?

John Aldred
John Aldred is a photographer with over 25 years of experience in the portrait and commercial worlds. He is based in Scotland and has been an early adopter – and occasional beta tester – of almost every digital imaging technology in that time. As well as his creative visual work, John uses 3D printing, electronics and programming to create his own photography and filmmaking tools and consults for a number of brands across the industry.
Related Posts
 Rode has announced the new NTG-5 broadcast quality shotgun microphone
 This camera can record sound without a microphone, it just sees the vibrations
 6 essential tips to get the best sound and comfort out of a boom pole microphone
 Here are 10 microphone tips to improve the audio quality in your videos
Join the Discussion
DIYP Comment Policy
Be nice, be on-topic, no personal information or flames.
2 responses to “Five tips to record better quality sound with your shotgun microphone”
Am Deaf, microphones don’t mean anything. Decorations only. ^shrugs^
The Røde NTG4+ suits me well and their much smaller videomic is food value for money too