


How to Find Good Light for Portraits Even at Midday
Dec 8, 2014
Darlene Hildebrandt

We love it when our readers get in touch with us to share their stories. This article was contributed to DIYP by a member of our community. If you would like to contribute an article, please contact us here.
Share:
You’ve probably heard you need to have good light for portraits. Okay great, but what does that mean exactly, and how do you find that elusive good light? In this article you’ll get some tips on how to recognize different kinds of light, and make choices based on the look you want for the final portrait. You’ll also learn about open shade, quality of light, direction of light and how to bring it all together so that you can work faster, smarter, and with less gear. Let’s begin!
Step One: Quality of Light
You’re likely familiar with quantity of light, which is simply how much light there is falling on your scene. But what about quality? This is where the discussion begins about good light. Most portrait photographer prefer to work with something called soft light, which is generally more flattering for people photos. The alternative is hard light, but neither is right or wrong. They are just different. Knowing how to spot the difference, and which you want to use for your portrait, is where you want to start.
Hard Light
Hard light is characterized by sharp edged shadows, high contrast between light and dark, increased texture, and more drama in your image. That means if you want a portrait with lots of contrast and drama this is the type of lighting you want. Just know it will pick up every bump, wrinkle, pore and imperfection in your subject’s face. If you are photographing your mother do you think she will want that? No, likely not! But a hard rock band, power business portrait, or character portrait of an old gentleman might be well suited to hard light.
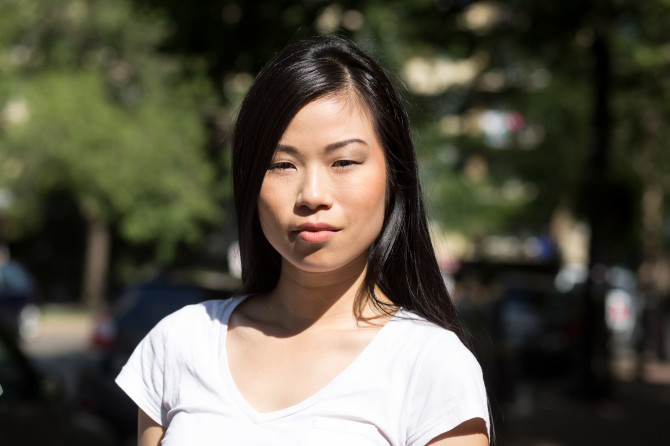
Caption: This is an example of hard light produced by direct sunlight. Not so flattering and harder to maintain detail in both the highlight and shadow areas.
It is created by a small light source or one that is proportionally far from the subject. Meaning a bare bulb lightbulb, your small on-camera flash, and the sun are all examples of hard light sources. Even though the sun is a large ball of fire, it is very far away. So, proportionally compared to the size of your subject’s head, it looks small.
Soft Light
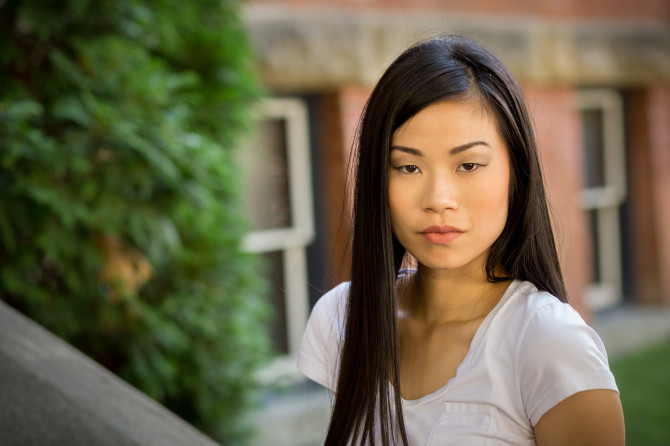
Soft light is characterized by soft edged or almost non-existent shadows (think a heavily overcast day and looking for your own shadow on the ground), low contrast, decreased texture and less drama. Most often this is the lighting of choice for portraits because it is more flattering for people. It doesn’t pick up all the flaws in the skin and parts of their face are not lost in deep shadow.

Caption: This is an example of soft light. Simply by moving five feet toward the building into the shade it is much more flattering to the model.
A very large light source is what creates soft light. That includes large umbrellas or soft boxes, large white reflectors (I say white because silver and gold can create hard light), and even the entire sky on a cloudy day.
Get Out of the Sun
To sum up step one working with quality of light, simply get out of the sun and into the shade. There is always some shade, even at high noon when the sun is directly overhead. Look under large trees and the around shady side of large buildings.
Remember, if you do want a portrait with more drama you may choose to work in the sun. Just know it will give you a very different look. For the purpose of the rest of this article we’re going to assume you want to make a flattering portrait so we’re going to continue on the quest for the good light.
Step Two: Find a Good Background
Once you’re in the shade and have softer light, the next thing you want to take a look at is your background. So many times I see a great portrait ruined by a busy or distracting background. Look behind your subject, better yet take a test shot and review it on the camera. This is what you want to look out for:
- Areas of high contrast
- Blown out or super bright areas
- Bright colours especially warm ones like red, orange and yellow
- Everything in sharp focus
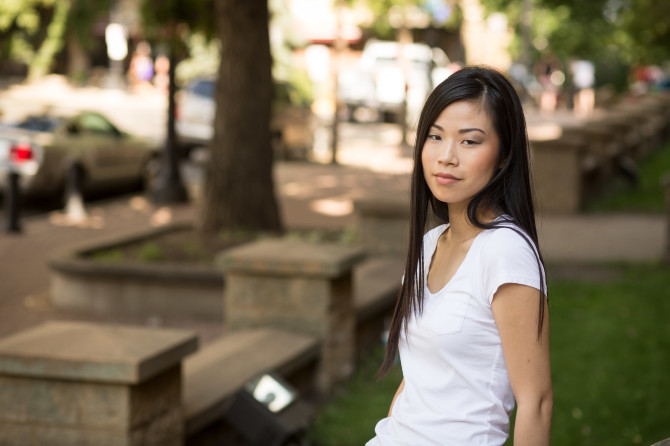
In the image above three of the four things to avoid are going on in the background (bright spots, high contrast, bright colours). Notice how busy it is, and how much it distracts the viewer’s eye away from the subject. She’s almost lost in the scene.
How do you fix that? This is where the work smarter not harder tip comes into play. Many photographers will plunk their subject down in front of a pretty background and try to fight with the lighting. They’ll bring in a reflector or even multiple speedlights to try and overcome the lighting issues on the background. While you can do this, there is a much easier way!
This could be a game changer for you, are you ready for it? Here it comes – move the subject and the camera! That’s it. Reposition the subject, or move yourself and the camera position, so that the background behind her isn’t so problematic.

Okay that’s much better! All I did was move to the other set of steps and turned around 180 degrees to get a different background.
Often times within the area you are shooting there will be more than one option for setting up and camera angles. One thing I recommend is to walk around your subject – literally! By that I mean put them into position and physically walk all the way around them, having them turn and follow you. Watch how the light on them changes and how the background looks. You might find a much better angle around the other side from your original spot. Don’t feel you need to stick with working in the first spot you pick, see step five below for more on this.
Step Three: Look for the Direction of Light
The next consideration you want to look at is the direction of light. If you aren’t sure where the light is coming from go stand where you want your subject and look back toward the camera. Look for the brightest area around you – THAT is the direction of light.
Analyze how it is falling on the subject. Is it coming from the camera angle straight at your model? Is it off to the side, or overhead? Often the issue shooting at midday is overhead lighting which will cause dark eyes, especially on people with deep set eyes or raised brows. If this is the case, look for a subtractive lighting situation where there is something to help block the overhead light. That might be a large overhanging tree branch, eaves on a building, or a porch or doorway.
Ideally you want the light to come from the side, which will allow you to create nice portrait lighting patterns on your model. By moving them or having them turn their face slightly the pattern will change. But overhead or direct straight on lighting will not give you those options and flattering lighting.
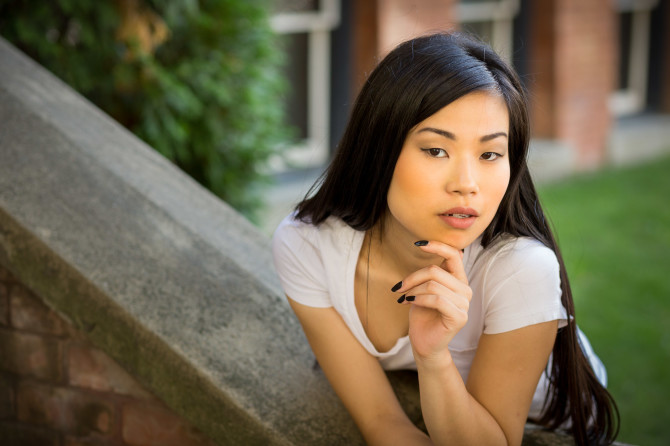
In the image above there are two things working in my favour to create nice soft and directional light.
- There is a large tree just to camera right blocking much of the overhead light.
- There is a five story white apartment building across the street to camera right. It is basically acting like a giant reflector providing a large light source, and thus soft lighting, from the side. Because of this, it is one of my favourite locations when shooting at midday.
This scenario is often referred to as “subtractive lighting” (part of the light is being blocked) or “open shade“. When you go look at (scout) a potential portrait location take all these factors into consideration, and if you can find a spot that offers this type of situation you’ve struck gold! Make note and use that spot often.
Of course keep in mind if you do go location scouting, to do so at the same time of day you will be doing the photography, otherwise the light will be different. Scouting in the evening but going back to shoot at noon could give you some unwanted surprises, i.e. completely different light.
Step Four: Dial-In Your Camera Settings and Take a Test Shot

Only after finding the best light and a good background is it time to set up your camera and think about settings. Take a meter reading (using either your in-camera meter or a handheld one) and set your exposure. I highly recommend working with a tripod for two reasons. First you’ll eliminate camera shake in case of a slow shutter speed (although you can still get blur if your subject moves during the exposure), and second it allows you to interact with your subject.
Select an appropriate ISO, aperture, and let the shutter speed fall where it may. If it’s too slow, increase your ISO or open the aperture. Usually for portraits a wider aperture like f/4 (or larger if your lens allows) is desired to help throw the background out of focus.
When you’re all set take a test shot. Examine it carefully on your camera’s LCD screen looking for:
- Proper exposure (use the histogram to make sure no highlight areas of importance are clipped)
- Good white balance
- Composition
- Quality and direction of Llight on your subject
- Distractions in the background
Step Five: Adjust as Necessary
This last step is actually the key to having more success on your photo shoots. Photography is a process, not a destination. Do NOT expect to get everything perfect on the first test shot – the pros don’t!
Earlier I mentioned to not be afraid to change things up if it isn’t working or you can’t get the results you want. So take your time. Slow down and review your images. Refine any camera settings, lighting, and move to a new location if need be. Your subject is likely way more patient than you think and will be appreciative of a great final portrait by spending an extra few minutes refining things.
Remember to build rapport with your subjects and most of all – have fun. Now it’s your turn to go try these tips and let me know how you make out.
About The Author
Darlene Hildebrandt is the creator of Digital Photo Mentor. She has been a professional photographer for over 25 years, and photography instructor since 2011.
Darlene provides valuable articles on her site and offers online photography courses, including Portrait Photography Fundamentals – Your Guide to Using Natural Light and Off-Camera Flash
We love it when our readers get in touch with us to share their stories. This article was contributed to DIYP by a member of our community. If you would like to contribute an article, please contact us here.


Join the Discussion
DIYP Comment Policy
Be nice, be on-topic, no personal information or flames.
9 responses to “How to Find Good Light for Portraits Even at Midday”
Thanks for letting me write this and share with your readers at DIY!
It is 100% our pleasure Darlene
Step 1. Have a very attractive model with a lot of makeup.
Steo 2. .. I forgot what I wanted to say
I appreciate your comments but the tips work with any person. The images were taken from stills from our video shoot and yes we did have a model. Very hard to ask a friend: can you please come and show up at this location and sit there for 5 hours while we talk on camera? That is what professional models do and get paid for. But the tips I stand by and use with “regular” people too. Try it.
I loved the last shot of the girl and wondered about the lovely glow cast upon her face… And then you revealed why you love this spot! Made me smile really big and thoughts race through my mind.
Awesome! Glad it was helpful.
thanks a lot very nice article
Thanks Alber!
Light. I am inspired by you. I am truly inspired by the sun’s rays shining through my kitchen blinds or through the trees during the http://dailycome.com/finding-your-light-with-camera-photography/