


Create Geometric Light Painting Spirographs
Feb 2, 2011
Udi Tirosh
Udi Tirosh is an entrepreneur, photography inventor, journalist, educator, and writer based in Israel. With over 25 years of experience in the photo-video industry, Udi has built and sold several photography-related brands. Udi has a double degree in mass media communications and computer science.
Share:
 Spirals, I could talk for hours on end about what they are, their geometrical qualities, or the fact that earth will die without their existence.
But that would be long and boring. Instead, I am going to describe is how to make them. Photographically, that is.
If you thought that light painting is fun, wait to discover, light painting and geometry, it’s even more fun!
Materials Needed
- A dark room
- A camera (one that is capable of long exposure). A DSLR and a cable shutter release is preferable)
- A wide angle lens.(17 or 18mm on a crop body or a 24mm on a FF DSLR)
- A Flashlight (small and bright, AKA a Maglight.)
- String – Lots of it
- A place to hang the flashlight that is at least 5-6 feet tall
- A tripod
- For multicolored – colored plastic or cellophane and a rubber band.
- For multicolored – a piece of black paper or something to cover the lens with.
Setup and Execution
The first thing you will need is to get some altitude for the string mounting point. Use the string to hang the flashlight from a high point – about 2 or 3 feet above the lens.
The flashlight will not keep constant distance from the camera, so you would want the most depth of field that you can get. Set the camera for the smallest aperture that lens can go to (I used f/22).
The focus can be a bit tricky, since the flash light will not want to assume position for you to focus. Use manual focus and either:
- Focus to about where the flashlight is using the distance scale on the lens.
- Or use something to temporarily position the flash light and make sure you are focused to it.
Here is the setup that I used

Now turn off the lights, activate the shutter release and throw the flashlight a circular arc. See the diagram below for a graphical illustration of the process.

The more time the shutter stays open, you will get a more complete circle. Depending on your preference and experience, close the shutter and grab the flashlight. (You need to first close the shutter to avoid any stray light lines)
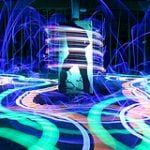
The light from the flashlight is accumulated on the sensor, creating a trace of the trajectory. It will look something like this

Creating Multicolored Spirographs
While single color Spirographs are cool, multi-color Spirographs are even cooler. Here is how you make one.
At some point when the shutter is open, cover the lens with the black card (or lens cap) and place the colored cellophane over the flashlight. Now, throw the flashlight again, and remove the object on the lens. The additional color will trace the sensor.
You can repeat this with as many colors as you’d like.
When throwing again, try throwing the flashlight to a different direction so the trace will not overlap with the existing trace.


We would love to see your results on the comments and DIYP flickr pool.
About the Author
Matthew Smith is 13 years old photography enthusiast from California, USA. to see more of his work, visit his Flickr Photostream. To see more of his Spirographs, visit the Parabolas set

Udi Tirosh
Udi Tirosh is an entrepreneur, photography inventor, journalist, educator, and writer based in Israel. With over 25 years of experience in the photo-video industry, Udi has built and sold several photography-related brands. Udi has a double degree in mass media communications and computer science.


Join the Discussion
DIYP Comment Policy
Be nice, be on-topic, no personal information or flames.