


How to build a DIY Teleprompter
Jun 26, 2016
Udi Tirosh
Udi Tirosh is an entrepreneur, photography inventor, journalist, educator, and writer based in Israel. With over 25 years of experience in the photo-video industry, Udi has built and sold several photography-related brands. Udi has a double degree in mass media communications and computer science.
Share:

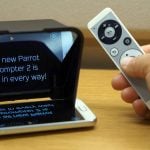
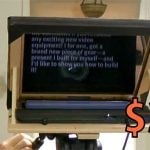
Anyone who remembers my early videos knows that my command of the english language is far from perfect extremely creative. It was after several long days with many takes that I decided to test using a teleprompter. My first test was just placing an iPad with a teleprompter app and giving it a shot. We went down from million takes to three after 15 minutes of fiddling.
There was one caveat though, it was looking weird as my eyes were not looking at the camera anymore. This is when I decided to build a teleprompter. (In whole honesty, after living with my wooden, handcrafted prompter for several months, I did go for a more streamlined option. But for testing sake, several months of usage and about $15 I was quite happy.
If you think that you can benefit from a magical device that whispers your next line when you are doing video, hit the jump button for instructions.
What’s in a teleprompter?
A teleprompter is basically a very simple device. At it’s core it is a piece of glass angled at 45 degrees. This is it. You place the camera behind the glass (and very close to it) so it “sees” no reflections. And you place some text under the glass which is then reflected 90 degrees so the talent can see it.

Like anything in life, you can improve upon this device. For example, you can use splitter glass which if more reflective on one side (the text facing side) and more transparent on the other side (the camera side).
You can also use some black fabric to block some of the light that is coming from the camera side. And on and on….. But, I started simple with the following materials. It is really simple design:

I used:
- two pieces of plywood measuring 38x28cm
- a piece of leftover glass 22x17cm (taken out of an old photo)
- a few hinges (the type that holds position)
- some black spray
- black fabric
- glue, silicone, screws, and other found tools.
Instructions
The first step is to find the center of one of the two the plywood boards and cut a hole to be covered with glass. Run two diagonals to find the center and cut a square of 12×12 cm. You may need to use a drill to make the initial hole where you can start using a jigsaw. I also drilled 4 holes at the corners for a clean cut-end.

The next step is to cut the hole and spray everything black. I used matte black spray to eliminate as many reflections as I can.

Now add the hinges. You will note that they are not flat, and when you close the prompter down, you will have some space. This space will be used for the glass.
Now to place the glass in place and apply silicone all around it, Its nasty stuff, so make sure it does not touch the glass.

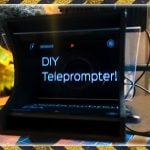
Lastly we added some first grade old leftover fabric and nailed it to the plywood. The cross in the middle is where the lens goes through.

Here is the final piece:

Some after thoughts….
Using this teleprompter was nice for a while. There were plenty of things that could have improved though:
- “My” glass is not beam splitter (not optical) so I always got a double reflection, it is something you can leave with, but it’s not optimal.
- We really could not get a sturdy enough base plate for it. This meant that we: A) could not mount it on rails, and B) hat to use our tethered shooting table for mounting it in front of the camera
- It was still wooden, big and bulky, not to mention heavy.
While both of these concerns could have been addressed, I ended up opting for a bought solution. I am today using a OneTakeOnly Pad Prompter, which is nicely built, comes with a bag and uses split beam glass.
Any thoughts? hit us in the comments!

Udi Tirosh
Udi Tirosh is an entrepreneur, photography inventor, journalist, educator, and writer based in Israel. With over 25 years of experience in the photo-video industry, Udi has built and sold several photography-related brands. Udi has a double degree in mass media communications and computer science.

Join the Discussion
DIYP Comment Policy
Be nice, be on-topic, no personal information or flames.
5 responses to “How to build a DIY Teleprompter”
….or you could just mount the bloody iPad facing the presenter and do away with this altogether. Talk about over complicating a solution!
Did you read the article John? He did that first, this method allows him to maintain eye contact with the viewer, a subtle but important part of producing good video.
?
love this udi – we spent too much money on one for video production at my job. will try this, but using plexiglass instead of glass. wouldn’t want it to shatter! plus there is anti-glare versions too which like steve said, could help. it can be expensive but since you don’t need a large size, you could always order a sample http://www.acplasticsinc.com/categories/non-glare
also – if you use plexiglass – you can avoid the silicon and use less messy adhesives http://www.acplasticsinc.com/categories/plastic-adhesives