


Build a Cardboard Instant Camera: This is the LomoMod No.1i
Mar 22, 2026
David Prochnow
Our resident “how-to” project editor, David Prochnow, lives on the Gulf Coast of the United States in Ocean Springs, Mississippi. He brings his expertise at making our photography projects accessible to everyone, from a lengthy stint acting as the Contributing How-To Editor with Popular Science magazine. While you don’t have to actually build each of his projects, reading about these adventures will contribute to your continued overall appreciation of do-it-yourself photography. A collection of David’s best Popular Science projects can be found in the book, “The Big Book of Hacks,” Edited by Doug Cantor.
Share:
Sharp-eyed DIYP fans of the Lomography LomoMod No.1 will recall that this crafty cardboard camera has been modified into being a 35mm film camera, as well as an enlarger. Well, this time around the LomoMod No.1 is being converted into an instant camera.
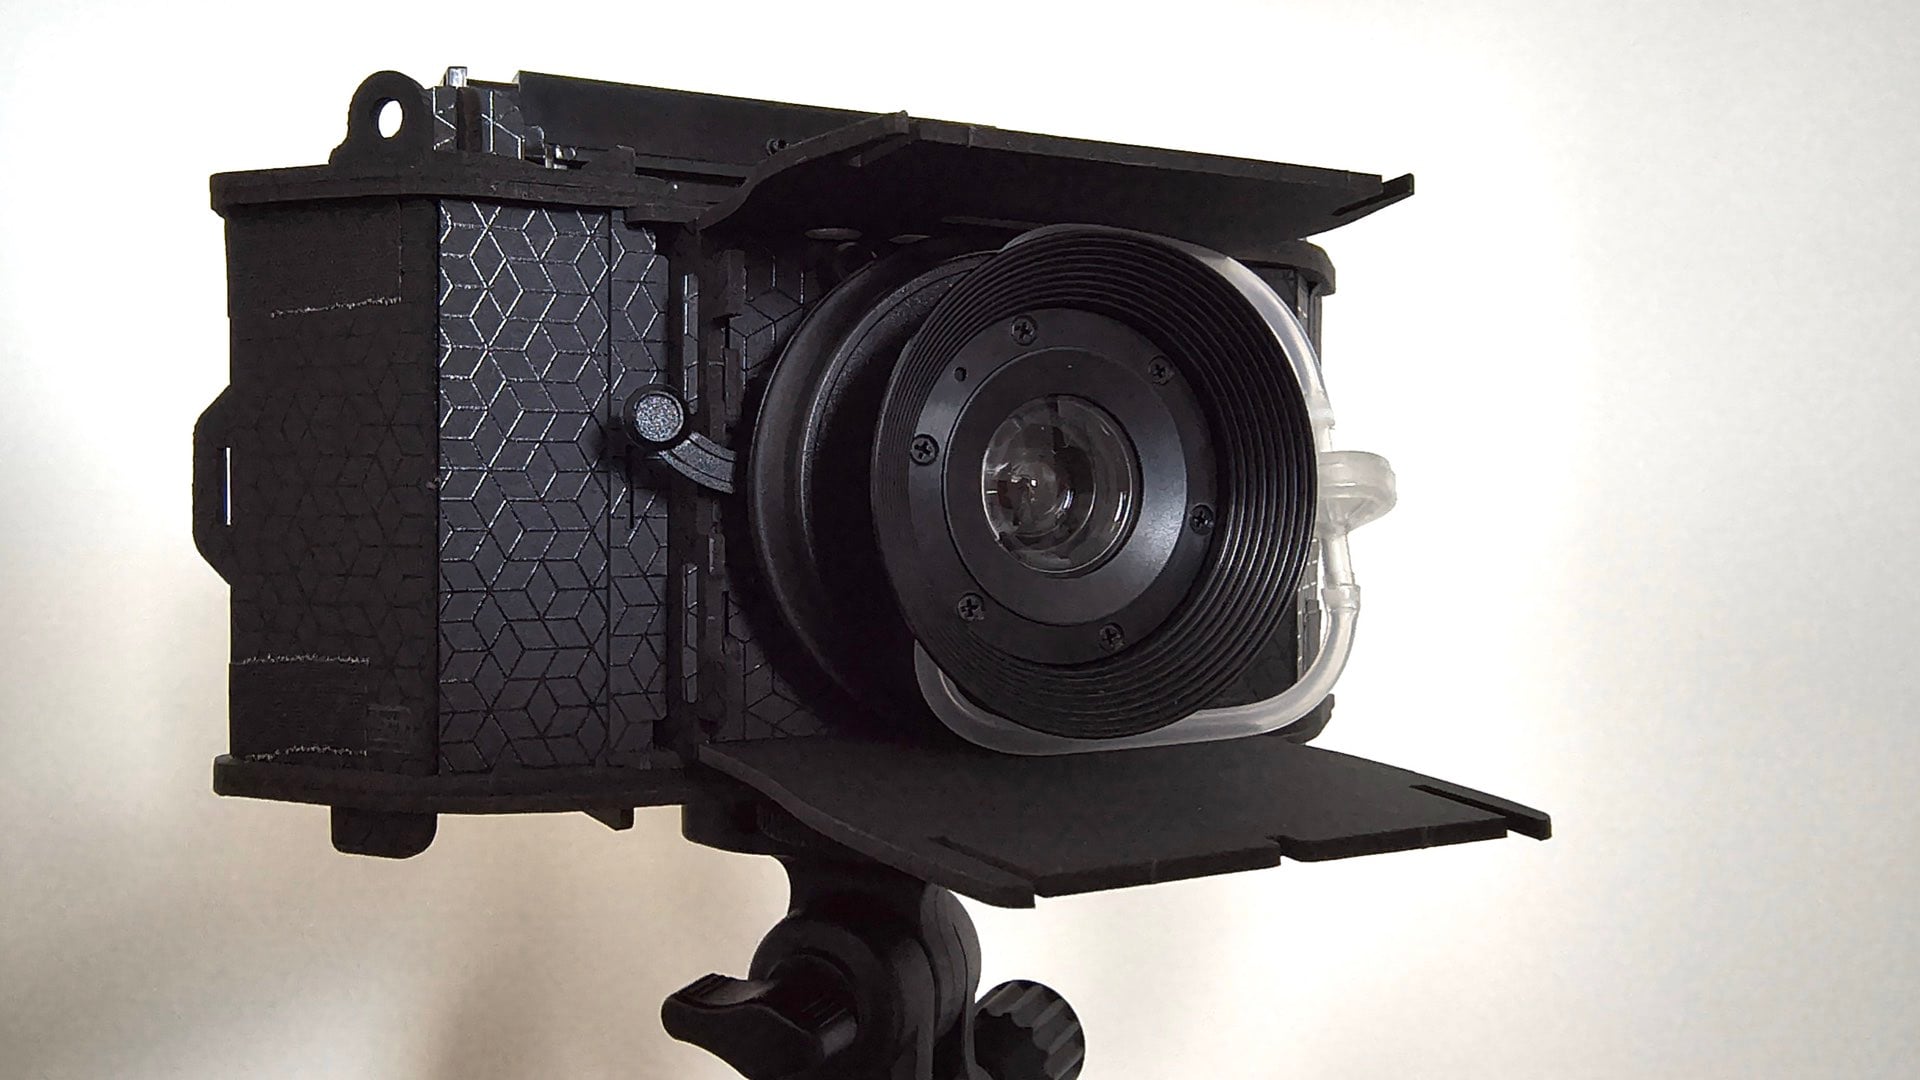
Dubbed, the LomoMod No.1i, this easy modification combines two totally dissimilar cameras into one “dream-maker” camera. Like oil and water, the LomoMod No.1i takes a cute cardboard camera and grafts a large plastic Instax film back onto it.
Before we embark on this project, however, a precautionary word of warning. The required Instax film back should be a salvaged piece from a broken camera. It is not advisable to “break” a new camera just for obtaining this essential part. Let’s begin.
[Related Reading: Lomomod No. 1 review: a fun and frustrating DIY cardboard camera with a liquid-filled lens]
In an Instax, a New Development
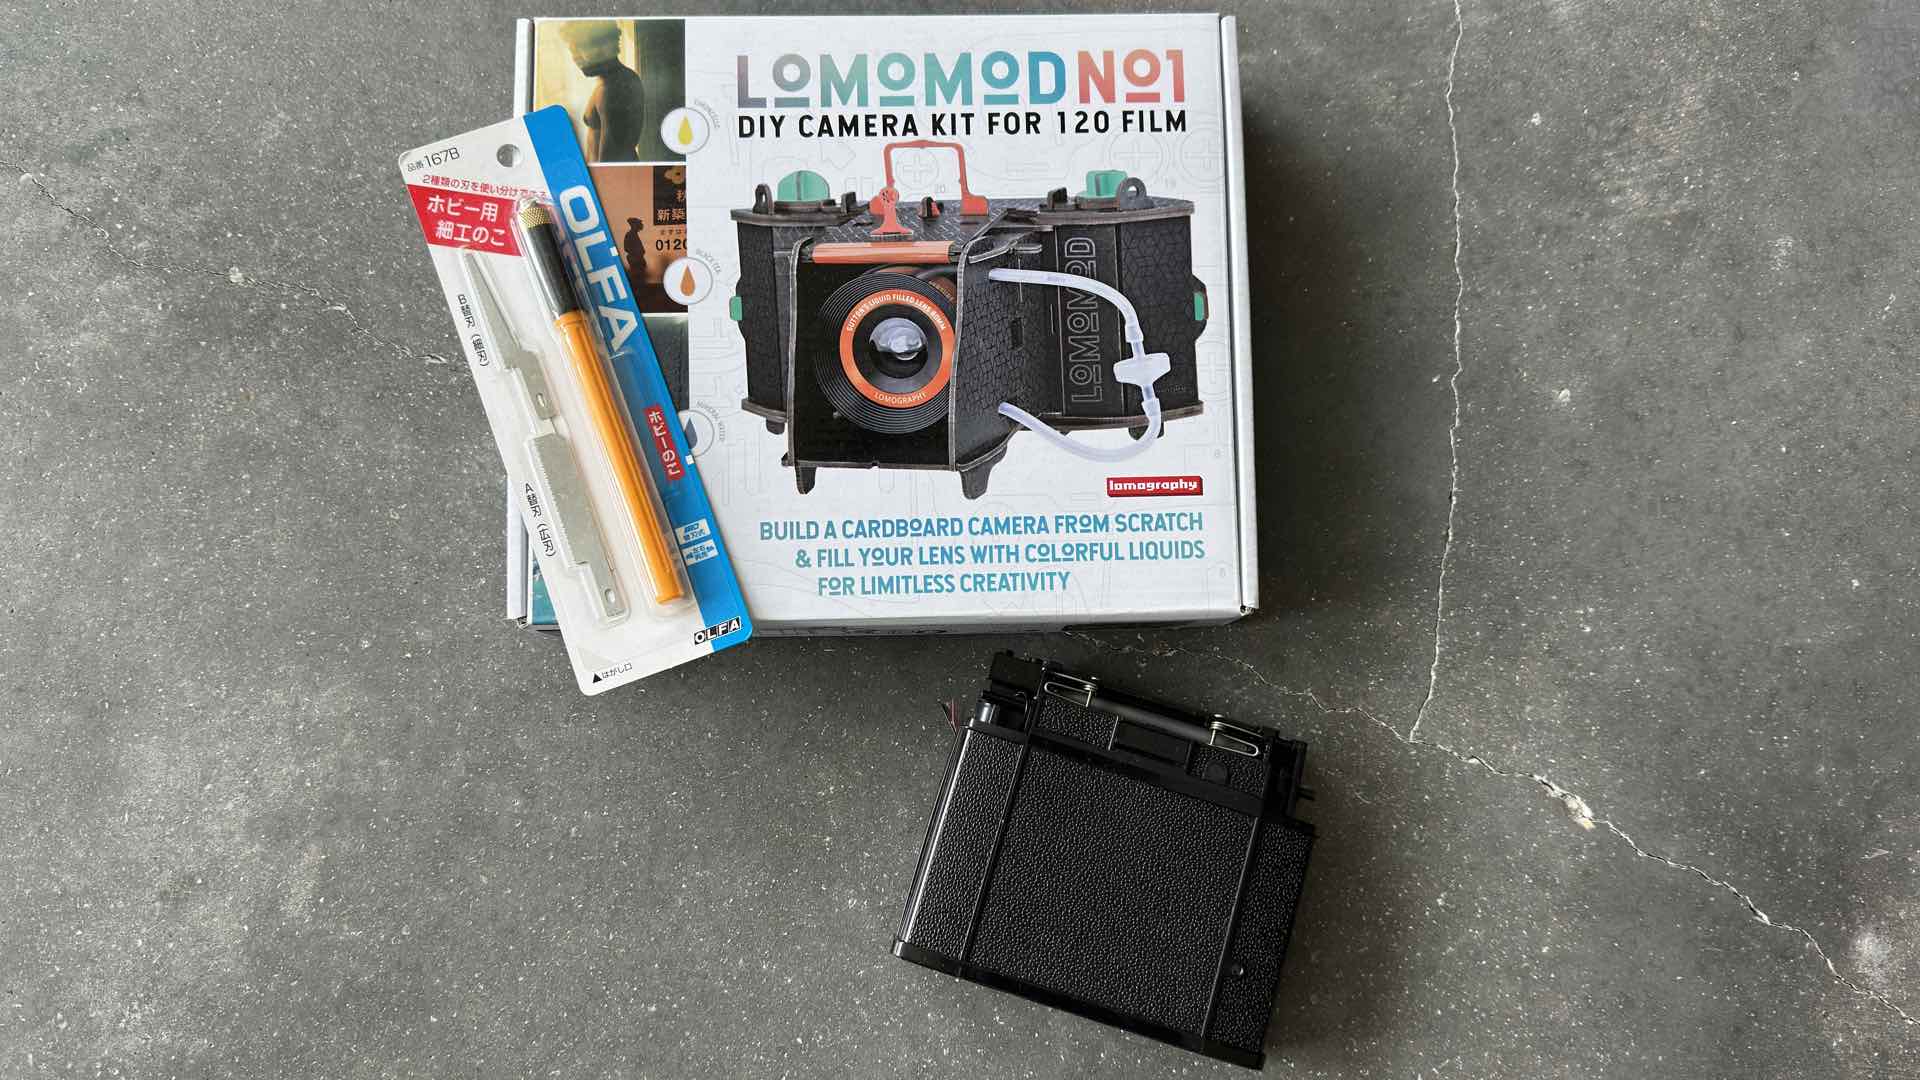
Only three parts are needed for building the DIY instant camera, aka LomoMod No.1i:
- Salvaged Instax film back from: Lomography Diana Instant Square Camera with Flash Classic Edition $129
- OLFA Saw & Art Knife & Spare Blade $7.79
- Lomography LomoMod No.1 $59
As previously mentioned, you really shouldn’t buy a new Diana Instant Square Camera just for obtaining its Instax film back. That’s a foolish waste of money. Rather, a non-functioning camera is the ideal donor for this project.
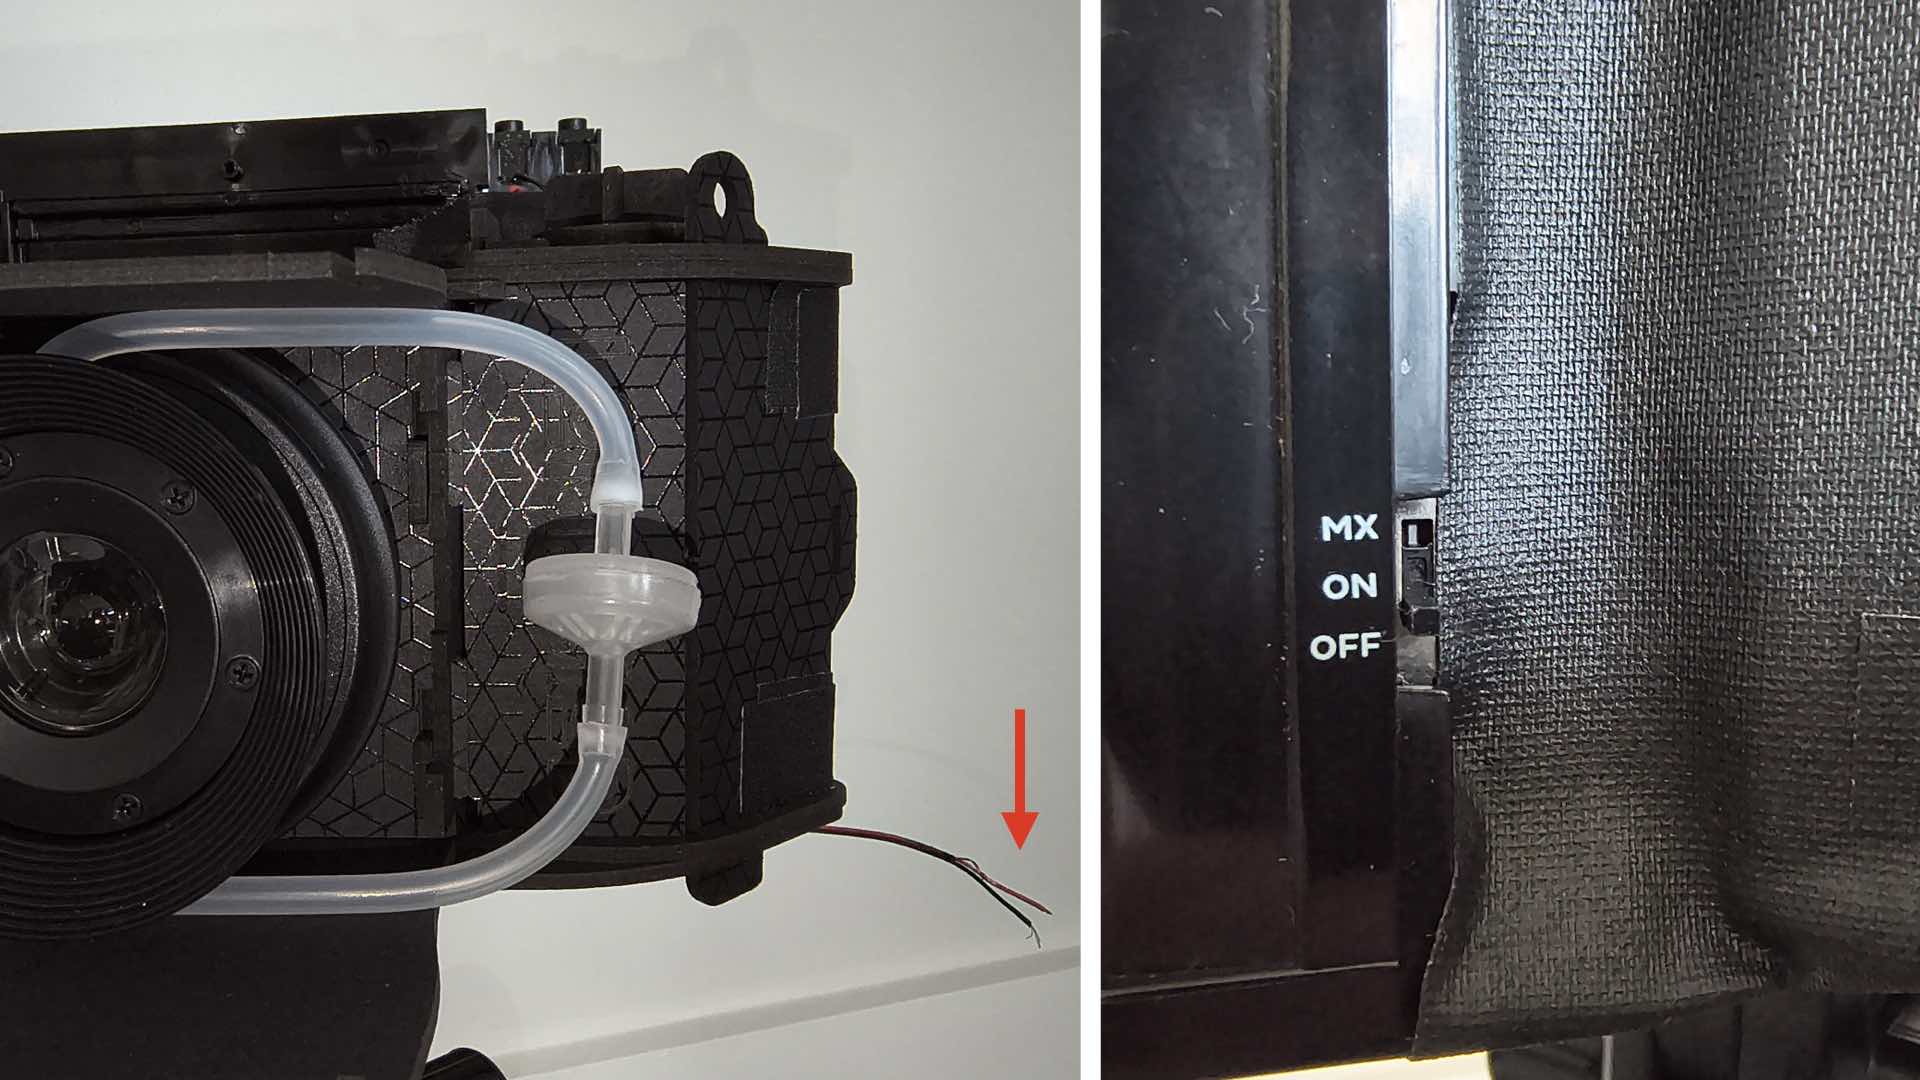
In fact, salvaging the back from the Diana Instant Square Camera is an easy task requiring the removal of a handful of screws. Keep in mind, there are three things to ensure that you retain and keep attached to the film back: the battery compartment and lid, the slender red and black wires that are attached to the camera’s shutter release circuit, and the selection switch. These items will be necessary for ejecting film from the Instax back.
Once you have the Instax film back in hand, the LomoMod No.1 must be partially assembled. There are three large subassemblies that constitute the construction of this camera: the back (referred to as “A,” in the Lomography assembly instructions), the body (referred to as “B”), and the light box (referred to as “C”). Only subassemblies “B” and “C” will be constructed for this partial assembly.
After you’ve finished building these two subassemblies, continue following the Lomography instructions until you reach the step for combining subassemblies A+B+C. Obviously, you will only assemble B+C for making the LomoMod No.1i.
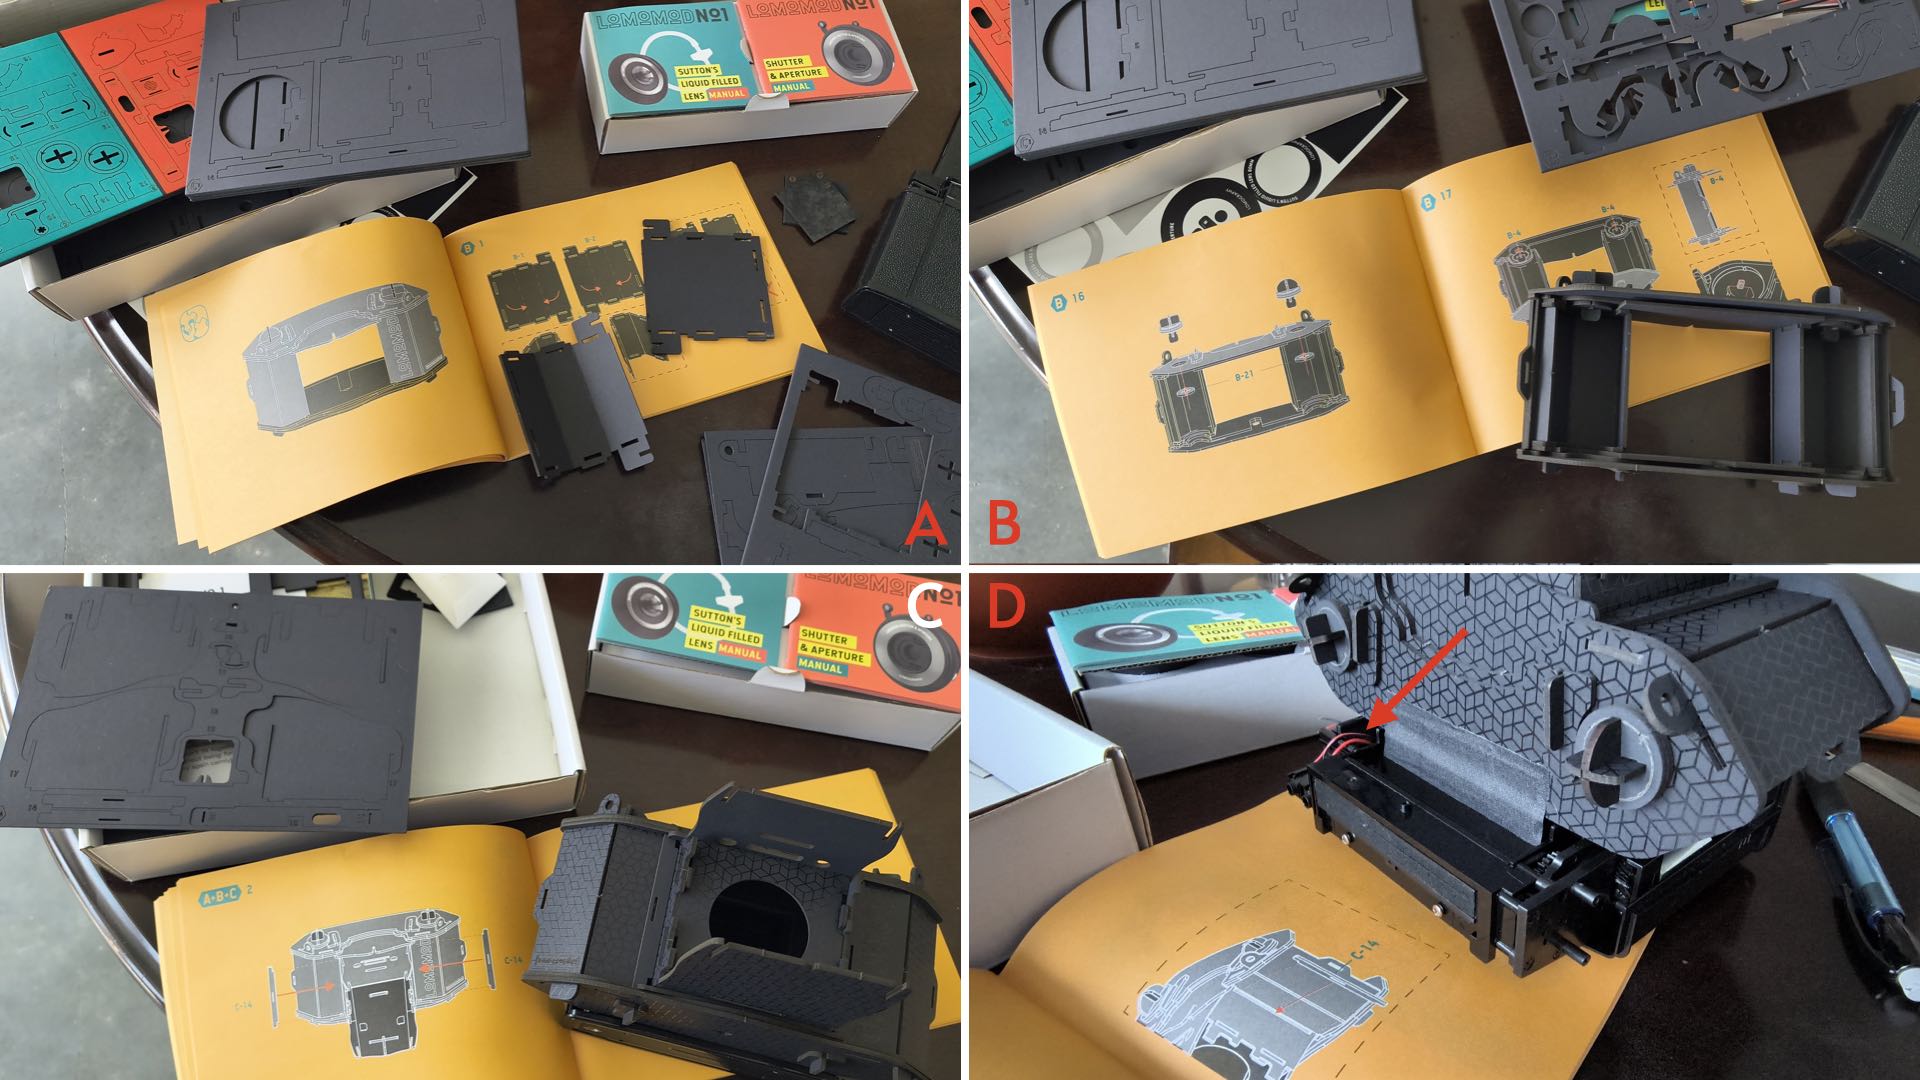
Prior to inserting the Sutton Water Lens into the camera’s light box, use the OLFA art saw and carefully cut slots into the cardboard back for receiving the plastic Instax film back. The final fit between these two dissimilar materials should be snug, square, and light tight. Also, the film back needs to be pushed into the light box far enough to ensure that the film plane for the back is roughly equal to the camera’s original film plane.
Use tape to join the Instax film back to the LomoMod No.1. Be careful that your taping doesn’t cover either the film door or the battery compartment lid.
After the film back is securely taped to the LomoMod No.1, the two side openings must be covered. Return to the cardboard film back pieces from subassembly “A” and locate piece A-1. Once again, use the OLFA art saw for slicing off the two end flaps from A-1. Bend these flaps as shown in the Lomography instructions, slide them into each side of the LomoMod No.1 back, and securely tape them into place.
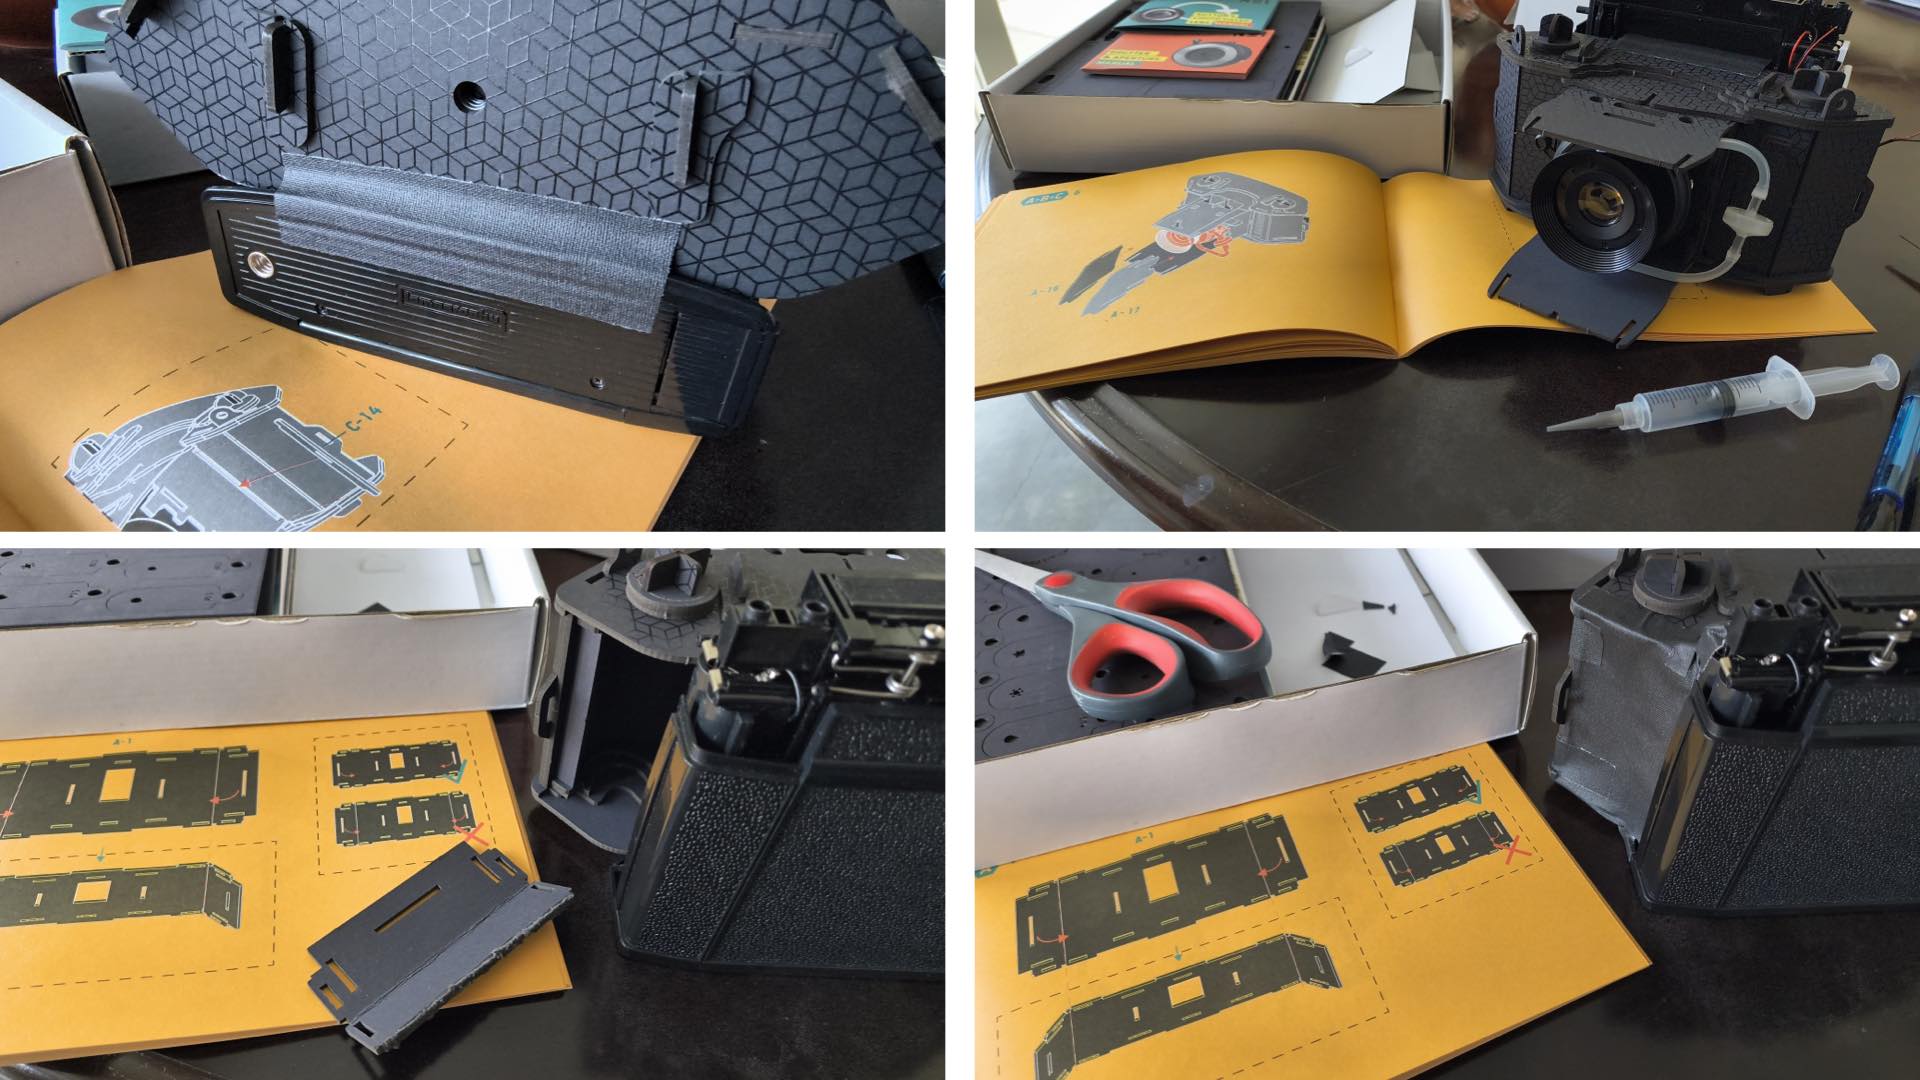
Your new LomoMod No.1i should now be assembled, sealed (i.e., light tight), and ready for adding the Sutton Water Lens. Carefully push the lens into the front of the light box and secure it into place with the threaded lens retaining ring.
You are now ready to make some creative, “dreamy” photographs. Fill the lens with your preferred fluid, add batteries to the Instax film back, load a pack of film into the camera, and move the film back selection switch to the ON position. If everything has been assembled correctly, a green LED should light up.
The film pack’s black cover sheet is ejected by gently touching the exposed copper filaments from the red and black wires, that you kept attached from the Diana Instant Square Camera’s shutter release, momentarily together.
Likewise, after clicking the shutter release on the Sutton Water Lens, the Instax film is ejected by touching the red and black wire copper filaments momentarily together, again. This action is repeated for each photograph in the 10-exposure pack of film.
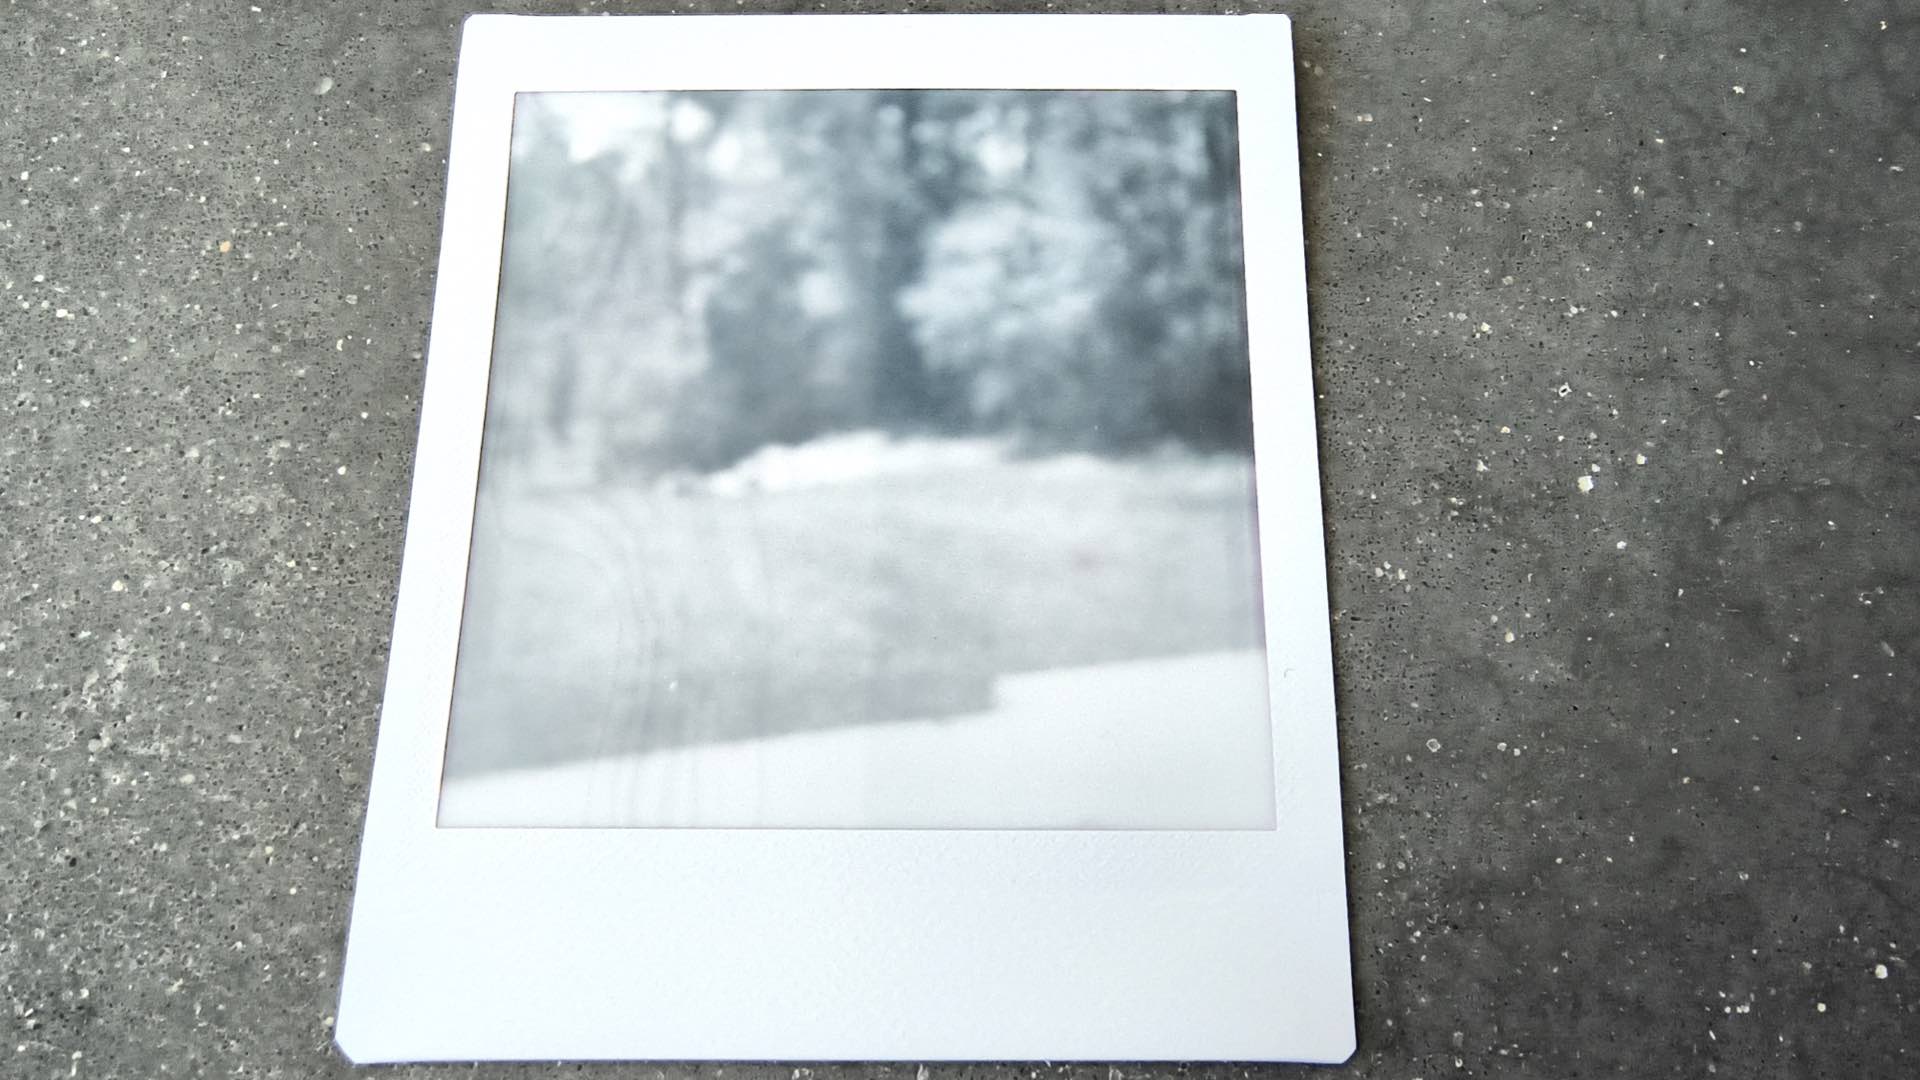
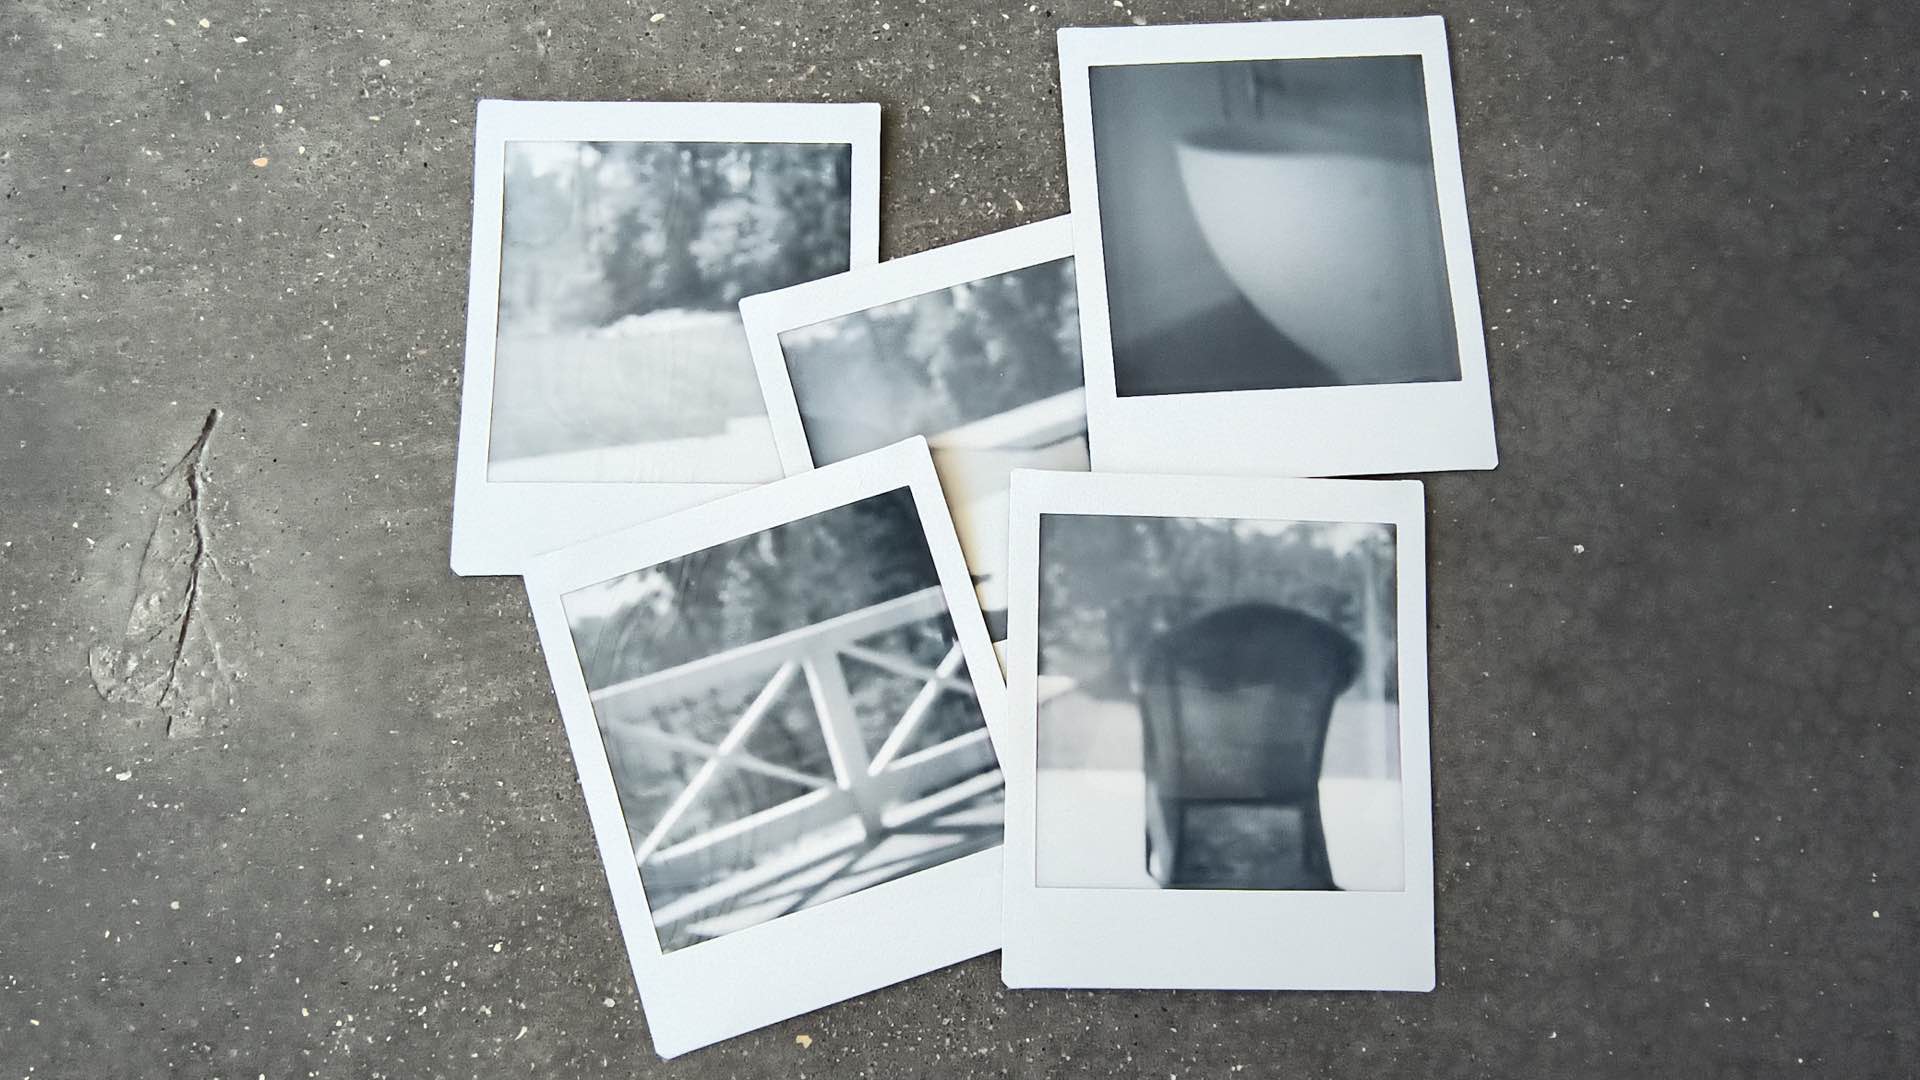
Photographs with the LomoMod No.1i cardboard instant camera will have a dreamy, ethereal appearance. You can control your exposure by adding the various cardboard Waterhouse Aperture Plates (referred to as “W”) to the lens. Persistence and experimentation will help to make your photographic dreams come true with the LomoMod No.1i.
Enjoy.
Filed Under:
Tagged With:

David Prochnow
Our resident “how-to” project editor, David Prochnow, lives on the Gulf Coast of the United States in Ocean Springs, Mississippi. He brings his expertise at making our photography projects accessible to everyone, from a lengthy stint acting as the Contributing How-To Editor with Popular Science magazine. While you don’t have to actually build each of his projects, reading about these adventures will contribute to your continued overall appreciation of do-it-yourself photography. A collection of David’s best Popular Science projects can be found in the book, “The Big Book of Hacks,” Edited by Doug Cantor.
Related Posts
 Now You Can Enlarge Negatives with Your LomoMod No.1: Build the LomoMod No.1e Enlarger
 Lomomod No. 1 review: a fun and frustrating DIY cardboard camera with a liquid-filled lens
 Lomomod No.1 lets you build your own camera from scratch without screws or glue
 Jollylook: a folding instant camera made almost entirely from cardboard
Join the Discussion
DIYP Comment Policy
Be nice, be on-topic, no personal information or flames.
One response to “Build a Cardboard Instant Camera: This is the LomoMod No.1i”
David, this is awesome!! gonna see if I can get my daughter to play