


Aluminum foil and some lights are all you need to create epic photos at home
Mar 21, 2020
Dunja Đuđić Kalinin
Dunja Djudjic is a multi-talented artist based in Novi Sad, Serbia. With 15 years of experience as a photographer, she specializes in capturing the beauty of nature, travel, concerts, and fine art. In addition to her photography, Dunja also expresses her creativity through writing, embroidery, and jewelry making.
Share:

Around two weeks ago, I saw an epic photo Jason D. Page posted to Facebook, crediting Tim Gamble for the idea. Both of them made their photos with aluminum foil (tin foil) and some lights, and I knew I wanted to try the technique immediately!
I reached out to them and they kindly shared the process with me. It turned out to be pretty simple, so I even skipped a Saturday night out to stay at home and take photos. I didn’t regret it. Considering that many of us are currently in self-isolation, I think this is a great project to try: it’s simple, you have everything you need at home, and the possibilities are virtually endless. So, let’s dive in and see what you need and how to do it.
You will need
- Tinfoil
- Some lights
- Clear tape
- A camera on a tripod
- Optional: a pillow, a skeleton Halloween decoration, any object you want to mold your foil around
How inspiration spreads
For Tim, Jason and me, it was interesting to see how inspiration spreads. So this is why I wanna tell you a bit about it before we move on.
As Jason pointed out, he got the idea from Tim. From their photos, I thought that the process was complicated and that it required two people to pull it off. However, I chatted with Tim about it and realized that it wasn’t that difficult and more importantly – that I could do it myself. Tim explained that he molded the foil around his face and hands and then added some lights to the “sculpture” to bring out the texture of the tinfoil. This is when I decided to try it out.
When Tim sent me his images, I’d already taken my photos based on his instructions. We chatted a bit more and we came to realize that both of us used a pillow to mold the foil around our hands. Great minds think alike, right? :)
So, now that all three of us have our photos and some tips to share, let’s get to the shooting process.
The shooting process
First, you need to take a piece of tinfoil, scrunch it and then flatten it out to get a nice texture. Since tinfoil sheets are pretty narrow, you’re gonna need a few of them taped together with some clear tape.
Then, take your tinfoil and mold it around the shape of your choice. Tim and I shaped it around our faces, all three of us shaped it around our hands, and Jason used the Halloween skeleton I mentioned above. He molded the foil around its skull and shone some lights onto it.
Jason even made a video to guide you through the process. He used a ROSCO MixBook to shine some orange and pink light onto the foil from the sides. Then, he used a Cree XP-L LED flashlight paired with a Black Fiber Optics light painting brush and a green and blue gel. With this tool, he painted in some green and blue light around the skeleton’s skull.
Here’s Jason’s video so you can see how he did it:
And here are two more photos Jason created with this technique:

When it comes to Tim’s images, he lit them with an RGB strip on rainbow mode and worked around the periphery of the frame at an oblique angle. “This kind of lighting really brings out the texture and undulations,” Tim explains. “When lit from behind the camera the image looks far less 3D.”
Here are Tim’s images:


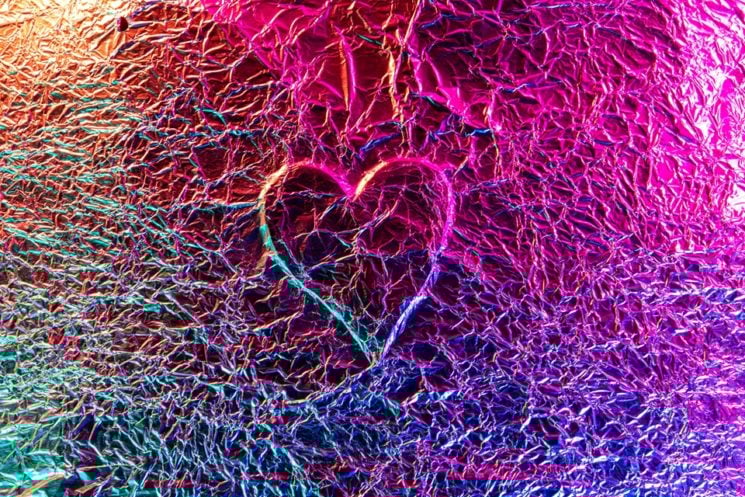
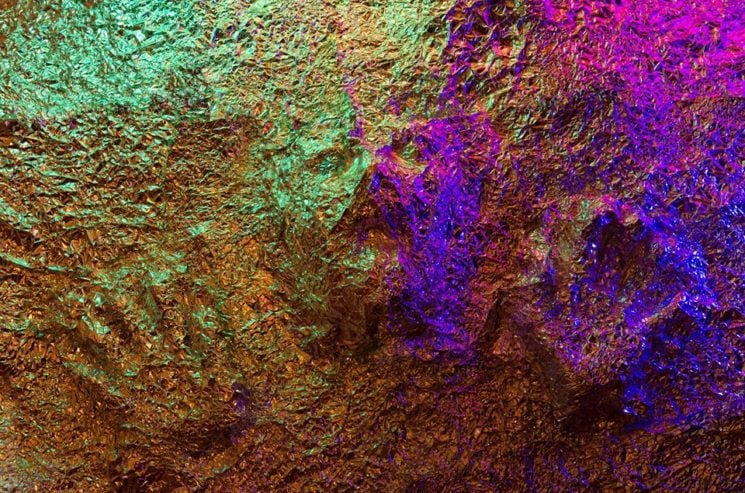
Finally, as for my photos, I made my “sculpture” and hung it onto a curtain with safety pins. It’s better to tape it onto a wall, but this position in my flat was the best for a number of reasons, so I just placed my “tinfoil demon” there. I tried out different lights. I used a bi-color Lumiee wrapped with a red acetate sheet and lit the foil at an oblique angle during a 2-second exposure. (there is also an RGB Lumiee, but I only have the bi-color one).

Then I tried adding two color-changing night lights. First I combined two of them on one side, and red Lumee on the other. Then I tried using only the night lights, one on the right and the other one on the left of the tinfoil sculpture. I experimented with different combinations of colors, but generally, I liked the results better when using two different colored lights. Here are two photos that I like best:

Tips and tricks
After chatting with the guys about this technique, trying it out myself, and watching Jason’s video, here are some tips and tricks from all three of us.
- When you mold the tinfoil, make sure to line it so that the shiny side is the one you light.
- As I mentioned, Tim and I used a pillow to mold the hands. Lay the tinfoil shiny side down on a pillow and press your hand into it. That’s a quick and effective way to mold your hand.
- Tim suggests that, if you’re gonna mold your face, start at your nose and work outwards. You can add a bit more detail once you take the foil off your face.
- I found it easier to make a large tinfoil sheet first by taping together a few smaller ones. Then, mold each of my hands and my face onto separate sheets and tape them onto the large one.
- When working with tinfoil, be extra careful not to tear it or pierce it because it’s very fragile.
Bonus tip
It was on 7 March when I tried this technique. The following day was Women’s Day, so I met my cousin Lena who gave me a beautiful carnation. That evening, I used my tinfoil from the day before and turned it into a backdrop. I flattened out the face and hands I’d molded and again experimented with different lights to take my photos. Here are some examples:


The final word
As I said, the possibilities are virtually endless: from different lights that you can use, to different shapes to mold your tinfoil around. After all, you can also use it as a backdrop for some other photos. What’s also important is that most of us already have all we need at home, so we don’t need to break self-isolation. And last but definitely not the least: the base technique is pretty simple, and it’s up to you if wanna upgrade it and even make it more complicated. :)
I hope that you were inspired by photos Tim, Jason and me made, just like they inspired me. if you’d like to check out more of their work, here are the links:
You can find me on Facebook and Flickr (and some of my food photos and recipes on Instagram), and if you need more ideas, check out one of these links:
- Eight ideas to help photographers survive self-isolation
- Self-portrait practice (a great self-isolation activity)
- 11 more ideas for spending time in self-isolation
- Ten ideas for photographers who are out of work due to the coronavirus outbreak

Dunja Đuđić Kalinin
Dunja Djudjic is a multi-talented artist based in Novi Sad, Serbia. With 15 years of experience as a photographer, she specializes in capturing the beauty of nature, travel, concerts, and fine art. In addition to her photography, Dunja also expresses her creativity through writing, embroidery, and jewelry making.


Join the Discussion
DIYP Comment Policy
Be nice, be on-topic, no personal information or flames.
6 responses to “Aluminum foil and some lights are all you need to create epic photos at home”
This could not come at a better time. I am already experimenting on techniques like that. Tin foil was the missing ingredient. Thanks!
You’re welcome! Feel free to share your photos with us! :)
Like the idea of experimenting, but the end result is poor.?
Thanks guys. I was looking for something creative to do and you got me going. My own effort looked a bit “dark side” so I added some flames for effect. I created the eyes by manipulating in Photoshop.
I a trying to share the photo but it won’t upload.
Sounds pretty cool and I really wanna see that. Try uploading to our FB page under the post :)
https://www.facebook.com/DIYPhotography/posts/2814514095251876
Hi, Dunja, I love creative ideas like that. Thanks for sharing it! While reading I was imaging you with the tinfoil on the face and I smiled, hoping that nobody saw you to be scared!