


Lighting Modifiers Cheat Sheet Card
May 10, 2010
Udi Tirosh
Udi Tirosh is an entrepreneur, photography inventor, journalist, educator, and writer based in Israel. With over 25 years of experience in the photo-video industry, Udi has built and sold several photography-related brands. Udi has a double degree in mass media communications and computer science.
Share:
 So we had a Portrait Lighting Cheat Sheet that was designed to help placing the light in space around the model. While I called it portrait lighting cheat sheet card, I was only telling half of the truth.
The half that I did not include in that card was how different modifiers will change the light falling on your subject.
It is time to correct this wrong, so this lighting modifiers cheat sheet completes this gap.
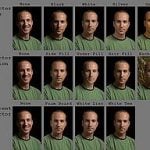
There are some new things on this sheet, like a perfectly still model, dark walls to control reflections and a few beers that you can not spot in the actual card. But they were there. Trust me.
")
You can download a “super size” here.
Again, we tried to keep it simple. We usually ask a wife or a boss to model for those kinda things, but since the differences between the modifiers can be subtle we wanted to keep everything constant but the light. So… We asked Lady Plastic to come to our aid on this one. She kindly agreed or at least did not mind.
What’s In The Card?
The card is divided into four sections, each dealing with a different type of modifiers. While there are lots more modifiers out there, I tried to include the more common ones.
Softboxes:
- 90x120cm Rectangle softbox
- 90x90cm Square softbox
- 20x90cm strip light in both vertical and horizontal positions and with grid
Umbrellas:
- A Compact 43″ White Satin Umbrella as a shoot through
- 43″ White reflective umbrella
- 45″ Silver reflective umbrella
Restrictors:
And some Miscellaneous
- 7″ reflector
- 240 x 50cm DIY V-card
- Gridded and non gridded 55cm beauty dish
- 550EXII driven 28″ Apollo
I have included links to products like the ones I used for the cheat sheet. While the brand is not always matching, the characteristics of the modifies remain (i.e. recessed Vs. not recessed, single screen Vs. Double baffle and so on.
Things To Notice
When choosing alight modifier there are several things you may want to notice.
Is The Light Hard Or Soft?
This is a relativity easy one, the bigger the light source the softer the light. This can be seen by comparing the square 80cm softbox with the rectangle 80×120 softbox. To compare check out the 7″ reflector on the bottom.
It is seen again when comparing the gradients on the 90×20 and 20×90 strip lights (OK, this is the same modifier mounted differently). When mounted vertically there are hard left to right gradients, and when mounted horizontally those become softer.
Is The Light Controlled?
By this I mean, is it hitting only where you want it to hit? Again several interesting observations:
I used three umbrellas and the shoot through umbrella was the best when it comes to contaminating the backdrop. Since the light can be treated as if coming from the umbrella, the model-to-light and backdrop-to-light ratio is about 1/2. When using a reflective umbrella the model-to-light and backdrop-to-light is about 2/3 so light on the backdrop is way more noticeable.
The best tools for taming light were (obviously) the grid and snoot. I was surprised to learn that the grid was more effective than the snoot and surprised again to see how limited barndoors are.
On the “others” raw I was not surprised, yet happy to discover under “scientific conditions” just how well the V card works for diffusion. It is basically a 240×50 cm light source and the light is soft accordingly.
Color Shift:
Last but not least, I wanted to refer to the color shift, we used the same flash for the entire test, however, not all the images are color balanced. I can attribute this to two factors: Some modifiers needed stronger bursts of light, on some flash models this can cause a color shift. More importantly is that the light did not arrive directly from the flash. It went through/bounced/reflected of a modifier, I suspect that not all modifiers have the same color shift properties.
How The Card Was Made
I hooked up with Ron Uriel a commercial photographer for this one. As he has more modifiers, and most of them are not DIYed too :)
Gear wise, we used an EOS 5D mark ii with a Canon EF 100mm f/2.8L IS USM. All Images (exuding the Apollo) were shot at ISO 100 / F11 with an old Bowens Espirt as single light source.
Here is a picture of the setup. It is about 130 cm from plastic nose to lens and about one meter from Plastic to backdrop.
")
We used a light meter to measure f/11 on Lady Plastic’s nose for each of the modifiers. Had to do this since each modifier “eats up” different amount of light.
Using The Card
As with all the Cheat Sheet Cards, feel free to print, share and reuse the card in a non commercial way. It is licensed under CC just for that.

Udi Tirosh
Udi Tirosh is an entrepreneur, photography inventor, journalist, educator, and writer based in Israel. With over 25 years of experience in the photo-video industry, Udi has built and sold several photography-related brands. Udi has a double degree in mass media communications and computer science.


Join the Discussion
DIYP Comment Policy
Be nice, be on-topic, no personal information or flames.