


Light up the Floor – A Floor Lit Table Top Studio Project Part Deux
Jan 12, 2008
Udi Tirosh
Udi Tirosh is an entrepreneur, photography inventor, journalist, educator, and writer based in Israel. With over 25 years of experience in the photo-video industry, Udi has built and sold several photography-related brands. Udi has a double degree in mass media communications and computer science.
Share:

After taking some shots with the Floor Lit Table Top Studio by Nick, It’s time to take it up a notch.
The previous article showed how to take great liquid product shots, though the set up can work for both liquids and solids.
In this part of the tutorial Nick will show a modification of the setup that allows you to add some color effects to the shot. If you like it, stop by Nick’s flickr stream and say “Hi”. In addition to showing your appreciation, you’ll get some great studio images and setup shots. Now for todays exiting twist:
By cutting a flap in the back side of the box you can get a whole new dimension to the pictures you can take.

Here, I have cut down about a quarter of the way into the back of the
box. With the flap folded down we can now see through the glass to the
background. By changing the black backdrop for a white one, we can
light it any color we like with a strobe placed on the floor and a
filter placed on the strobe head.

On the image that opens this article, I have placed a purple filter on the strobe head and set the zoom to 85mm. The back edge of the glass gives a nice horizon effect.

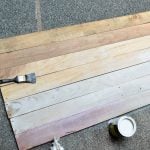
Here is the setup shot for the picture above.

The possibilities for this setup are almost endless.
So, I hear you saying, that’s all well and good, but what else can
this thing do? Okay, you want a quick and dirty product shot for your
e-bay auction. No problem. Close the back flap, put a piece of white
fabric under the glass and stick your auction item on top. Instant
light table.

Not the best product shot in the world, but very quick and easy.

Nice clean edges if you need to cut a complicated shape out from a background.

Dark items work really well with this setup. This is the setup for the elephant shot above.

Well, that really is all for now. I hope you found this article
useful. If you used this setup, I’d love it if you post your shots to DIYP’s flickr pool. Also feel free to send Nick a thanks note.
More Lighting:
– Getting Fired by My Daughter – a Homage to X Man
– Just Fab’s Turkey Pan Beauty Dish
– Lighting Diagrams, Planning and Explaining
– 3 Lights Studio for Under $100
– Homemade Speedlite “Snoot”

Udi Tirosh
Udi Tirosh is an entrepreneur, photography inventor, journalist, educator, and writer based in Israel. With over 25 years of experience in the photo-video industry, Udi has built and sold several photography-related brands. Udi has a double degree in mass media communications and computer science.


Join the Discussion
DIYP Comment Policy
Be nice, be on-topic, no personal information or flames.