Studio Lighting - Home Made Cheap DIY Backdrop Stand

Studio Lighting - Home Made Cheap DIY Backdrop StandIn The following article, Brian will demonstrate how to build a DIY backdrop stand. The stand, along with matching backdrop will help to create a controlled environment, with good subject/background separation. The cost is very low, just some PVC pipes, muslin and two really good hands. Oh, and a wife to agree to place this in the leaving room.

Backdrop Stand Instructions

Design sketch for a possible backdrop stand using 1-1/2" PVC pipe sliding inside 2" PVC pipes to allow adjustable width plus height, or the option to hang the top pieces from the ceiling or garage door tracks.

Note: Adapted from Todd Asher's design - see here:
http://home.mn.rr.com/rayzorfist/temp/
or here for more details:
http://forums.dpreview.com/forums/read.asp?forum=1025&message=4158683

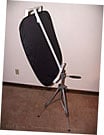
Another shot with the flash-lit diffusion panel setup with reflector and homemade backdrop as shown in the diagram in the Backdrop Stand folder. I like this one.

Design sketch for a possible backdrop stand using 1-1/2" PVC pipe sliding inside 2" PVC pipes to allow adjustable width plus height, or the option to hang the top pieces from the ceiling or garage door tracks (mine are 9'-3" apart). Dimensions are to fit a 9 x 12' canvas dropcloth, which is presumed to be rolled up on the 8-1/2' long (or 9'?) 2" PVC pipe. This pipe could be joined from two pieces for portability, however I would think it best to keep the canvas rolled rather than folded. I expect the friction between pipes would keep the canvas from unrolling, or else a pin could be used at one end similar to the manner in which the vertical supports use pins for height adjustment. Also note that the adjustable width would allow the cavas to be seamed along both sides for use in a wider horizontal orientation for a group photo. Better yet, create seamed loops on all 4 sides to allow a smaller tube to hang at the bottom to help keep the material straight. I would glue only at the 4 spots marked "G", leaving the option to remove two feet in the rear if propping against a wall is desired due to lack of space. Since I have not built this yet, I cannot vouch for whether this design provides enough rigidity to avoid wrinkles in a fully outstretched cavas of this size, but some strategically placed spring V-clamps could probably take care of that if necessary. Another option would be to put a couple of grommet holes near the top of each side of the canvas and use a bungee cord around the vertical post to stretch it out (would probably require pins through each end of the top horizontal pipes to prevent telescoping inward). Bungee cords may be a good idea anyway at all 4 corners.

Note: Adapted from Todd Asher's design - see here:
http://home.mn.rr.com/rayzorfist/temp/
or here for more details:
http://forums.dpreview.com/forums/read.asp?forum=1025&message=4158683

Other options can be added if you use T-connectors at the top instead of 90° Elbows. Option 1 shows how tubing can be added for multiple rolls (although it wouldn't be too difficult to slide one roll off and put another one on). Option 2 shows how an additional T piece could serve as a tilting canopy support over which to drape a backdrop or perhaps other opaque or translucent fabric (white sheet, rip stop nylon, etc) to create your own shade outdoors on a sunny day.

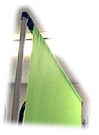
Backdrop stand with 9 x 12 canvas (7 x 11 finished size with seams) purchased at Sherwin Williams paint store for $20 (Home Depot had 9 x 12 canvas for $3 less but it had a seam down the middle and the material had a coarser weave). The cavas hangs from an 8 ft long 2" PVC pipe that can be temporarily fixed to the 1-1/2" PVC pipe inside by a thumbscrew which can be loosened to adjust the width. The thumbscrew screws snugly into a hole drilled into the 2" pipe, but loosely into a larger hole in the 1-1/2" pipe, just to prevent the pipes from sliding laterally when tension is placed on the canvas or stand. The canvas backdrop has not been painted yet - that's another ongoing project. Note: I don't recommend cans of spray paint at all for this (maybe for highlights), due to poor coverage and lack of penetration for a deep color (and a real mess of a garage) - at this point I cannot say what works best, only that I know it isn't spray paint.My guess is that a brushed-on or sponged-on (diluted?) water-based paint or else dye might be best.
Update: I may have found just the right thing for coloring cavas... Minwax brand water-based wood stain - brushed on. I am testing the "Verdigris" color (with an extra 8 parts of yellow to offset the slightly bluish tint to give a deep green color) which gives a very dark forest green color (diluting lightens the color a bit).This seems to be the perfect solution to getting a deep penetrating color without having to mess with soaking in hot dye solution or the potential problem with paint cracking or making the canvas too stiff. The stain has a completely flat appearance with no sheen at all, which is good. I am able to brush it on while the canvas is hanging, if I am careful not to load too much on the brush to avoid drips. I may use lighter shades of spray paint on top of this dark base color to add highlights or give a mottled pattern. Another potential advantage of this method is that if you don't brush it on too heavily, it does not soak all the way through, and so there may be the option of using the reverse side for a different color scheme.

Vertical pieces were cut to 4-1/2' long, which still allows them to telescope out to a height of about 8 ft.

A cotterless hitchpin fits snugly through holes drilled in the PVC pipes. Pin has a spring ball bearing in the tip which helps to keep it from sliding out. Ring on pin makes it easy to pull the pin out for height adjustment.

Details of canvas stitching. Approximately one foot in length was lost from each end to make the looped seams. A piece cut from the corner was doubled over in a triangle and used to reinforce the corner where a 1" aluminum grommet was installed (see next photo).

Grommet in corner of canvas allows tension to be placed on the canvas using a bungee cord to help keep wrinkles out of the material. Note S-hook installed at the top to allow the top piece to be removed and hung from the ceiliing. A T-joint was used instead of a 90° elbow, so that additional pieces may be attached in the future for other uses (e.g, boom to hold a hair light, or other ideas shown in the sketch).

Backdrop stand setup in living room, with soft light diffusion panel (slave flash) to right, silver auto windshield reflector on left, halogen hair light on top of backdrop stand and halogen spot light behind subject to light backdrop (see next image for diagram of the lighting setup).

Diagram of lighting setup. CORRECTION: Angle of light above subject is more like 30°, not 60°.

I used "Simba" for my first practice session with this Flash lighting setup to play with finding a good lighting balance (distances, angles, aperture, etc). I ended up using the flash diffuser directly on the flash, for two layers of rip stop nylon between flash and subject, due to relatively weak background lighting. Backdrop is canvas dropcloth from Sherwin Williams, stained with Minwax water-based wood stain. (Note: catchlights were already painted on the stuffed animal's eyes, which had a mainly flat, not convex, surface. 1/125 sec @ F2.8, 250mm, ISO 50).
As for the staining procedure, it's a long story, but here's what I did...After going through a half dozen cans of spray paint and then realizing it was just not going to cover it efficiently or soak in enough (canvas material's original color was still showing through), so I gave up on that idea, but already had the cavas sprayed all over with some dark green and gray.I then got a quart of the Minwax brand of water-based wood stain, Verdigris color, with 8 additional parts of yellow added in. Here are the other colors available... http://www.minwax.com/produse/water/puwbws3.htm I diluted the stain with 5 oz of water per pint (poured half of the quart can into a large coffee can and added 5 oz of water), then mixed and brushed it on as thinly as possible (to make it go farther) using a cheap short bristle brush. I had enough to cover the whole canas twice - a bit less on the second coat which was applied more heavily around the edges. I cannot say for sure whether the initial spray painting contributed to some of the mottling pattern in the final results (doesn't have much pattern though), but probably not much, because the stain was so much darker - it soaked in much more. I painted it while it was hanging on the frame, and didn't have any problems with running, as long as I didn't load the brush up. That's why I used a very thin, short 3" wide brush (cheapest one I could find).

Studio Lighting - Home Made Cheap DIY Backdrop Stand- bear

A rack added to the top of the stand to hold lights.

Studio Lighting - Home Made Cheap DIY Backdrop Stand- fixure

Note middle light is angled to the inside for aiming back towards the subject for hair light. I have some aluminum flashing material that I may fashion into a tube for use as a snoot.

Studio Lighting - Home Made Cheap DIY Backdrop Stand- fixure 2

120W Halogen spot light used to illuminate the background (hope you can read French ;)

Studio Lighting - Home Made Cheap DIY Backdrop Stand - bulb

View from above.

Studio Lighting - Home Made Cheap DIY Backdrop Stand -above

Closeup view of the vertical support shown at right in previous photo. It was necessary to add a nylon tether to support the weight added to the front by the rack of lights. To provide a place to connect the S-hook on the nylon cord, a T-fitting was cut in half and fit over the 2" vertical base to allow the 1-1/2" pipe to still slide inside.

Studio Lighting - Home Made Cheap DIY Backdrop Stand - pipe

The other end of the nylon cord is attached to the bottom leg through a hole and knotted on the inside.

Studio Lighting - Home Made Cheap DIY Backdrop Stand - end

Light fixtures are made from PVC pipe parts and socket designed for flood lights that can swivel and tilt. Fixture can slide along the horizontal pipe and is held in place at a slightly elevated angle by a cotterless hitch pin that passes through holes drilled in the pipes.

Studio Lighting - Home Made Cheap DIY Backdrop Stand - bulbs

Light socket is mounted on a PVC end cap and wired to the electrical cord with wire nuts and electrical tape before fitting the pipe pieces together.

Studio Lighting - Home Made Cheap DIY Backdrop Stand - end 2

Homemade outlet box with 4 outlets, 3 controlled by dimmer switches to adjust light intesity.

Studio Lighting - Home Made Cheap DIY Backdrop Stand - outlet

Outlet/Dimmer box with panels and knobs removed, showing dimensions and other construction notes. A better design, but requiring larger dimensions, would be to install each set of outlets or switches inside of an approved junction box, in order to minimize the exposure of wiring connections to combustible materials (wood).

Studio Lighting - Home Made Cheap DIY Backdrop Stand - dimmer

Top & bottom cover panels and knobs removed from outlet box.

Studio Lighting - Home Made Cheap DIY Backdrop Stand - box

Outlet/Dimmer box with panels and knobs removed, viewed from underneath, showing wiring details. For added safety, I recommend using a 3-prong plug with ground wire, plus GFCI type outlets.
WARNING: This device was not designed for outdoor use or wet locations, and may not even meet local electical/safety codes as shown. Sorry, but while I have confidence that my design works for my own purposes, I cannot accept responsibility for anyone else's faulty wiring. Therefore, use this information at your own risk, and please consult your local electrical code requirements or an electrician if you are unfamiliar with household wiring.

Studio Lighting - Home Made Cheap DIY Backdrop Stand - box 2

First test with real subject using slave flash/diffusion panel lighting with reflector and the new backdrop/stand. I'm not happy with the hair lighting (maybe should have moved it off to one side more), and I didn't fix his shirt, plus he needs a haircut, but the lighting isn't bad overall I think. I probably need to lower my main light a bit for better lighting of the eyes. (1/125 sec @ F3.2, 200mm, ISO 50) I plan to use only flash for main lighting of portraits and save the halogen worklight just for inanimate objects.

Studio Lighting - Home Made Cheap DIY Backdrop Stand - portrait

© 2002 Brian L. Zimmerman, BLZphotos.com

Get the DIYP greatness via RSS, newsletter and TwitterConnect with the community: Readers Photos, Discussions, Readers Projects

Comments

great site.. u are creative

thanks.. the info is great...
and saves alot of money too

Lopezcreations

Merci !

I just would to say thank you for all these explanations !
I'm going to build one for myself tomorrow.
Best regards,
Seb

Thank you very much for your

  • February 9
  • Axel Resto

Thank you very much for your detailed "DIY".

DIY

Thank you for sharing your valuable info and ideas with us.It is very much appreciated.It's people like you that make the photographic industry a worthwhile experience to explore.
The best thing anyone can do in life is to pass on their knowledge to others,which in turn will pass it on again.
Kind regards
Lionel

Thanks for your kind words

  • June 19
  • admin

Thanks for your kind words. Actually, I owe this part of the site to Brian Zimmerman who kindly agreed for me to post all those great DIY photography projects he built.

Amazing

Truly amazing project! I can't wait to try and build something similar..
thanks for sharing.

- Yonatan

remamber color code your

  • July 24
  • Anonymous

remamber color code your wires and also dont overlode the dimmers those dimmers can hadle only about six hundred watts. if posible get a electican to check it. i built one but a lot bigger i use it for theater.

What a surprise!

Ha! What a surprise to see my old PVC backdrop stand resurrected!

Apologies to those who are trying to find photos of my original design. They are long since gone, as is the stand. I've gone a different route using commercial light stands now. It's more practical for me since I have a lot more junk (er..., equipment) now. :-)

Brian, I appreciate the credit you gave me. Nice job adapting the design for your own use with the light bar.

Take care,
Todd Asher
www.tjasher.com

Just what I was looking for.

  • November 4
  • Anonymous

Just what I was looking for. Thanks!

One note about the wiring in your receptacle/dimmer box; I believe that the Hot wire is supposed to be routed through the dimmers and not the Neutral. To the best of my knowledge it's because Neutral is at the same potential as ground and so will not shock you, but the Hot side of the AC is at 120V and will zing you pretty good. So if you had routed the Hot side through the dimmers, assuming your dimmers are set to totally off, you could short the Hot and Neutral together at the lights without popping a breaking, because the Hot side is totally disconnected. The way you wired it, the wires to your lights are always essentially hot. At least that is my understanding.

Anyway, the way you did it will work just fine as long as your careful.

NOTE: I'm talking about wiring in North America.

Thanks again for the great ideas.

Plug/Dimmer Box

  • December 2
  • Anonymous Electrician

You are correct that the wiring is "backwards". Although the way it is wired will work, the hots (black wire) should be routed through the dimmers. Switches do not have hot and neutrals, they actually have 2 hots as all a switch does is break the flow of electricity. In this case the break (switch) is behind the lights, and you want the break to be in front of the lights.

Other safety recommendations I would make:
-Use the ground wires and a 3 prong plug, even if your house doesn't have the ground in the wall outlets, then use an adapter. You may be somewhere else with it that does have a grounded system. I can not emphasize enough how important it is to ground the system.
-Run the screws on the outlets in, even if you use the hole to put the wire in. Then wrap electrical tape around the sides of the outlets to cover the screws. This covers all exposed parts that are energized.
-Use a GFCI outlet as the first connection. Wire your cord to the GFI, then from the load side of the GFI go to your dimmers and wire as shown (except for reversing as stated above). The GFI will be a constant hot and not controlled by a dimmer. This gives you a safety trip for all devices in the box. You can use a GFI in place of the standard outlets if you want, but they are quite a bit more expensive, and you will need 1 GFI for each dimmer as there are not tabs to break off on GFIs, therefore wiring will be slightly different than shown. Be sure to read the instructions on installing a GFI as it is easy to wire it wrong.

Someone else mentioned the wattage of the dimmers. If you are using 600 watt dimmers, be sure the wattage of the lights on that dimmer does NOT exceed 480 watts (80%). If you use the authors design you will be fine as each dimmer is using only 120 watts.

By the way... the neutral can shock you.

Always unplug the box from the wall before taking any covers off, and when not in use. You can never be too safe with electricty!!!

As the author stated, use this information at YOUR OWN RISK. You alone are responsible for the proper assembly of all electrical devices. If you're not sure, consult a licensed electrician in your area.

DIY-ers Unite!

  • November 12
  • Warren

This is awesome!!! Thanks so much for the very well thought out, step-by-step plans! It's DIY folks like you that inspires the rest of us to think..."hey, I can do that...".

I love to do things "just because I can", even though sometimes the commercial ("store-bought") version is almost as economical. There is one thing about the DIY version the commercial version will never have, pride in workmanship (and creativity). I can't think of five words that give me more satisfaction than "I made it my self".

Great job!
Warren

great job guys

  • November 24
  • padilopadilan

thanks for all the usefull tips...a low budget photographer like me really need all this tips... any other tips??? ;)

Alternative

In Sweden plastic PVC pipes are expensive, but Party Tents are cheap.
I'll buy me a party tent this spring and will convert it to a background stand.

Until then I have two heavy duty stands which are too short, but some wooden planks made it long enough,
and a curtain rod from side to side. IKEA of course.

I agree that halogenlights is not good enough for peopleshots. Slave flashes are cheap and great
for backgrounds and can easily be diffused.

/F

Very nice

  • January 4
  • mgspeed

I was trying to figure out the best way to build a backdrop stand and came across this guide. Thanks a lot! Excellent look and functions great!

Questions about the home studio setup

  • January 9
  • Annastacia

Thank you for your helpful instruction: I have some questions about what I saw in photograph of the studio setup. Please explain how to make a Rip nylon diffusion panel. What kind of light was shown hanging above the Rip Stop Nylon Diffusion Panel? What is the difference between the flash on a digital camera and a Slave Flash. I am eager to learn. Thank you for helping me with constructing a home photo studio on a budget.

Lighting for Children Portraits

  • January 11
  • Inspired

What type of lighting should I use, when taking portraits of children between 1 month and 2 years old? I want great lighting effects without bothering anyones eyes. What lights would you use? Would you still use the same studio setup as discribed above?

Lighting for Children Portraits

  • January 11
  • admin

Hi Inspired,
The setup here might work for little kids. I prefer to use cold light for kids (i.e. flash). and to get the diffusion as big as I can. The octagon softbox works wonders for kids portraits.

Suggestion for Backdrop Stand Build

  • January 13
  • Bondo

I built the PVC backdrop stand for under $40! It was pretty easy, a hack saw cuts through PVC like a hot knife through butter.

I have a possible time/process saving suggestion for the building instructions. Instead of having to line up holes and drilling through the 2" uprights, just drill holes through the 1.5" risers, put a bolt through the hole, and let the weight of the crossbars hold it in place by resting on the bolts. That may not work if the height is raised too high, but it works great under my 8' ceilings.

I'm getting ready to add one more upright so I can create a "corner" using of my huge muslin backdrop (backdrop also created/dyed through the tutorials from this site).

This site is very informative. Keep up the great work everyone!

WOW i was looking for a way

  • January 16
  • j g

WOW i was looking for a way to make my own back drop stand and this is it i cant believe how awsome and very neatly this looks .. thanks.

Very Nice

  • January 20
  • K. L

Thank you for posting this design, i've been working on one for a while without sucess and you provided me with the info nessassary to complete my stand.
thanks so much

Amazing

  • January 30
  • nikongirl

I am in the process of opening a small home based studio. This looks like a great project for the stand and ligthing options I may need. Can you recall the approximate cost??

Excellent job...thanks so much for sharing. You made my dream that much closer to reality!!

Yours in Photography,

Amanda

Thanks

Thanks for sharing the tips!

Softbox - diffusion panel

  • February 10
  • Inspired

How would I go about construction an octagon softbox? What is the difference between using a diffusion panel or softbox?

finally, the best pro

  • February 13
  • Anonymous

finally, the best pro looking homemade lighting with detailed info....Thanks a lot

Thanks!

Like Todd, I've been using light stands. I use a piece of pvc pipe with holes at each end to drop into the tops of the light stands and fabric, hemmed at the top only, runs along the pvc pole like a window drape; it is loose at the sides and bottom. BUT, that doesn't address the lighting, and your article does so thank you so much for this!

I was told that if you are photographing small children, put a bean-bag chair behind the fabric and push it forward a bit so that the fabric hides the bean bag chair, but makes a perfect place to nestle a little bitty person while you are photographing them.

Alfie

Hitchpins

  • February 25
  • Sam

Great DIY guide.

For anyone struggling to find hitchpins they're also known as detent pins.

not so sure

what a waste of time. why not spend 120 bucks and buy a professional backdrop stand and spend your free time photographing.

sure too

  • March 23
  • admin

Hi There,
Well, on one hand you are right, if you can spare the bucks, get pro gear. If you can not however - you can get much fun from making the studio constructions. plus they are way (WAY!) cheaper.

Waste of time?

  • July 11
  • Anonymous

Why would you attack this alternate way? Many of us are creative and like alternate methods.
To each his own but don't say it's a waste of time for those that enjoy making their own. I made an overhead studio light out of a strand of clear 150 Christmas light string. I wrapped in a circular motion on 1/4" plywood from inside to out. It hangs from my drop ceiling and the results can be quite different from anything that you can buy. The effect is wonderful!

interesting idea

  • July 11
  • udijw

Hi,

that sounds like an interesting idea. can you contact me via the contact pages? we can make a tutorial.

regards,

Udi


Not a waste

  • August 13
  • Anonymous

Don't be so rude. Someone is sharing their way of doing things which for me is very helpful. Sure you can BUY the stand, and the backdrop, and the camera, and the tripod...etc. etc. But after it is all said and done, how much money are you looking to be out of? Thanks for displaying your blueprints. I am on my way to home depot today!

Superb

I used your design as a basis for mine though it's just 9foot by 9foot.

I am however having trouble with keeping it solid, have you had this issue before? How was it cured if so?

Thanks for providing this information!

Can you place some pictures?

  • March 23
  • admin

Hi Phil,
I am not sure I understand. can you place some pictures?

PS.
I visited your site, great portraits.

Stability

Hi, sorry for being brief in my description, I will be using it again this coming weekend so will be able to post photos.

However, I will try another description again.

The stand doesn't seem to want to support it self, it twists and falls often, unless it is leaning against something, to cure this I thought of joining the legs together from behind to stop them moving apart, and using a slip rope to tether the top of the stand to the back of the legs to stop it falling forwards.

There seems to be a little flex in the PVC Tubing I am using.

Ps. Thanks for your kind comments regarding my portraiture, there are a few more there now, ones with the white backdrop was supported with the backdrop stand :)

Tips are really useful and

  • May 29
  • Anonymous

Tips are really useful and impressive....good work guise....

Other materials

I used heavier PVC piping, 1 1/2 inch, which makes the stand more steady. The heavier pipe allows a wide stand, mine is designed for 72" material. Also, my version has separate crossbar and backdrop bars. This makes changing colors easier.
http://diygreenscreenstand.blogspot.com

Thank you SO VERY MUCH!!!

  • June 22
  • Lex

God Bless You...

I thought I would actually have to buy thousand dollars worth of equipment just to practice some studio photos. Thank you for show us the thrift way of doing photography.

What a way to start a journey!

  • July 4
  • Sam Adeyiga

Just here to say thanks so much for all the tips. This is a good starting point like TJ Asher. Hopefully I'll step up higher within a few months. Well appreciated.

Why the edge loops on the cloth?

  • August 14
  • Murali

I understand the reason for the loop on the top (to hang it on the pipe) but why the loops on the sides? Is it to slide it through the side poles (to keep the cloth tight?)

Why did you loose a foot of cloth on each side for the loop?

Muslin Design?

  • September 1
  • DavidN

That's very nice-looking muslin that you're using. Did you make that design yourself? Did you buy it someplace?

I'd really like to make something like that myself if possible - and the tips on this site are really great for figuring out how to do that - but I haven't seen a DIY design that's looked as nice as yours does. Thanks a lot in advance!

Those Lights!!!

Some how i missed something... did you buy those swiveling light fixtures that capped to the ends of the pvc??? Where and how much???

Backdrop rack- just what our quilt show will need!

Thank you so much for the "how to" on making this backdrop rack. Need some racks for a quilt show our little museum is putting on..this will work!
I am going to make one today to put a quilt on display at the bank. I was looking for something I could modify to hold two quilts back to back...the light addition will work, with a 2nd set of smaller pvc pipes for stability. Perfect!

Marge Campbell
Littlefield, TX

backdrop stand & lighting

  • October 18
  • Laura Wright

I have been needing something of this sort, but something with portability. Any siggestions?

Great idea and instructions.

  • November 1
  • Sandy Anderson

Great idea and instructions. I had the general idea but could not figure out how to put it together. I need a small backdrop frame (6'x6') for photographing dogs. I will edit the background out and could not decide what color to use. Finally settled on bright blue as it will contrast with all dogs. One thing I will do different is to make the backdrop about 5' longer so that the dogs can sit on it. This will make a continuous color from back of dog to beneath dog. Thanks so much for the tip!

Thank you! Just finished mine and used it...

  • November 10
  • Shanon

Thanks for the plans. They worked great for the backdrop stand. I finished mine last weekend and used it this week for the first time and it was so easy to do! The only thing I did different was add caps to the end of the base pieces so they wouldn't rock back and forth.

add to the idea

  • November 23
  • jill

http://diygreenscreenstand.blogspot.com I like this guy's idea too. you need to have something to keep it from tipping over. I am in the process of making one that you can disassembly to go on location.
And since I am not that good with electric.. what about the clip on lights. I also have used flood lights. but they get very hot. I also wanted to make a stand to hold my reflector, but I guess they are not that expensive.
Great website. thanks. ----
ps: if anyone can recommend the best website hosting. I want mine to look professional but cheap. (of course). I am looking at yahoo. any thoughts. mmm

good websites

Jill~
i've used smugmug as my photo site for over a year. easy to use, full of options, and 3 different price ranges. www.smugmug.com

i have the professional site option so i can charge for photos.

Amy Lindsey

Took your idea and gave it a twist

  • January 7
  • Cameron

I took your idea and gave it a little more flexibility. I made 3 separate separate units, each with a built in fuse, and with tap on/off dimmer. It's great for letting me adjust the main 3. The best part was it only cost me a total of $14 since I had everyhign laying aorund except the dimmers and two gang covers.

Backdrops stand

It looks like a great prodject. Wish I was handy enough to do it. I purchased all my equipment, but I think honestly in an in home studio or small studio, I would rather have this set up. It's way easier than what I deal with.

Great job in sharing the information.

:) Happy New Year

another idea for lighting

Instead of fixing the light fixtures to the bar you added across the front, you could attach the light sockets to hardware store clamps to make them movable. Or you can use hardware store clamp work lights (the kind with the aluminum bowl shaped shade), they pivot and swivel allowing them to be angled in all sorts of directions. The aluminum shade helps reflect light forward, and provides a great place to add a homemade snoot.

I'm going to try making this...anyone know how sturdy it is? Also, how much fabric weight can it support without danger of it tipping over on subjects? Do you think it would be possible for me to extend the top bar to allow a 10' piece of material to hang?

Lights

  • February 26
  • Darren Parker

Hey hi are you doing. I want to know how did your lights setup come out.. I'm in the process trying to do the same setup...But how did you make your snoot to fit on the aluminum bowl..Do you have some instruction...Also did you use a dimmer control to turn down the light...Thanks

Thank you for your tips very

  • March 10
  • Cath

Thank you for your tips very helpful

Something i have done is

circle clothesline with plastic pegs ($2)

i take the pegs off..leaving the hook on the end
and i peg some plain material on my curtain rod over my already hanging curtains (using the hooks on the peg ends)
works well the hanger is already there....

Lights

  • March 20
  • Leo

Has anyone looked at the new energy star lamps?
I am using a three way set of two.
Great diffusion and no heat.

Homemade Backdrop Stand

  • April 21
  • Valerie

I just finished making the stand. What an easy project. I had to use 2 and 1 1/2 inch ABS pipe (the black plumbing stuff), instead of PCV. Works just as well. Another helpful hint, have your local hardware store cut the ABS pieces for you. It's also cheaper to by the 12 foot lengths and ahve it cut then the little peices (3 and 6 ft lengths) This is what a used...

(2) 2"x5' ABS Pipe
(4) 1 1/2"x5 ABS Pipe
(1) 1 1/2" coupling to join 2 5ft sections of the 1 1/2" peices for the fabric to hang on.
(4) 2"x18" ABS Pipe (legs)
(4) 2" Test caps (legs)
(2) 2" Sanitary "T"
(2) 1 1/2" Sanitary "T"
(2) 3" eye screws

I used plumbing cement to glue the "T" to the legs. The hole contraption can come apart in 3 managable peices for transportation. Thanks so much for this design! If anyone has any questions on how to make this email me at boyer.ve@forces.gc.ca!

Drawing for this stand

  • January 24
  • jptphoto

Is there a diagram or picture of this stand you can email me? I won't to try to put one together.

Thanks

Woot, love pvc piping

  • May 25
  • Alex

Just want to second Lionels opinion from the second post.

Unfortunately i can't say thanx to everyone, but i try my best.
I am using something like this and and developing a movable stand for the reflector. Something like the one that was posted up around here also, but just for the reflector and not the complete thing.
I love this place. Keep up the great work. I will make sure to pass it on and hope that it helps someone and that in turn helps you too. Now back to my DIY inventions.

Simply Stunning!

A revelation! One that's a long time coming (for me). I have a past history in Theatre and stage, and I have always wanted to recreate the idea of a cyc-cloth (cyclorama), coloured foot/back lighting, overhead spots (including snoots, barndoors, cutouts and gels) and the supporting framework, incl. lighting box, all as a part of my photographic studio, but coudn't see past the cost of it all:
- continuous backdrops;
- strobes + power + accessories;
- Soft boxes, lighting banks, diffusers etc.

With your site, I now see what is again possible and I'm excited, thanks very, very much.

I especialy love the lighting bar that you attached to the backdrop frame.

One question, with your backdrop canvas, do you just buy a plain whiteoff-white canvasand then paint it whatever color you want?

Do you think this frame

  • September 11
  • Kae Tibando

Do you think this frame would support the weight of a 9ft roll of seamless paper backdrop?

Cheap, Easy and It Works!!!

This tutorial helped out a lot when I built my version last year. I didn't add all the bells and whistles, just the stand, but I painted it and that reduced the home made look a little.

This is about the best tutorial around, great examples and explanations. Anyone interested in building a stand should read this thoroughly first.

Here is my write-up on building a custom backdrop stand that I built after reading this tutorial.

backdrop stand

  • April 8
  • Anonymous

how much did the pipes, pins, glue and other permanent accessories for the stand cost you? Can you send me an email with the amount?

Thanks,
Sanna

awesome

  • December 13
  • RJ

awesome write up!..i will do the back drop stand soon when i have the time...

I built this and had some

  • February 14
  • Hilary

I built this and had some issues with stability. While changing a roll of seamless, the thing came apart and almost hit my model. Think it's probably great for a permanent studio setup with no seamless/muslin changes. Just a heads up.

Tips to Stabilize Base

  • February 15
  • Satendra

On both floor touching bottom legs, there is PVC “T” at the center (like this ╩). From this T, every frame part is supported. Do the followings, to make dam rigid base.
1. Measure horizontal leg length (suppose two feet) and its diameter (suppose two inch) of PVC pipe. Get FOUR pieces of one feet and eleven inch length and one & half inch diameter SOLID cast iron rod from any junk yard or mechanical shop.
2. On the two iron rods (for bottom floor), get half inch female threading at the center from machine shop.
3. On the remaining two rids (for vertical), get half inch male threading at one end only from machine shop.
Now insert bottom floor iron rod (2) into PVC pipe and look for the female threading through PVC “T”.
Now insert and rotate vertical treaded male thread rod (3) into 2. Tight it with teeth wrench.
Now slide the Center vertical PVC pipe into vertical iron rod and PVC “T” . By this way PVC pipe and Iron pipes can be further fixed permanently by use of insulating solution in between free tolerance, if any.

To help steady the base.

  • February 18
  • mrmac

Two things come to mind....

1. If you're going to use the over-head light bar, or heavy fabric, make the upright support foot, on the front, and extra 12" longer.
2. Fill the upright supports (or feet) with cement. Remember to let it set, before fixing the 2" upright in place.

thanks

  • March 19
  • shamim

i had similar ideas on how to do a backdrop framework but just the thought of getting it done made me go numb in the brain. having found my doctor u, u just made things look so simple. i will most definitely look u up again. thank u sooooo much

Phenominal Job

There goes my plans for next Sunday. I'll be at Home Depot. They'll think I'm building some contraption to smoke that mary-jah-wanna.

great idea!! thanks for

great idea!! thanks for sharing

Great idea.

I really like your setup. I am going to assemble my own tomorrow. Nice to see that you don't need to spend thousands to get great lighting. Great job!!!!!!!!!!!!
Garry

thanks!

  • May 2
  • timmy

this is so helpful! super thanks!

the Sherwin-Williams drop cloth had a seam

Yesterday I went to the local Sherwin-Williams paint store.

Yes they had a 9x12 foot drop cloth but one look at the package and I could see what looked like a seam right down the middle.

I did not buy it.

Could you supply a SKU or other brand / label information so I purchase the correct item?

Thank you.

Terry Thomas...
the photographer
Atlanta, Georgia USA
www.TerryThomasPhotos.com
TerryThomasPhotos(x)gmail.com

One of the best on the internet.

I just finished building mine in the garage. I have to say that this is one of the best DIY photography builds that you can find online. very well thought out and functional. super functional. I used clamp lights and CFL lamps instead of the halogen. And I used thinner PVC 1.25" and 1". it's still very sturdy and causes no trouble. thanks a lot for posting this. Follow me on twitter.
http://twitter.com/WhizSearch

http://whizsearch.blogspot.com

Portable setup

Has anyone ever built something like this that is portable? I'm going to have to do my set up in my living room also and with 3 children and a Great Dane, there's no way it can stay up. So I need something that goes up and down quickly. I'd also like to start doing portrait parties and want to be able to bring a studio setup with me. (And I'm kind of...mechanically challenged we shall say so I don't know if I'm going to find anything that fits all my needs.)

Thank you posting these step by step instructions! I'll definitely keep this, and if at some kind we have an "extra" room - my husband will have a great weekend project! :)

THANK YOU!

  • August 11
  • Courtney

seeing as I'm going to be doing online classes for my bachelors in photography, this is going to be ideal for me! i thought i was going to have to spend loads of money on equipment, but this gave me a TON of ideas.

THANK YOU!!!

re: no, thanks you

  • August 11
  • udijw

Courtney,

This is one of the most heart warming replies I ever got. when starting this site students were on the top of my mind so knowing I got a hit is a splendid thing. Thank you.

Oh. well I am glad you had

  • August 12
  • Courtney

Oh. well I am glad you had us in mind! :]

i've been looking through the site and have been getting a lot of ideas that are really going to help me. i really do appreciate the time taken into this helpful site! it is definitely bookmarked!

wow

  • September 9
  • Twain

this is really cool.
you are really creative.

thanks.

This is Amazing!

This was great of you to share. I have made all my own lighting equipment and backdrops, but this background stand is amazing. Mine was two hooks in the ceiling to hold my rod up. Now I will have a portable backdrop.

THANK YOU!

WEDDING BACK DROP

  • October 25
  • Anonymous

HI WAS LOOKING TO GET A BACK DROP FOR WEDDINGS, FOR BEHIND TOP TABLE. LIKE THE STARLIGHT ONE WITH TWINKLING LIGHTS. DO YOU THINK THIS DIY PVC TUBS WOULD BE SUITABLE REGARDS

Backdrop

  • November 2
  • Scotty

What a great idea! This is the coolest DIY setup I've seen. Thanks so much for taking the time to share with all of us. I'll be building one this week for sure! (COOL! I get to break out the power tools!)

Thank you

Your ingenuity and detailed explanations have opened up many doors!

Well done - thank you.

-R

love the color!

  • November 29
  • hal mooney

You've gotten REALLY close to Monte Zucker's famous "Monte Green" background, which he swore was the perfect color for nearly every portrait. I can't begin to afford a real one, so I'm definitely going to try painting one with your mix. Thanks a lot!

This is Hot!

  • January 4
  • Ms.Sheena

Thank you so much.... simple but yet so brilliant I couldn't find a cheap stand for my backdrop for a motorcycle the a well know motorcycle show but this will most def. do the trick... now I gotta have some one help me make it!

Awesome blog! I love the way

Awesome blog! I love the way you got into details about making the background. It was very helpful and seems like an inexpenive way to create exactly what I need.

owww really good job.well

owww really good job.well done.keep it up.

Thanks for the inspiration!

  • February 1
  • rs2sensen

I created my own stand based upon your concept. I decided I wanted a simpler mechanism to control the height of my stand, so I built it completely modular. If you look at my pictures below, you will see that all of my vertical and horizontal are exactly the same length. I can either hang my muslim from the top, or lower pole. Each of the little pieces on the bases are all the same size. If I need to get a bigger (or smaller) stand, I simply have to plug in a bigger or (smaller) tube.

I went with 3/4 inch PVC, because I wasn't planning on mounting any lights onto the frame. However, my current design is so sturdy, I really feel like I could safely do so if wanted.

If anyone has an questions about questions and stuff, please feel free to ask!

re: modularity

  • February 1
  • udijw

This is a great design, rs.

From the looks of your placement, I guess it is not a permanent setup. I think that the "break into halves" concept will work great in the sense that it will be easier to setup. I mean all the pipes are the same length so you dont have to look for em.

If you do have some constraints on those, you may want to color code the corresponding edges.


Outlets

  • February 2
  • Bill

I did my own variant to the electricial set up, I ran individuial 10' feed lines to each dimmer, which shared a double box with the plugs, and then ran another 10' line out of the box so I have the ability to plug right into the box or move my lights out.

Post new comment

The content of this field is kept private and will not be shown publicly.
CAPTCHA
This question is for testing whether you are a human visitor and to prevent automated spam submissions. It is not case sensitive
13 + 0 =
Solve this simple math problem and enter the result. E.g. for 1+3, enter 4.