


Try this Cheap and Easy DIY trick to create magical bokeh portraits
Jun 23, 2025
Alex Baker
Alex Baker is a portrait and lifestyle driven photographer based in Valencia, Spain. She works on a range of projects from commercial to fine art and has had work featured in publications such as The Daily Mail, Conde Nast Traveller and El Mundo, and has exhibited work across Europe
Share:
Great portraits don’t always require a perfect location or expensive equipment. Sometimes, all you need is a little creativity and some basic DIY gear to turn an ordinary space into a dynamic photoshoot setting. You can do magical things with a little ingenuity and a few household items.
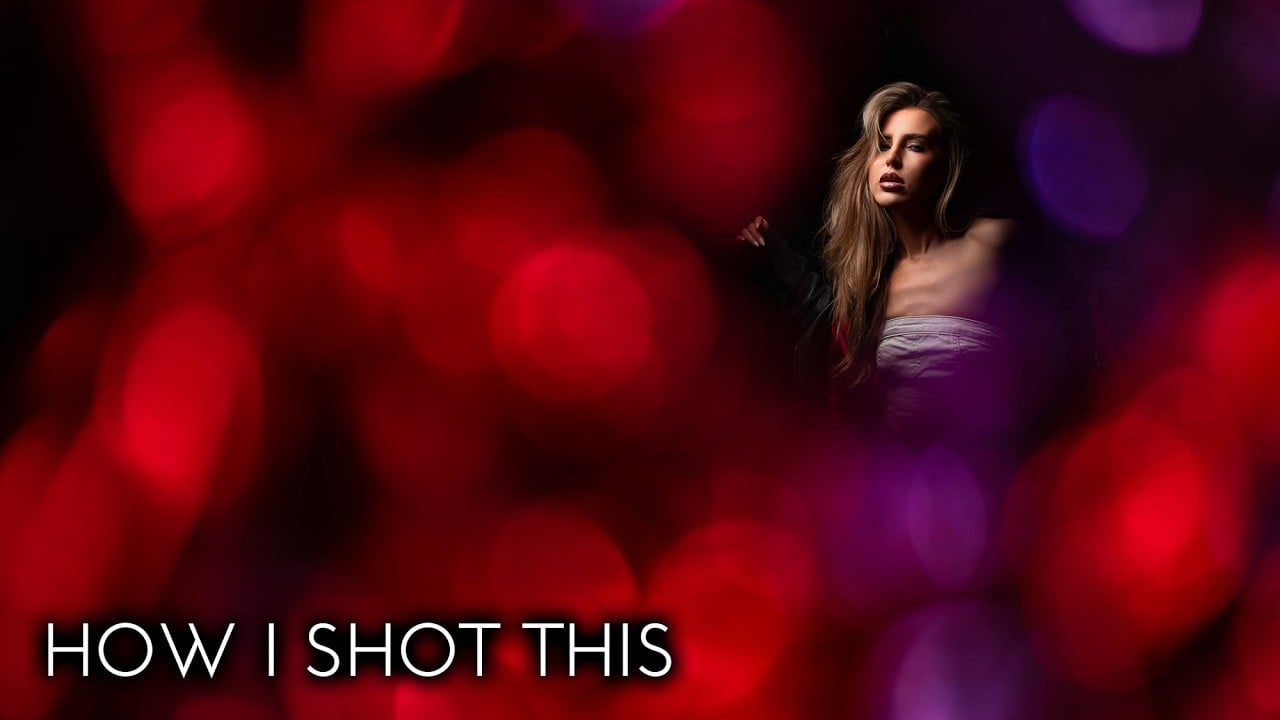
In this video, portrait photographer Neil Redfern shows us how he shot striking bokeh portraits using off-camera flash and tin foil, proving that even a humble garage can become a studio with the right techniques.
Making Something from Nothing
Neil’s approach is based on the idea that photographers shouldn’t rely solely on their surroundings. Instead, they should create their own light and atmosphere. Whether shooting in a bland wedding venue or, in this case, a featureless garage, off-camera lighting and inventive setups can produce professional-looking results. The key is controlling every element, from the background and foreground to subject lighting, to craft a cohesive image.
Simple Yet Effective Equipment
Neil used a straightforward setup: a camera with fast prime lenses (35mm f/1.8, 85mm f/1.4, and 105mm f/1.4) for that shallow depth of field. For lighting, he relied on a MagBox Pro 24 with a Godox V100 flash as his key light, gridded to prevent spill onto the background.
Two Godox V860 speedlights with coloured gels (red and purple) illuminated a crumpled tin foil backdrop, creating vibrant bokeh. For extra depth, he added an AD200 with an ND filter behind the model as a subtle rim light.
The Setup
First, Neil positioned his key light (the MagBox) above and slightly in front of the model to create soft, directional light with dramatic fall-off. The grid ensured the light only hit the subject, keeping the background dark and clean.
Next came the DIY magic: a large sheet of crumpled tin foil, carefully uncrumpled to create texture, with a hole in the centre for the lens to shoot through. Placing the foil close to the lens (but out of focus) allowed it to dissolve into soft, sparkling bokeh when lit.
Two speedlights with colored gels were placed on either side of the foil, set to low power (1/128) to avoid overexposing the bokeh. The result was a dreamy, colourful foreground that added depth and interest without distracting from the subject.
Camera Settings
Neil shot at wide apertures (f/1.4–f/1.8) and used a fast shutter speed (1/1250s) to overpower ambient light, ensuring the background stayed dark and the bokeh remained soft. Keeping the ISO low (50–100) prevented noise, while manual focus helped avoid autofocus struggles with the textured foil.
Creative Variations
Swapping lens focal lengths changed the look entirely. The 35mm gave a wider perspective with smaller bokeh, while the 85mm and 105mm produced tighter, more pronounced bokeh balls. Changing gel colours (like blue and purple) also shifted the mood instantly.
Neil’s biggest tip is to build the shot step by step. Start with just the key light, then add the foil backdrop, then the coloured lights, and finally any rim lighting for separation. This methodical approach ensures control over every element.
Final Thoughts
Neil proves that you really don’t need to spend a ton of money to create interesting and beautiful portraits. You can do a lot with a few DIY props and household items. It’s easy to experiment; you can try different gels, foil textures, or lighting angles to make the look your own. Or even try using different materials other than foil to see how those look. The possibilities really are endless!
Share with us what you end up making!

Alex Baker
Alex Baker is a portrait and lifestyle driven photographer based in Valencia, Spain. She works on a range of projects from commercial to fine art and has had work featured in publications such as The Daily Mail, Conde Nast Traveller and El Mundo, and has exhibited work across Europe


Join the Discussion
DIYP Comment Policy
Be nice, be on-topic, no personal information or flames.