


How to Prepare Gear for Massive Video Shoots Abroad
May 1, 2014
Guest Author
We love it when our readers get in touch with us to share their stories. This article was contributed to DIYP by a member of our community. If you would like to contribute an article, please contact us here.
Share:
One of the biggest challenges with any creative production is gear management. At the start of my time as a creative, I don’t know how many times I have arrived at a location and realized a crucial part of my kit was missing. However, like most things, you only learn from your mistakes and what I have learned is that it is extremely important to create checklists and prep gear BEFORE heading out to shoot. Although it does take more time to do this, it will save you time and heartache from going out to get a shot and realizing you don’t have everything you need.

Now I must admit, my least favorite part about filmmaking is the gear prepping. It’s a fine balance between taking too much and taking not enough and this battle is unique for every job. This is especially critical when traveling. With this post, what I hope to do is talk about how to prep your kit when traveling abroad. I will use a recent project to Cuba as the case study.
*Note: I am by no means an expert but here is what I have learned up until this point.
A PLACE TO CALL HOME
Prepping gear can pose many challenges depending on the needs of each job. What is even more challenging is packing when traveling abroad. Weight is the primary concern when traveling. Every small piece of gear needs to have a purpose. Here are a few tips to consider when selecting your gear. Please note that every trip will be different so use these points only as a starting point. The longer and more strenuous the trip, the lighter pack that you will want to have.

- Use Lightweight Tripods. My go to tripods are the Manfrotto 190CXpro’s. They are great lightweight carbon fiber tripods.
- Lots of Batteries and Cards. Although adding more weight to your pack, having more cards and batteries will allow you to shoot longer and not worry about dumping your footage or charging batteries. Any trip under five days I will try bring enough to get me through the trip so I do not need to worry about bringing computers, hard drives, or charging solutions.
- Work with Zoom Lenses. I try work with zooms as much as possible when out shooting as it reduces the amount of lenses you need to carry with you yet allow you to have a wide range of focal lengths to choose between. I know a lot of people completely disagree with me on this point but this works best for me. For trips under three days, my go-to kit is either the Nikon 14-24, 24-70 and 70-200mm or the Canon 16-35, 24-70 & 70-200 depending on which brand I am shooting with.
- Lightweight Motion Controlled Gear. If wanting to travel with motion controlled gear, it is important to find light-weight solutions. My go-to gear is Kessler because of it’s build quality, reliability and team behind the gear. I typically either travel with the Shuttle pod mini kit (2 x 2ft sections) or 2ft Stealth slider and basic controller powered by the ION Battery system.
- Small Audio Recorders. For all my time-lapse films, audio is an integral part of the film. There are many great solutions and most of them do a great job.
- Balance your kit. When carrying heavy loads, you will want to make sure your kit is balanced. By doing this, you will be able to carry your gear for longer periods of time and not struggle with a sore back. For shorter expeditions, I am using the F-Stop Tilopa BC and for longer treks I am using a pack by Eberlestock.
- Refine your kit. With each trip you take, you will learn what works best for you. Make sure to take notes along the way for modifications you can make to your kit.
Creative direction plays an integral role in determining what type of gear to bring with you. Below is a look at how we decided to approach the project we shot in Cuba.
A PLACE TO CALL HOME MAIN VIDEO – BEHIND THE SCENES
When approaching this film, we wanted to have as small of a kit as possible while also being able to produce polished looking sequences. Everyone will have their own approach but attached is a breakdown of the kit we decided to take with us. Gear-wise, we decided to shoot DSLR and took a hybrid approach shooting both Nikon and Canon. I shot with the Nikon D800 and Brent shot with the 5D Mark III. It was interesting to see in post how we were able to push each of the images and it was easy to see how much easier it was to push the images that came out of the D800. For support gear, we had the Kessler Pocket Jib Traveler, Kessler Stealth, HD4000 Glidecam and a monopod. In the video below, I walk through the kit that I took with me to Cuba to shoot the film, A Place to Call Home. In the post below, I want to dig a little bit deeper into the process as well and give a few tips for packing when traveling. Also, the packing done in the video has a few elements that was different on the trip. For the accurate list, please see below.
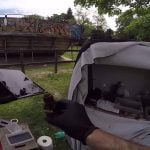
CASE 1 WEIGHED 68 LBS

Note: The kit I mentioned in the video was organized a bit different for the trip. I’ve attached an accurate list below.
In the main compartment, I had the HD4000 Glidecam, the Kessler Stealth Mini with flat mount adapter, a Manfrotto 190CXPRO tripod, the Lowell Blender light and Kessler Ion Battery, 2 pairs of jeans, 2 pairs of shorts, the Lenskirt, Audio Kit #1 (1 x Rode Lapel & Tascam DR100), dress shirt & pants for my brother’s wedding in Jamaica and the Manfrotto 128RC tripod head. In the middle compartment, I had the Bose portable speaker, FSTOP traveler bag, the Thinktank retrospective 30 (not pictured in video) and the mili backpack. In the top pocket I had underwear and socks and in the bottom pocket I had extra shoes, sandals, a multi-tool and hex key set.
CASE 2 WEIGHED 50 LBS

In the main compartment of bag two, we had the Kessler Pocket Jib Traveler, the Manfrotto 190XPROB (not pictured in video), Audio Kit #2 (1 x Rode Lapel & Zoom H4N), Manfrotto lightstand, 5 pairs of shorts, 5 t-shirts, 4 dress shirts, Kessler All Terrain Outrigger feel, a pair of jeans, sweater, and a polo. In the middle compartment we had the bounce, 3 Kessler short plates, 3 low profile ball heads, 2 pairs of jeans, and 4 shirts. In the top compartment we had 20 Clif Bars and a bunch of lifesavers. In the bottom pouch we had gaff tape, short sash, small zip ties, and the extra duffel bag.
CASE 3 – CAMERA BACKPACK

The last bag I took with me was my carry on. In the carry on I had a Nikon D800E, Nikon D4, Nikon 24-70mm 2.8, Nikon 70-200mm 2.8, Nikon 24mm 1.4, Rode Videomic Pro, 6 x 32gb CF cards, 4 x 64gb CF cards, 3 x 1 TB Western Digital Drives, filter kit, Macbook Pro, IPAD, lens and sensor cleaning kit, 2 intervalometers, money clip, zip ties, gaff tape, and batteries / chargers. The key item that wasn’t included in the video that I had as a carryon was the Guerillapod. I did this to ensure that I had some sort of way to stabilize my camera if my checked bags didn’t show up.
A PLACE TO CALL HOME MAIN VIDEO – WHAT’S IN THE BAG
Before heading out to any location, it is key to ensure all your gear is prepped and in good working order. For me, I even go to the point of making sure both my lens and sensor are clean. Regarding cards and batteries, it is important to find a workflow that will ensure you do not lose data and do not get charged and empty batteries confused. When I have filled up a card, I will take a piece of tape and place it over the edge of the card so there is no way of putting this card back into my camera. I will then label the card with what camera the card came from and the date. As for dead batteries, I will do the same thing. When I take a dead battery out of my camera, I will place a piece of tape over the contacts so I know the battery is dead.

Maintaining Gear / Preventative Measures
Gear can be very costly and in order to ensure that you get your money’s worth out of the gear, it is important to maintain it. Each piece of equipment requires a different type of maintenance so make sure to review your gear after every shoot to ensure it is in perfect working order. By monitoring your gear and fixing issues as they arise, you will be able to avoid costly repair bills. Some people will even suggest to send your gear once a year for a thorough cleaning to make sure your gear remains clean and in perfect working order.
Gear Management
The next thing I want to talk about in this post is gear management. As your arsenal of gear continues to grow, finding a way to manage it is critical. For me, developing a system to keep my gear straight has been very challenging but also rewarding at the same time. By de-cluttering my life, I have also managed to create systems to streamline the process of dealing with gear.
Organize gear based on how frequently you use it. If there is a specific piece of gear that you do not use on a regular basis, store it accordingly. Breakdown your equipment into relevant areas and build kits based on specific shoot requirements. I keep all my batteries with chargers in one area, all my sliders in another and all cables in it’s own section as well. I create labels and printout sheets for all kits with all gear that is in the kit with a picture representing what is in each kit.
- Organize Gear. Figure out what gear is needed for the shoot and organize it based on shooting needs.
- Label All Gear. When working on multi-person shoots when multiple people are supplying gear, you will want to make sure you have a full list of all your gear with all gear having labels to ensure you get all your gear back.
- List of Kit Breakdowns. Create lists of all gear needed for a specific time-lapse project. Break it into static, one-axis and multi-axis kits or day / night kits.
- Reference Image. Once you have selected the gear you need for your shoot, lay it out and take a picture of the gear out of the case and take a second image of all the gear packed in the case. Include these images with the kit.
- Gear List. Create a gear list for all gear you will be using for the shoot. Ensure to create a print out with all pieces that are in the specific kit and include this print out with the images.
Although each of these tasks takes time, you will be thankful you have the lists and images when working with others.
Data Management
The last thing I want to touch on is data management and this is usually an overlooked section when talking about gear management. However, data management is a huge element to consider in the process and developing a consistent workflow is imperative. I will be touching on this more in depth in the post production section but I’ve included a few tips below to help:
- Redundancy. For any project, it is important to have multiple copies of files in case of hard drive failures. I typically have three copies of all files in case one hard drives dies. This will keep you from stressing when you are in the process of backing up the failed hard drive.
- Naming Conventions. I highly recommend a consistent naming structure for all projects. This will help find files when revisiting a project filmed previously.
- File Integrity. Before formatting any of your cards, make sure to check your offload folders to ensure all contents are transferred over. Double check the size of each of the folders and do a quick visual check.
Keeping your Gear Safe
One of the challenges you need to deal with when you are traveling is how to protect your camera. Below are a few tips that may help to keep the gear safe from both damage and theft.
- Travel Cases: A great way to keep your equipment safe is by using hard travel cases. Most of my equipment is kept in Pelican cases as they protect against the harshness of the film environment and can withstand the wear and tear that occurs when traveling. I highly recommend purchasing cases that have the wheels built in. Another approach is to use standard suitcases / soft cases. As of recent, I have found that if you pack your gear efficiently in these bags (wrapping gear to keep it safe), that your gear is still safe and you run into less obstacles than you do when you travel with hard cases. Obviously there are exceptions but I do tend to lean towards soft cases whenever possible.
- Carry-on: When I travel, I always have my drives/media and cameras with me as a carry on. I do this for two reasons. First off, it ensures both stay safe and in perfect working order. The second reason is that if my luggage gets lost, I am still able to perform the job I was hired to do. Typically, it is a lot easier to find support gear than it is a specific camera/lens/media/etc.
- Wrap in Clothes: Another great way to keep your camera safe is to wrap it in your clothes and then place in your suitcase. One of the advantages of going this route is that it conceals your equipment so people are less tempted to steal it. Make sure there are no hard objects that could come in contact with your equipment if your bags are dropped.
- Insurance: The most important thing you will want to do if you own gear is get insurance. When looking for policy packages, look for ones that cover accidental damages and theft as it will save you. It’s not IF, it’s WHEN.
When traveling, I also highly recommend buying locks for your cases (the ones that have the ability to be opened by airport security officers). I have never ran into issues when I haven’t used them but it is another step you can take to ensure your gear stays safe.
What I have found when traveling with gear is the inconsistencies in airport security officers and standards at airports. When carrying your camera gear on board, be prepared to take all the items out of the bag and send through the scanners individually as I have been asked to do this on occasion. It doesn’t always happen but depending on how full your bag is, it could happen. It is extremely frustrating but a reality when you are traveling with gear.
There are a few things you will want to also make sure to do before traveling as well:
- Check Your Gear: Before traveling with your gear, make sure it is in perfect working order, the lenses/sensors are clean and that you have all the accessories you need to operate the camera with you. If you are shooting with a DSLR, make sure to take your lenses off the body and pack safely. Typically when I travel with DSLR’s, I carry my cameras/lenses in the Lowepro Pro Trekker. Another option I have used is the Pelican 1510.
- Document all the Contents: Ensure that you have documented everything that you are taking with you. Typically, I keep sheets in all cases including a list of the contents and a master list as well. By doing this, you are able to keep kits together. They are also great references when you have others that are packing up gear for you.
- Proof of Purchase: When you are traveling between countries, make sure that all equipment that looks new has proof of purchase documents. Another option is to get a Carnet. This is important for when you both enter a country and come home from a trip. It makes the process much simpler if the security officers know you are prepared and are not trying to hide anything from them.
- Prepare for Back-ups: When I am out shooting away from home, I find myself changing out cards on a more regular basis. You never know if you will either lose your camera, damage it or have it stolen. Make sure to switch cards on a regular basis. Further to this, you will want to make sure to create back-ups of all your work. Depending on the job, sometimes I find myself mailing drives home and carrying the back-up with me on the plane.
No matter how prepared you are, there is still a chance that your luggage will get lost and I am sure that this has happened to virtually everyone that has traveled with luggage/gear. It is the nature of the beast and when this does happen to you, you learn quick what gear you SHOULD have had with you.
Conclusion
As seen in the points above, once you get into the routine, gear prep is not that difficult and will benefit you immediately and benefit your gear in the long term. By taking the time to setup systems, you are effectively investing in yourself and your business.
About The Author
Preston Kanak is a filmmaker, a producer and an all around creative based in Saskatchewan, Canada. His main focus is timelapses. His portfolio includes broadcast and independent work with a focus on capturing the human condition as well as the environment they live in. He is also the Executive Producer & Creative Director over at Cinescapes Collective. You can follow him on his excellent blog and on Facebook, Twitter, Google Plus, Youtube, Instagram and Pintrest

Guest Author
We love it when our readers get in touch with us to share their stories. This article was contributed to DIYP by a member of our community. If you would like to contribute an article, please contact us here.

Join the Discussion
DIYP Comment Policy
Be nice, be on-topic, no personal information or flames.
2 responses to “How to Prepare Gear for Massive Video Shoots Abroad”
Interesting to me, mainly in that I was visiting my daughter a couple of weeks ago and helped her prepare for her first pro video / time lapse two camera shoot of a sit-down interview in window light. I’m a duffer photographer but know something about thorough prep, so suggested some rehearsals, which I’m not sure is fully addressed in the article above. I reminded her that unlike many shooting scenarios in which models and subjects revolve around what the big shot photographer wants to see, an interview instead revolves around somebody else with something important to say, for whom the best photographer is an out of mind nonentity who is not a nuisance.
We decided on three mock shoots. She would pack exactly as she planned to go, backpack and wheel her gear into the room we’d set up to mimic the shoot, and she would not be allowed to go back for “more stuff” or waste time mucking about. In the course of three rehearsals she changed virtually everything from gear selection, gear settings, packing arrangement and unpack sequence, and was able to test out camera angles, reflector placements, sound levels at various distances, and gained a lot of confidence in managing contingencies she would not have anticipated by simply “imagining” things. The hands on aspect added a lot to prep.
The shoot last weekend was a success and she’ll be editing it this month. Maybe useful.
Thanks for your comment, Albin. Doing tests in the studio beforehand to determine lighting / shot setups is invaluable. You suggesting that was brilliant and without a doubt helped with the shoot. Pre-production is extremely important and almost always results in a better final product. Would love to see what you guys were working on.