


Panoramix – A Panoramic Hack Of The Wonderful Dippold Pinhole Camera
Mar 12, 2013
Udi Tirosh
Udi Tirosh is an entrepreneur, photography inventor, journalist, educator, and writer based in Israel. With over 25 years of experience in the photo-video industry, Udi has built and sold several photography-related brands. Udi has a double degree in mass media communications and computer science.
Share:
One of the nice things about releasing a project to the world is the fact that it can tranform, and et enhanced by the community. Here is how humble Paul Eliasberg describes his project:

This tutorial is nothing more than showing you my way of putting an extra frame into a standard Dippold pinhole camera. There may be other ways, but this works for me. If you haven’t made a Dippold camera before, please do so first. You can find the template and instructions here.
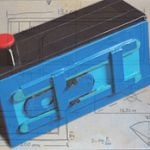
For the panoramic one, first print out the template

Then, cut out the all the three main parts: the back, the front and the mask:

These three parts need to be widened, except for the front cover. Remember, we’re only adjusting the TEMPLATE at the moment; when we’re done, all will be reassembled, stuck onto cardboard and all will be cut out as one piece. So for now, cut off the front cover:

Draw a line at the exact centre of the main body and cut it in half. On a separate sheet of paper, draw two parallel lines 36mm apart (the width of a 35mm frame) and stick both halves back on again using the lines as guides. You can now also reattach the front cove

Repeat the same procedure for the other two parts that need to be extended


So… now you’ve got the three adjusted main parts on normal paper

Now, stick them on cardboard (preferrably black)

I know, this is white, but… the reverse (the inside) is black!
Cut everything out and remove all the holes. As this is a wide-angle pinhole camera I thought it would be better to make the front hole where the pinhole goes slightly oblong, to prevent vignetting. Don’t know whether it would be strictly necessary, but better safe than sorry.

I removed the template from the cardboard trying to keep it nice and tidy, but it turned out I had it glued a bit too securely and removed the top layer of the cardboard. Doesn’t matter, but it’s something to watch out for.


Now, assemble like you do with the normal Dippold. There is one other adjustment I made though: I changed the movement of the shutter from vertical to horizontal

Glue two bits of cardboard above and below the window. Cut out something similar to below, making it to fit the above flap. Attach a bit of tape to both ends

And you’re done! The shutter construction will feel a bit wobbly when you’re putting it all together, but the two rubber bands make it all come together.
With

Here are some of the photographs captured with the Panoramix


About The Author
Paul Eliasberg Freelance web developer, graphic designer and photographer based in Armagh, Ireland. You can see his portfolio on his site, and follow his flickr here.

Udi Tirosh
Udi Tirosh is an entrepreneur, photography inventor, journalist, educator, and writer based in Israel. With over 25 years of experience in the photo-video industry, Udi has built and sold several photography-related brands. Udi has a double degree in mass media communications and computer science.


Join the Discussion
DIYP Comment Policy
Be nice, be on-topic, no personal information or flames.
3 responses to “Panoramix – A Panoramic Hack Of The Wonderful Dippold Pinhole Camera”
Where i can download the templete ?
How should I print the template? I was printing few and all the size is not can’t really fit the film…
Hello, I have made the camera but I was wondering how far away I need to have the camera away from the subject for it to work? to get a full view of a 6ft tall person for example.
I’m new to pinhole photography and I’m just trying to avoid wasted film if possible.
Thanks!