


The Motus Is A (Commercial Grade) DIY 3 Axis Time Lapse Beast
Aug 22, 2013
Udi Tirosh
Udi Tirosh is an entrepreneur, photography inventor, journalist, educator, and writer based in Israel. With over 25 years of experience in the photo-video industry, Udi has built and sold several photography-related brands. Udi has a double degree in mass media communications and computer science.
Share:
Who said that DIY equipment looks cheap? Motus – A 3 Axis motion control system – look great and polished. It is one of those machines that are DIYed but everybody secretly wishes they’d go Kickstarter. See the video below for a glimpse of its capabilities.
 DIY 3 Axis Time Lapse Beast")
We interviewed Constantino Schillebeeckx, the freelance photographer behind the motion control system, about its capabilities.
UT: How did the project start? Did you base it of anything?
CS: The evolution of the project has been a long and sinewy one. I began working in a commercial photography studio and saw, as we started shifting towards video, a need for a solid slider. With my engineering background, I knew I could implement some sort of commercially available product, one based on the linear slides / linear bearings that are often implemented in industrial settings. After buying the linear slide, I started out on a quest to motorize it which led to a pan/tilt head, and applications such as time lapse, gigapan, GFX and live motion control.

Initial sketches of pan/tilt design
UT: Can you explain how Motus is used?
CS: Motus is, currently, a 3-axis (dolly, pan, tilt) motion control system; what that means is that through the control box, you can program a specific path of motion, and then repeat that path of motion exactly. The benefit of that is that you could, for example, do multiple passes of the same move and add/remove elements in your scene; later, in post, you can edit things to appear and disappear in what seems to be one fluid shot. Furthermore, since we have exact control over move increments, you can use Motus to do time lapse photography as well as gigapan photography.
 DIY 3 Axis Time Lapse Beast")
Fully assembled pan/tilt with built in stepper drivers (big easy drivers); side view
UT: That sounds pretty interesting, for the sake of photographers who are starting out, can you list the parts in the system
CS: The full parts list is long/detailed and it’s one that suits my needs; each person will be different regarding their application, and so will need different parts. However, the basic list goes as follows (link to a sample part with each part):
- rail – used to direct camera motion in a precise linear path (link)
- carriage – part of the slider that moves and to which your camera is connected (link)
- wheels – allows for a smooth connection between your carriage and rail (link)
- timing belt for slider – connects the stepper motor to your slider (link)
- Stepper motors – powers motion (link)
- Timing belt gears – connects the timing belt to the shaft of the motor and provides different gear ratios which translates into different speeds (link)
- stepper drivers which handle the power switching of the steppers (link)
- some sort of micro-controller which tells the drivers when, how fast and which direction to drive the stepper; in my case I’m using Arduino (link)
- user interface (in my case joysticks, buttons and LCD) to tell the micro-controller what to do
 DIY 3 Axis Time Lapse Beast")
Fully assembled pan/tilt with built in stepper drivers (big easy drivers); top view
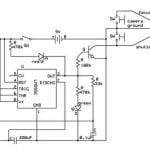
UT: What is part that the Arduino plays in this setup?
CS: The Arduino is the brains of the whole operation, it’s the CPU, it tells the motor driver when, how fast, with what kind of acceleration and which direction to energize the coils of the stepper. Iit also handles things like setting up the time lapse options (which are inputted though the joysticks and LCD) and keeps track of where the motors are (how many steps we have taken). Finally, the Arduino is also responsible for triggering the camera.
 DIY 3 Axis Time Lapse Beast")
Simple control box able to drive single axis (dolly) version; rear view
UT: What cameras does the Motus take, can it handle large weights?
CS: The current design, v2, is large enough to handle pro-DSLRs cameras as well as fit something larger like the Canon C100. The new design, which will be larger and more robust, will easily be able to handle cameras like the Epic and Canon C300 while still providing smooth, real-time motion.
 DIY 3 Axis Time Lapse Beast")
Red Epic camera mounted on Motus v2
UT: What are you using to power this beast?
CS: The stepper drivers will dictate which power source you want to use. Typically, these can be in the 12V range; however I’m using industrial drivers which run at 24V and I’m using some hobby drivers (Big Easy Driver) which run at 8-30V. I’m using 12V to power my Arduino. Meanwell offers some nice power supplies but you can use almost any power source as long as it’s able to provide enough Amperage to power all the phases of the steppers.
 DIY 3 Axis Time Lapse Beast")
two-camera mounting plate with Nikon D700 and Canon C100 mounted; C100 has a focus motor attached (also controlled by Motus)
UT: What are the controls that you can use and how do they work?
CS: Currently I have two joysticks that can be moved along two axes, several standard push buttons, and an LCD. Through all these controls, the user can navigate the menu system and choose options for the time lapse setup (such as number of shots to take, the distance and time interval, etc) as well as the live motion options (set keyframes, adjust motor speeds, etc). The Joysticks are used to increment values and traverse the user interface; the buttons are used as “OK” or “select” buttons and to bring up the menu.
 DIY 3 Axis Time Lapse Beast")
Control box for v2 with LCD, on/off button, 2 joysticks, and 3 push buttons
UT: Nuff talk, can you show us some more Motus in Action?
Even though it’s hard to tell; this video is a composite of time lapse and live video, both shot with Motus.
In this application, the time lapse spans a real-time duration of about 40 minutes; naturally we couldn’t get our talent to stand in that position so perfectly for that long, so we had to use a composite approach of time lapse and live video to achieve the shot.
UT: Can you explain the control mechanism?
CS: Regarding some of the more in-depth control, I’d have to defer to these fine sites; they’ll do a better job than I ever could.
- https://www.pcbheaven.com/wikipages/How_Stepper_Motors_Work/
- https://homepage.cs.uiowa.edu/~jones/step/
- https://www.freescale.com/files/microcontrollers/doc/app_note/AN2974.pdf
- https://www.st.com/st-web-ui/static/active/cn/resource/technical/document/application_note/CD00003774.pdf
- https://forum.timescapes.org/phpBB3/viewforum.php?f=24
 DIY 3 Axis Time Lapse Beast")
Closeup of OLED display along with push buttons and 2-axis joystick on control box
Is the Motus being used live, or is it just a fun project?
SC: Motus, in its time lapse capacity, has already been used for some clients; the footage now being in the editing room. Clients have spanned a broad range from agriculture to a local specialty clothing company.
UT: What’s next?
CS: My efforts are now focused on releasing the next version of the pan/tilt head and control box. The new pant/tilt will be better able to handle cameras like the Epic and will offer real-time, smooth video motion which is controlled live through the joysticks on the control box or through Dragonframe. Another two axes, zoom and focus, have been added. Along with a touch screen, the new control box will record the move to an SD-card; this trajectory can then be loaded into a virtual environment and the same move can be repeated with 3D elements which then allows you to seamlessly combine it with the live-action video or it can be used to repeat a predefined path.
 DIY 3 Axis Time Lapse Beast")
New design interface with LCD touch screen
If you want to take a stub at a similiar project, you can try building this Amazing Super Versatile DIY Time Lapse Dolly it uses similar mechanisms and has full instructions.

Udi Tirosh
Udi Tirosh is an entrepreneur, photography inventor, journalist, educator, and writer based in Israel. With over 25 years of experience in the photo-video industry, Udi has built and sold several photography-related brands. Udi has a double degree in mass media communications and computer science.


Join the Discussion
DIYP Comment Policy
Be nice, be on-topic, no personal information or flames.
11 responses to “The Motus Is A (Commercial Grade) DIY 3 Axis Time Lapse Beast”
This would be an awesome kick starter project
You think I should? More and more people are trying to convince me to do it…
yes sir, definitely!
Do it bro, it’s an awesome piece of kit that will be snapped up. You might kick yourself down the line if you don’t give it a shot!
I second a kickstarter project!
I would back it!
Wow! Simply, wow!
This is such a well thought-out and well put-together piece of equipment. And though there are quite a few sliders already out there on the market, the slider/3-axis motion control combination of this project puts it way ahead of most potential competitors.
Yes, definitely go the Kickstarter or IndieGoGo route.
thanks for the kind words, man everyone is telling me to go to kickstarter…
aaaggghhh!! You people depress me with your “know how to make things” skills. I’m so jealous! LOL This is very very cool.
ah ext, don’t be jealous! it just takes a little creativity, a ton of patience,and a friend with a machine shop ;)
Aaaaagggghhhh!! You people depress me with your friends and their fancy equipment. I’m so jealous of people who have friends!