


How to turn an old floppy disk into a free infrared camera filter
Jan 16, 2023
Dunja Đuđić Kalinin
Dunja Djudjic is a multi-talented artist based in Novi Sad, Serbia. With 15 years of experience as a photographer, she specializes in capturing the beauty of nature, travel, concerts, and fine art. In addition to her photography, Dunja also expresses her creativity through writing, embroidery, and jewelry making.
Share:
Remember floppy disks? We’ve come a long way since they were the primary method of data storage, and now we have terabytes of storage on a cloud, hard disks, and even flash drives. So, your old, dusty floppies are lying somewhere forgotten, and they’re entirely useless. Or are they?
Mathieu Stern dug up some old floppy disks and paired one of them with his camera. How, you may wonder? Well, he turned one of them into an infrared filter. It’s a DIY project that costs basically or literally nothing, and it’s also pretty simple to do. So, if you’re an infrared photographer, you’re going to love this.
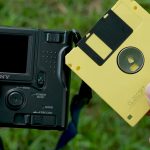
Mathieu got some empty floppy disks from his wife’s grandma, who kept a few of them as memorabilia. She kindly agreed to let him use them for his project and so he did. He disassembled the plastic shell and carefully took the disk from the inside. Since fingerprints are a no-no here, I suggest you use gloves while handling the disk.
Before we move on, here is a little disclaimer: you need a full spectrum camera for this “hack” to work. Mathieu converted his old Sony a7 II when he upgraded, and you can have any of your old cameras converted for around $200-$300. So, this isn’t a cheap DIY project for those who already aren’t into infrared photography. But those who are just need to find an old floppy disk or buy one for under $2.

Since Mathieu wanted to make his DIY IR filter as close to the sensor as possible, he made it fit the backside of his lens. He carefully cut the disk around the rear lens cap with an X-acto knife. And then, using a bit of putty, he attached “the filter” to the back of the lens before attaching it to his converted Sony a7 II.
Comparing the DIY infrared filter and the professional clip-in filter
Mathieu tested his “floppy filter” against a $160 clip-in infrared filter to see how they compare. Of course, you can see the difference, even though it’s not even that obvious in some shots. The DIY filter gives you less vibrant colors, which is the most noticeable difference. Also, it adds more stops to the image, so it takes a longer exposure or higher ISO to take an equally exposed photo to the one you take with a proper filter.


However, you can observe this not as flaws, but as the character of your DIY filter. If you’re just entering the world of IR photography, this could be a great way to get started and experiment a bit before you buy a dedicated filter. Judging from the comments, some photographers have heard of this use of floppy disks a while ago, but to me, it was completely new. Have you tested it before?
[I Put a Floppy Disk in my Camera, And This Happened | Mathieu Stern]

Dunja Đuđić Kalinin
Dunja Djudjic is a multi-talented artist based in Novi Sad, Serbia. With 15 years of experience as a photographer, she specializes in capturing the beauty of nature, travel, concerts, and fine art. In addition to her photography, Dunja also expresses her creativity through writing, embroidery, and jewelry making.
Related Posts
 Floppy disk camera throwback: Shooting with a 1999 Sony Mavica FD83 in 2023
 Check out these digital cameras from when floppy discs were used rather than flash cards
 The IR Chrome infrared filter is a digital version of Kodak Aerochrome IR film
 Kolari Vision’s new neutral density filter works with both visible light and infrared cameras
Join the Discussion
DIYP Comment Policy
Be nice, be on-topic, no personal information or flames.
15 responses to “How to turn an old floppy disk into a free infrared camera filter”
If I could only find an old 💾
You may find it on Amazon 😊
Silvia Elena it’s even linked in the article ;)
DIYPhotography You know what you can easily buy on Ebay?
A real infrared filter.
Silvia Elena I have a box
Silvia Elena ebay is your friend
Amateur hour here, any real photographer understands how negative (or any!) light filters work 😂
People used to do the same thing with (pre digital) unexposed camera film negative as a replacement filter to see near IR (it’s not true full spectrum infrared).
Floppies are perhaps easier to get hold of these days than real negative.
Your attitude sucks.
What is it that you’re looking to hear as a response?
What sort of response would satisfy you?
What’s your point anyway?
If you want a cheap start and are into DIY, the new Raspberry Pi camera module (the v3) comes in an IR version. It’s the same as te regular, but has the IR filter removed. Paired with this, you might have some unexpectedly good results. It’s costs about €25,-. And has a 12MP sensor and autofocus.
Pretty interesting article. Good that people are always experimenting.
I shot a lot of IR in my day, going back to the 70’s with Kodak IR film. No need for a filter. It was very sensitive stuff, as far as fogging. ASA was not that fast.
In the digital era I had my camera converted to IR. Filters are not going to cut it for me. Exposure is too long. Converted cameras are doable with on-the-fly photography. Vast amount of my IR work is in BW with an IR flash.
I got into IR flash to allow for street photography in the dark. Weegee and Yoshiyuki were my inspiration.
https://uploads.disquscdn.com/images/ebec14f23ec11576c639fb76b1b62bad063531e2962018054fb64aeba6a4c347.jpg
Sad Buskers NYC 2016 IR Flash Daniel D. Teoli Jr.
Well…keep on experimenting and pushing the proverbial envelope.
Technically isn’t this a visible light filter not an infrared filter?
Technically, you could describe this as an IR pass filter, or a visible-light blocking filter, or a low-pass filter, or a high-blocking filter.
Anyone noticed the picture isn’t of a floppy lol?
To make things easier Haida filters has a rear camera lens adapter that you remove the three screws holding the back plastic of the lens and you put on a Haida filter holder and you can buy with it four graduated filters and also for night shots the Clear Night. There is also a template you can use to make your own filters out of materials like this floppy disk project. Also just for info if using a CPL on the front of a lens you have to use the 90 degree rule to prevent a center dark spot BUT if you use the Clear Night filter at the rear of a lens you get baby blue sky with no dark hump in the center, this is good for a pano making a bright sky darker all the way across every pano capture. I forgot to take the Clear Night filter out while doing a high noon scouting trip for a night milky way capture – accidents you learn from. Filters at the back of lens give different results, surprise! Rear Clear Night filter facing the sun, even the sand has great color with that much light.
https://uploads.disquscdn.com/images/60c699b3c0d1a67b7cde51b60a353a9d75fc33bc0edef5a325d3585448942b53.jpg
the cool thing is that the difference can be easly matched with a bit of digital”Darkroom Magic” in LR and PS.