


How to Take Underwater Photos for $50. In Your Own Home
Dec 13, 2018
Dunja Đuđić Kalinin
Dunja Djudjic is a multi-talented artist based in Novi Sad, Serbia. With 15 years of experience as a photographer, she specializes in capturing the beauty of nature, travel, concerts, and fine art. In addition to her photography, Dunja also expresses her creativity through writing, embroidery, and jewelry making.
Share:

Shooting underwater can be complicated and expensive. But what if I told you that you can recreate the underwater look in your own home, for about $50? In his latest video, photographer Raj Khepar will show you a great DIY idea to shoot “fake underwater photos” on a budget. It’s one of the most creative DIY photography hacks we’ve seen for simulating expensive effects.
You will need
How to make
You can use wood and acrylic sheet of any size, but it’s important that they match. Basically, you will need to make a small shallow “pool” to pour water in it and use it to create ripples in your photos.
First, use the drill to screw the pieces of wood together and make a frame. Then, attach the acrylic sheet to it with the remaining screws. This is your water container, and now you need to make sure that it’s water-sealed. Apply the sealant between the wood and the acrylic, and give it 24 hours to dry. And just to make sure, add duct tape over the seals for extra protection.


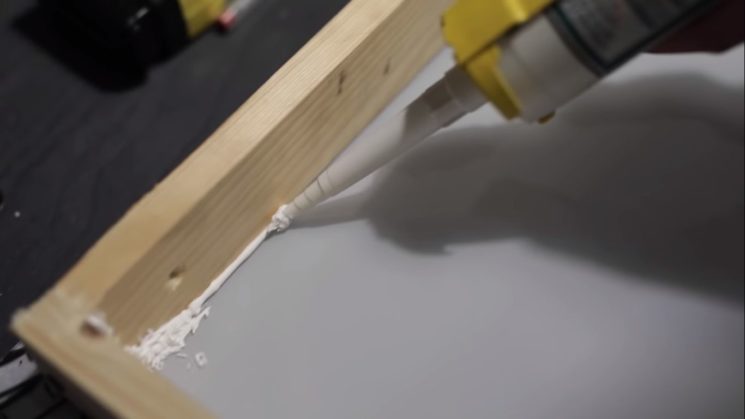

Now all you need to do is make sure that your acrylic is thoroughly cleaned before you set up the container and pour water in it.
How to shoot
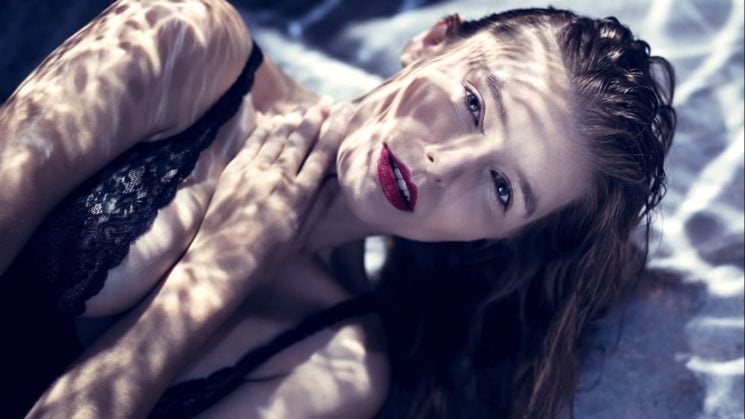
Place your DIY container between two chairs and make sure it’s stable. Pour water into it and use your hand to make ripples. Shine the light through the water so it falls onto your model, who should lie underneath the build. You can learn more on Raj’s blog and watch the video to see what it looks like.
Raj shares some extra tips for creating the underwater look: First, make sure that the model’s hair is wet. Then, you can add a blue gel to your speedlight to get the bluish tones characteristic of underwater photos. And finally, shoot on tiles, so it appears that the model is at the bottom of a swimming pool.
Here’s how it turned out for Raj. Even though it’s not a real underwater photo, it has a similar feeling, and the lighting effect is certainly interesting. Tricks like this make DIY photography hacks a powerful tool for home studio creators. If you plan to try it out, let us know and feel free to share the results.
[Easy FAKE UNDERWATER Photography Trick! | Raj K Photo]

Dunja Đuđić Kalinin
Dunja Djudjic is a multi-talented artist based in Novi Sad, Serbia. With 15 years of experience as a photographer, she specializes in capturing the beauty of nature, travel, concerts, and fine art. In addition to her photography, Dunja also expresses her creativity through writing, embroidery, and jewelry making.
Related Posts
 These underwater photos are breathtakingly beautiful – they won the 2018 Ocean Art Underwater Photo Competition
 How to make your own custom gobos at home with an inkjet printer
 Home Studio Photography: Your Complete Guide To Building A Photography Studio At Home
 Ring’s new “Always Home” camera is actually a drone that flies around your home… shooting video
Join the Discussion
DIYP Comment Policy
Be nice, be on-topic, no personal information or flames.