


How To Build A DIY HD Video Monitor
Apr 29, 2015
Hannu Ilkka

We love it when our readers get in touch with us to share their stories. This article was contributed to DIYP by a member of our community. If you would like to contribute an article, please contact us here.
Share:

While can buy wireless HD monitors on the market, but even the cheaper kits are not very cheap. This is why I turned to making my own DIY wireless HD field monitor.
I’m going to use the device both as a standalone, wired unit (via the hdmi-cable) when shooting video so I get all the benefit from the resolution. I’m also going to use the wireless link when I’m doing aerial and flash photography.
The idea was to find an affordable 7″ monitor with a high resolution (1280×800) and with an in-built battery. I also planned to include a video link, that I had purchased earlier, to this project so the monitor box should also have enough space for a receiver. I wanted to use a higher end IPS monitor for better view angles and use in the sun.
Part List
- box (GBP 14.99) – RETEX Graphite Grey Aluminium Electronic Enclosure
- screen (GBP 41.72) – HDMI/VGA/2AV driver board VS-TY2662-V1+7inch 1280×800 N070ICG-LD1 IPS LCD panel
- video transmitter (GBP 23.38) – 5.8G 200mW FPV Video Audio 2KM Transmitter TS58200 + 8CH Receiver RC5808
- battery (GBP 6.99) –3000mAh 12V DC Lithium-ion Rechargeable Battery Storage Capacity + AC Charger EU
- ballhead (GBP 7.97) – 2x Mini Ball Head 1/4″ Screw Mount
As space is limited, the only option was to start finding parts for the project from ebay. After finding a suitable case I started putting things together and placing parts.
I used a 122x47x190mm project box which looked like it could contain all the parts:

Sadly Happily, I had to cut a hole to fit the IPS panel

Here is how the IPS panel looks like along with the driver and keyboard

And this is the receiver

I am not going to go into the soldering and connecting parts, every out wire only has +/- one in location to go into. If you are not sure, look at the spec sheets that came with the products.
Next I fitted the receiver and battery: When the driver card for the screen and the video link receiver found their place I got to measure the size for the battery.

I had luck with the battery. When I removed some extra parts like the switch, LED and the wires, its measures got small enough to fit in the box.

Here is how the project looks from the back side:

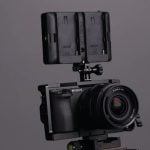
Here is the box for the transmitter side:
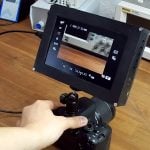
Once everything got connected, I ran a quick test. DATA!

The project is not completed for me, though. In the future I’m going to update the antennas for the video link, improve the casing and update the battery (to Lipo battery) on the transmitter side.
About The Author
Hannu Ilkka is a 30-year-old electrician from in Tampere, Finland. He was always keen on photography and have a knack for DIY projects. Especially for photography. You can follow his work on 500px, Flickr, Facebook or on his personal blog.
We love it when our readers get in touch with us to share their stories. This article was contributed to DIYP by a member of our community. If you would like to contribute an article, please contact us here.


Join the Discussion
DIYP Comment Policy
Be nice, be on-topic, no personal information or flames.
4 responses to “How To Build A DIY HD Video Monitor”
Just wondering why the internal battery, verses a plate on the back for a standard battery (canon to go with your kit)? And I didn’t see a charging port on the case, maybe that’s on the right side?
Also how is the lag time with the wireless video? Is it usable for focusing? That needs to have nearly no lag.
Nice build though!
This is more like it. Back to DIY posts!
Great build and it’s all UK sourced too!
The maximum resolution those transmitters can carry is 480i, which is 640×480, making the hd resolution useless for wireless transmission. Unless you went further and hacked an hdmi transmitter, such as (http://www.amazon.com/Nyrius-Transmitter-Streaming-Satellite-NPCS549/dp/B009E6R89C), but that is considerably more pricey, and the reviews are very poor.
That said, I do like the hack, but much money could be saved by going with a lower resolution screen, if you are primarily interested in wireless video.
As for lag, practically none, as the same transmitter is heavily used by UAV enthusiasts, and lag there is arguably more important than with focusing…
The cheapest LCD I have found for wireless monitoring is: http://www.ebay.com/itm/141641359906
Not GREAT, but cheap, and the right resolution.
That said, I have not integrated it into my kit yet, and do not know how it will work for remote focus pulling, but I am going to go out on a limb and say “not great.”