


How to Create Fringe-Like Titles In Your Videos
Feb 1, 2015
Udi Tirosh
Udi Tirosh is an entrepreneur, photography inventor, journalist, educator, and writer based in Israel. With over 25 years of experience in the photo-video industry, Udi has built and sold several photography-related brands. Udi has a double degree in mass media communications and computer science.
Share:
One of the things that got me right away with Fringe is the fact that I am an uber-geek are the titles they put to note locations. Rather than doing those boring lower thirds, or the typewriter thing that note a new location, Fringe always had those hovering titles that looked like they were hovering over buildings in the perfect perspective and moved right along with the camera. Videographer and Editor Basti Hansen takes us through a step by step tutorial of creating a Fringe-like hovering title.
It is a rather lengthy tutorial but it covers everything you need to know.
Once you have your movie ready (either from Premiere or from an After Effect composition) there are four steps to go though:
Step 1 – Stabilizing – This is an optional step and depends on how stable your footage is, the clip that Basti is using was kinda jittery, so a warp stabilizer was applied.
Step 2 – Apply a slow motion filter – Basti is using Twixtor which is not a native filter – it costs between $330 and $595 depending on the version. A free alternative is slowmoVideo which is an open source software to apply slomo effects. The process is not as smooth as Txitor but it is also not as pricey.
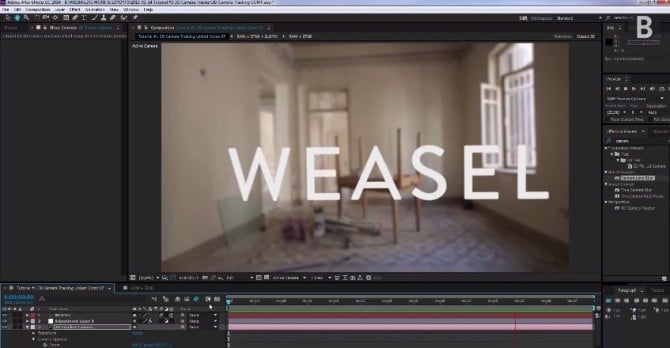
Step 3 – 3D tracking the scene. This step creates analysis the clip and converts the two dimensional clip into a computerized 3D space. After that part, the computer will show its speculation of surfaces on the scene and you can select one of the surfaces that represents the floor.
Then you will add a text, rotate and move it until you are happy with the location
Step 4 – Blurring the scene. In this step you make the scene blur as you move away from it. It is a bit weird as the scene is blurred regardless of the actual distance from the camera so the closer-walls are blurred in the same amount as the far-away table, but it works for this scene.
You can also blur the text to make it more real.
Here is the finished movie with lots and lots of titles :)
[via Basti Hansen]

Udi Tirosh
Udi Tirosh is an entrepreneur, photography inventor, journalist, educator, and writer based in Israel. With over 25 years of experience in the photo-video industry, Udi has built and sold several photography-related brands. Udi has a double degree in mass media communications and computer science.


Join the Discussion
DIYP Comment Policy
Be nice, be on-topic, no personal information or flames.
One response to “How to Create Fringe-Like Titles In Your Videos”
Awesome!!