


Build an easy DIY overhead camera rig with Open Source Hardware
Jul 13, 2016
John Aldred
John Aldred is a photographer with over 25 years of experience in the portrait and commercial worlds. He is based in Scotland and has been an early adopter – and occasional beta tester – of almost every digital imaging technology in that time. As well as his creative visual work, John uses 3D printing, electronics and programming to create his own photography and filmmaking tools and consults for a number of brands across the industry.
Share:

Whether hardware or software, Open Source is a wonderful thing. Open Source doesn’t always mean free, though, especially when it comes to hardware.
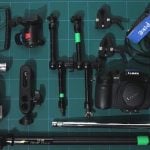
While not necessarily cheap, the DIY solution presented in this video from Bent-Tronics does fall in line with other such overhead camera projects. The simple fact of the matter is that it’s not easy to do something like this ultra cheap unless you happen to have the perfect components just laying around doing nothing already.
If you already know why you need another camera rig, and the problems with existing solutions like tripods, then you can skip ahead to just before 6 minutes into the video and go straight to the build.
Building a rig this way out of a modular system like OpenBeam, means that it’s easily expandable in the future, or can be modified to suit other needs. Adding brackets for lights or an external monitor is only a couple of nuts and bolts away.
- OpenBeam Starter Construction Kit – $49.99
- OpenBeam Kossel Pro Extrusions – $64.99
- Alpen Car Window Mount – $22.95
So, total cost will run you about $140 with these parts, but if you shop around, you can find alternatives for less. With OpenBeam being an open source product, the measurements are freely available for anybody to manufacture their own components if they have access to the suitable equipment to do so.
You can even dispense with the starter construction kit completely if you have your own 3D printer to make your own corner brackets, and M3 screws are the standard used for building PCs, so those are available in plentiful supply very inexpensively.
Using components like this also means that you can take it apart and reuse the pieces for something else when it’s no longer needed.
Do you use an overhead camera rig? Did you go with something like this? Or figure out something yourself from scratch? Let us know in the comments.

John Aldred
John Aldred is a photographer with over 25 years of experience in the portrait and commercial worlds. He is based in Scotland and has been an early adopter – and occasional beta tester – of almost every digital imaging technology in that time. As well as his creative visual work, John uses 3D printing, electronics and programming to create his own photography and filmmaking tools and consults for a number of brands across the industry.


Join the Discussion
DIYP Comment Policy
Be nice, be on-topic, no personal information or flames.
2 responses to “Build an easy DIY overhead camera rig with Open Source Hardware”
So… I haven’t put much thought into this, but I was planning to do something similar in the future, so just a mindstorming bit here.
For photographers and videographers that are not planning to do only overhead shots in a static location…. I’m thinking it might be better to get a full on slider mounted on top of c-stands or something similar.
The disadvantage I see compared with the interesting contraption Jesse came up with in his post is height adjustment. Well, you can adjust C-stands height quite easily, but perhaps not well in sync like his bar mounted thing.
I still have a lot of research and thought to put into this, perhaps one day I’ll make a video about my attempts too… but hey, if you need something like this right now and have no clue how to start, there’s always the Casey Neistat way:
https://www.youtube.com/watch?v=vb60rrtTddQ
Keep it simple, keep it functional, make do with whatever you have. xD
Nicely developed idea but if I were to build it I would probably go with Openbuilds extrusion rather than the kits he selected. The Openbuilds extrusion is a bit beefier at 20×20 and less than half the price. http://openbuildspartstore.com/v-slot-linear-rail/ or https://www.amazon.com/gp/product/B00YCOQO5A/ref=s9_acsd_hps_bw_c_x_3
Their rail system has shown up here previously on DIYP integrated into slider rigs. http://www.openbuilds.com/?category=camera-sliders-rigs&id=312