


How To Put A Granite Tile To Good Use
Jan 1, 2014
Laya Gerlock
Laya Gerlock is a Portrait and Product photographer based in the Philippines. His passion is teaching and sharing his knowledge in Photograpy and has been doing this for 6 years.
Share:
One of the simplest yet most used items in my photography toolbox is simple black granitle tile. I bought a small one 3 years ago and I am still using it today. I have a small tile that I bought for $4 and a bigger one that I got for $20. Other people use plexiglass or just a simple glass table for this kind of look.

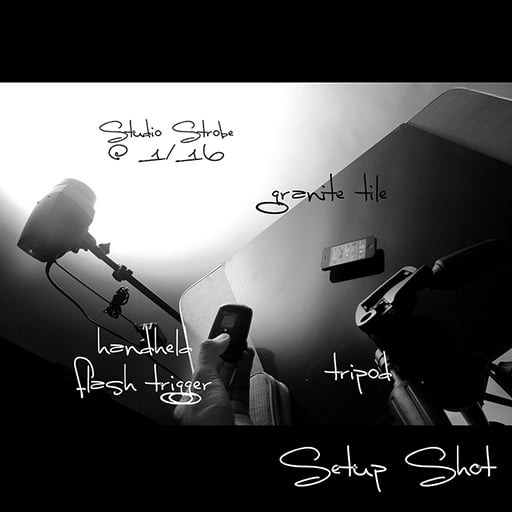
Normally I use the granite tile for my product or still life shots. Here are just some things that you can do with the granite
tile.
Backlighting
I like doing this shot when I am shooting a wineglass or cocktail glasses. I would put the granite tile close to my seamless white paper background and light it from the back).


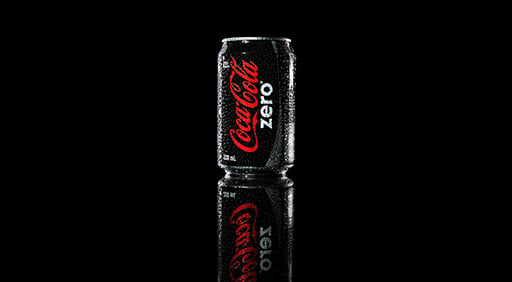
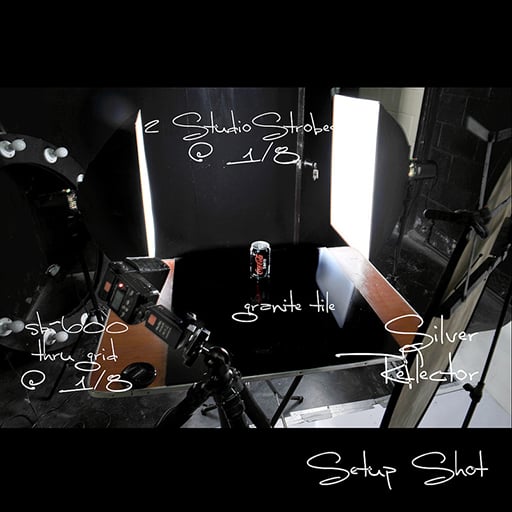
Keeping it Clean
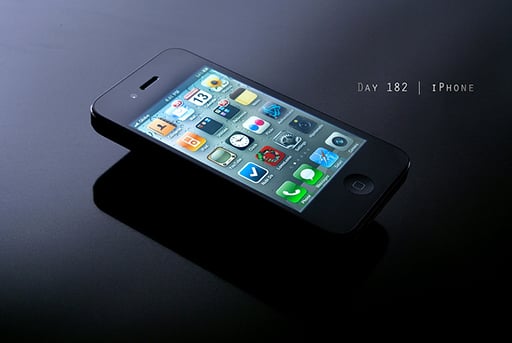
Just a clean black on black shot with rim lighting. I really love the reflections that the granite tile creates, it give’s “Spunk” to your shot.
Light Painting
I also use it for my lightpainting. You can check this tutorial on how I did these shots using an iPhone and iPad for lightpainting.


The El Bokeh Wall
Playing around with my little darth vader and the El bokeh wall. Check the tutorial here for the El Bokeh wall.


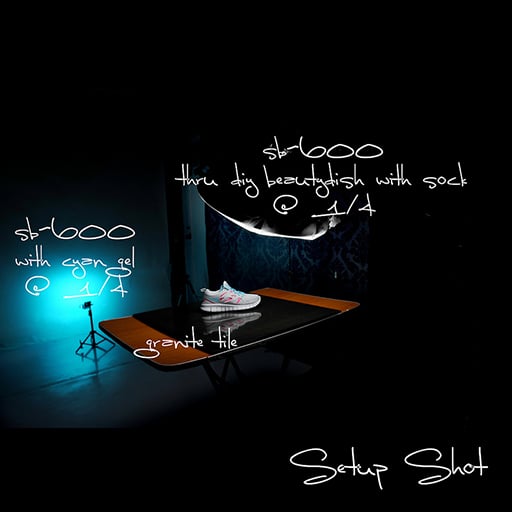
Gels
Simple product shots and using gels on the background.


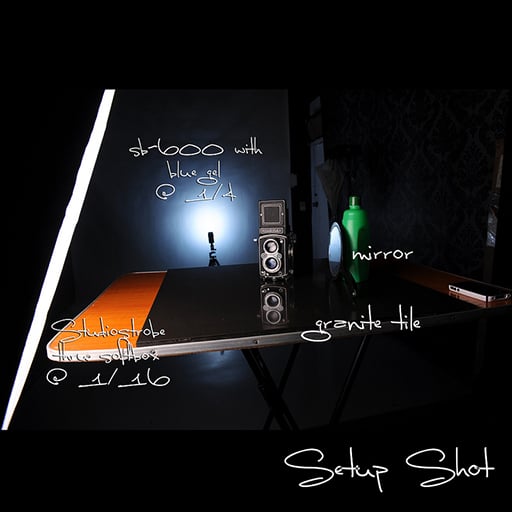

The Gradient Effect
This is one of my favorite techniques when using the granite tile. I create a gradient effect on the tile by reflecting the light that I bounce from my background.


Flame Shot
My other favorite trick is using the tile for creating real-flame shots. Because it’s a solid tile, you don’t have to worry about it cracking or catching fire. Though you should probably take basic safety precautions.


Laya Gerlock
Laya Gerlock is a Portrait and Product photographer based in the Philippines. His passion is teaching and sharing his knowledge in Photograpy and has been doing this for 6 years.


Join the Discussion
DIYP Comment Policy
Be nice, be on-topic, no personal information or flames.
37 responses to “How To Put A Granite Tile To Good Use”
WOW! Thank you to share
you’re welcome. sharing is caring :)
Amazing. Such a clean simple look that gets you to concentrate on the subject.
Black plexiglass works just as well and is a lot cheaper to use. But it does scratch.
Tips like this are why I read DIYP.
And comments like this is why I keep writing! Thank you! :)
A sheet of glass on black paper works great too!
Does it also work with a white paper to get the white equivalent ?
I use clear acrylic with whatever color I choose beneath it to get the same effect but with my desired color.
Granite is nice but it’s heavy, a little bit more difficult to store and sometimes harder to find. I have been working on the same double-sided piece of black acrylic for four years and, unless my angle of shooting is between 45° and straight down, I do not see the scratches in the reflections. It wasn’t until after three years that I actually killed the protective paper off the second side and started using it. At this rate, I will need to replace it for another two years and even then it was only $10.
Don’t you have the double reflection issue that way? I just tried with a mirror and a black background to get it dark. Even there I have double reflection (see attached pic). Indeed, a mirror is just a glass and a metal foil…
No, the glass and the foil of the mirror cause the double reflection. With clear acrylic the second reflection would have to be caused from the inside and there is nothing inside to cause the reflection. The second side is against your colored surface and negates any reflection. Here is an example: http://500px.com/photo/14729001?from=set/251826
Granted, it was a pretty scuffed up piece of acrylic, but that piece is laying on a red fleece blanket. I believe most of the red color comes from the jars of jelly but the blanket did contribute as I have seen in other photos of mine where I have used a similar technique.
At any rate, it should be a pretty inexpensive option to try. I do not have the room to store it, but Larry Becker, from the Kelby group, suggested buying a cheap poster frame from a craft store and simply using that large, inexpensive piece of acrylic that it comes with. He even suggested spray painting the underside black or whatever color you wanted to get the same effect.
In your example photograph look at the dots on the lower left side of the center jar and then look at the matching dots in the reflection. There are double rows of dots in the reflection. The inside face of the bottom side of the plex also causes a reflection. This is the same with any optical medium.
I repeated the test with my Santa Claus using 2 different transparent materials under wich I placed a black tissue. The first picture has been made with glass and the second with plexiglass (both from poster frames).
It is clearly visible that glass produces that double reflexion, but not plexiglass.
Does someone has an explanation ? I don’t understand why two transmarent materials that have the same shape and about the same thickness behave differently with light.
It’s all a function of your viewing and lighting angles. Plex is also a much lower quality optical medium than glass and thus the secondary reflection won’t be as strong because the light doesn’t pass as well.
The example you are using is not the best to bring it out. Take a low angle shot of some Christmas lights bouncing off the surface and you should see it. Light bounces better which is the reason why is it so obvious in the jelly jar example.
The only trouble with glass is that it gives double reflections which looks awful compared to plexi
Get a sheet of 18% smoked or tinted glass. By the time the reflection gets back, it can’t be seen. Plus you can light up through the glass for nice effect. For those old enough to remember cocktail video game cabinets. Amazon has replacement tops.
That Coke Zero shot is gorgeous. Great article!
Thank you! :)
great idea! I purchased a sheet of black acrylic for the same purpose, but the problem is, the stuff scratches if you look at it the wrong way. The black granite should be far easier to maintain! thanks!!
Really cool. I was considering getting a sheet of black plexiglas but now I’m considering getting the granite.
go for it!
I haven’t been able to find completely black granite – and a 24″ x 24″ piece was $54 and it had flecks in it that showed in the reflections. Any thoughts? RonH
My granite tile actually has some small spots, but it doesn’t seem to show. hhmmm
I ended up finding a nice pure black piece if porcelain. Works great. Thanks for the idea Laya.
Awesome tips. Great Content!
thanks :)
Sponsored by Nikon no doubt….
ohhh How I wish i was sponsored by nikon!! :)
Obviously it wasn’t – but so what if it was? yet another cynic.
A correction about the rock name – there is no such rock as “black granite”. Geologically speaking, granite is a coarse-grained, igneous rock that is dominated by lighter colored (iron poor) minerals such as feldspar, quartz, and a small percentage of darker minerals, like biotite mica. A coarse-grained, dark-colored igneous rock is dark because it is dominated by dark (iron-rich) colored minerals such as hornblende and pyroxene. In this case, the trade name is scientifically wrong.
Scott Brande PhD
UAB
** HEADS TO HOME DEPOT IMMEDIATELY ** Really compelling read. Thanks!
I’m trying to find a black tile of my own for this sort of thing. I’ve looked around on the big hardware store websites and the only “all black” tile I can find isn’t actually entirely black. There are still textures and small flecks of other colors in them. Does yours have this? If so does it end up being a problem? I want a completely smooth, black surface with no texture.
What size is that tile? The largest I can find at my local store is 16″x16″. Yours looks like 24″x24″.
Where did you get your granite slab? and how much did it cost?
Excellent article
One question
How do you keep the granite in the shade (photo with Coke)?
Or is the result post-production?
Thanks so much for the tutorial, I feel like this really helped me leap ahead but I still have a lot to improve on! https://uploads.disquscdn.com/images/8c8130ddab7421d6c5b9c4e94f5e34a552c1bd54590a98418996a756dc375c51.jpg
Thanks so much for the tutorial, I feel like this really helped me leap ahead but I still have a lot to improve on! https://uploads.disquscdn.com/images/ad99dc8af59f3dcde512156979c2a01b17d448f0f587c6b89dc7acd9139253c5.jpg https://uploads.disquscdn.com/images/8c8130ddab7421d6c5b9c4e94f5e34a552c1bd54590a98418996a756dc375c51.jpg