


3 Ways To Bare Bulb your Flash
Feb 10, 2013
Udi Tirosh
Udi Tirosh is an entrepreneur, photography inventor, journalist, educator, and writer based in Israel. With over 25 years of experience in the photo-video industry, Udi has built and sold several photography-related brands. Udi has a double degree in mass media communications and computer science.
Share:
“There is more than one way to skin a cat, and there is more than one way to bare bulb your strobe”. (Udi Tirosh, 2013).

Most hot shoe strobes have a fundamental difference from monoblocks or other “studio strobes”.
Studio strobes are “bare bulb” which means that the light they emit goes everywhere. Most (if not all) hot shoe strobes are directional, meaning that most of the light they emit goes forward.
Where you think about it, it makes sense. Hot shoe strobes are primarily used on camera (well, at least originally) and the main point of putting them on camera is to light distant subjects. This is why they are built to throw as much light forward. Even if today many photographers use them off camera, they are still designed and built mainly for throwing light forward.
The front of a hot shoe strobe has to be “bullet proof” as they are usually tossed in the bag, hence a plastic enclosure. Try throwing a studio flash in your bag, the unprotected xenon tube would break in a heart beat.
Studio strobes on the other hand, are almost never used without a modifier. To throw the light forward, you place a reflector on the head. But having the light go all ways makes them far more versatile when it comes to other light shaping tools like softboxes, beauty dishes, and actually anything that needs a wider dispersion of light.
This difference between hot shoe strobes and studio strobes can be a bummer for off camera flashers. Almost every modifier (maybe snoot and grid excluded) benefit from having a bare bulb flash.
Here are 3 different approaches for barebulbing a hot shoe strobe. Going from least efficient to most efficient, and from dumb-proof to please don’t do this unless you are a certified electrician.
1. Wax-Fenning It

The Wax-fen is probably the easiest mod of the all here on the blog, all it take is a sheet of wax paper and some tape. (If you wanna take it up a notch check out the Stofen Omni-bounce.
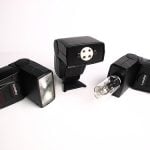
2. Voiding a Lumopro warranty

This modded LumoPro 160 from RapidGrapher looks as sweet as it gets. There are no instructions on this one, but there are some general notes on how the assembly was made:
- Removed and disabled factory zoom/flashtube assembly, and converted to bare-tube/bare-bulb
- Modified internal power circuit for a 25% increase in power to 75w-s (subsequent recycle time was increased by about 1 second when powered by 6v SLA battery)
- Added DC power jack for external power source (6v input)
- Swapped out factory hot shoe foot for a metal foot with 1/4″-20 threaded base (new foot came with redundant test fire button and PC sync port)
Are those instructions complete? heck no! and this is good, dont go modding strobes unless you are absolutely sure you know what you are doing! The internal capacitor can give you a nick shock if you are lucky and totally nuke you if you are not.
You can get the full brief on this mod, including lighting comparison on Rapid’s stream.
(Kevin from LumoPro said he was looking into this. I know I would get one – or three – if they were ever made commercial)
3. Pair A Couple Of YN560

This last and probably y favorite mod from Tilo Gockel brings together two YN560 speedlights on an aurora bracket, supported by a DIY aluminum bar. The smarts on this one, is the fact that the tubes were elevated to the focal point of the reflector, providing studio like experience.
Again here are some dim instructions. They should make sense to you if you are familiar with this stuff, or server as a printout when you get the instructions to someone who understands them. (if “cut the three wires leading to the flash tube” sounds like Chinese to you, go for the latter) – Click the image above to follow the instructions along with the picture.
- Disassemble / open the flash
- cut the three wires leading to the flash tube (and mark them before, so you can connect them later-on again :-)
- gently pull the tube out of its plastic housing (it is fitted there with some sort of rubber or silicone)
- glue the fragile little tube in a guitar glass slide with the help of SUGRU (the guitar slide acts as some sort of protection)
- glue the glass slide to an aluminum piece, bent in shape, also with SUGRU
- assemble the flash again, but with the wires leading outside
- glue the aluminum thingy on the flash — you guessed it, with SUGRU .-)
- reconnect the three wires with three additional pieces
Here is a resulting image. With pairing a couple of YN560 you get the same power as you would get from a couple of SB800. Pretty strong!

Have you ever modded a strobe? Heard of a good Mod? We would love to know!

Udi Tirosh
Udi Tirosh is an entrepreneur, photography inventor, journalist, educator, and writer based in Israel. With over 25 years of experience in the photo-video industry, Udi has built and sold several photography-related brands. Udi has a double degree in mass media communications and computer science.


Join the Discussion
DIYP Comment Policy
Be nice, be on-topic, no personal information or flames.
3 responses to “3 Ways To Bare Bulb your Flash”
:-) glad you like my two-gun mod; have a look at the new mod, single flash, bare: http://www.flickr.com/photos/galllo/12013684645/
–
// and also visit http://www.fotopraxis.net ….
// there’s a lot of strobist stuff to find there …
The Photo looks awesome, cant understand any of the German :)
use google translate, highlight copy and paste into google translate. Works pretty well