


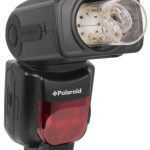
How To Really Void The Warranty On An LP160 Strobe (Extreme Bare Bulb Mod)
Mar 18, 2013
Udi Tirosh
Udi Tirosh is an entrepreneur, photography inventor, journalist, educator, and writer based in Israel. With over 25 years of experience in the photo-video industry, Udi has built and sold several photography-related brands. Udi has a double degree in mass media communications and computer science.
Share:
A while back I shared a post about three ways to skin a cat to bare bulb a strobe, one of which was Ryan Mangondaya’s excellent mod for the quad-sync LumoPro 160. Since than those strobes have been discontinued and I am now eagerly awaiting the LP180 replacement. But still if you care for having a go on this with one of your units Ryan put up a guide on this mod. Of course, with the 160 being discontinued and the 180 not announced yet, don’t come crying if you nuke your strobe dead. Or if you buzz your self to death handling a stripped strobe. Those capacitor inside can deliver an unhealthy a healthy jolt is handled incorrectly. There, this was our standard warning, consider yourself warned. It’s all Ryan after the jump.
")
A while ago, I posted some images featuring a modified LumoPro LP160 that I had converted into a bare bulb/tube flash. I had originally planned on getting my personal website and blog up and running to post some tutorials and information on some of the different modifications that I’ve been working on with various photography/videography gear… but between working full-time as an automotive tech and spending time with my wife and kid, that kind of vaporized due to my schedule and abundance of other projects.
With to the amount of interests and queries that I have received regarding the bare bulb conversion, I’ve finally decided to make some time and create a kind of “how-to” on the modification. The directions I’m providing are somewhat generic and may or may not apply to other hot-shoe flashes, but should be adequate for anyone with the aptitude and inclination necessary for such a modification. In other words, I have decided against posting an all-inclusive step-by-step instruction manual for the sake of avoiding the impression that anyone that has the necessary tools and parts can safely do this. If you cannot figure out how to do this based on the information that I am providing, you should probably not be messing around with the internals of a flash.
Now for the disclaimer part: This write-up is solely for educational purposes only and is provided free of charge. This is not guaranteed to have everything you need to know to successfully convert a flash without killing or damaging either your photography equipment and/or yourself. Please read this write-up in its entirety before attempting any modifications. The voltages/current inside camera flashes can be hazardous, and even fatal. The bright light and possible exposure to UV radiation can also be hazardous. Malfunction of your flash after or during modification may also be result in bodily injury (for example: capacitors can explode, you can burn yourself from the heat of some of the electronic components, or you can have the whole thing short out and cause a fire which burns down your house). Proceed with care, caution, and common sense. Do not attempt any of this or anything similar unless you are completely sure that you know what you are doing and are aware of all the inherent risks involved. Be aware that when working with electronics, your body can emit a static discharge that can destroy the components inside your flash. Also, make sure you know how to use the tools you use and the safety hazards involved with those (especially with things like soldering irons, drills, saws, etc.).
With that all being said, it’s time to get started. To begin with, I will be modifying another LumoPro LP160 (because I already have it and because I have already modified several of these successfully). I have done this to a few other brands and models of flashes with success, and it should work with a lot of different flashes, but I can’t guarantee that it will work on any one in particular due to the wide variety of differences of voltages, wattages, physical constraints, etc. I also do not know if such a modification will have any problems with flashes that have features such as automatic exposure/metering, high-speed sync, or TTL (All the flashes I’ve done this too were manually controlled).
")
I use the following parts for doing this modification with an LP160:
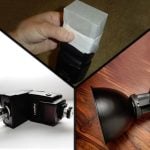
Flash Tube – Can be a replacement tube for Sunpak 120j, Quantum, or other similar flash. Basically looks like a small coiled flash tube inside a vacuum tube housing with a four-pin base. Also check Eiko or Wiko bulb #WK120HD. These flash tubes are available with or without UV coating.
")
Tube Socket – Readily available for sale on Ebay. Do a search for “300B 4-pin tube socket“. Any flash tube above will plug right into this size socket. I prefer to use the small ceramic ones with gold plated pins. Avoid anything big, since the smaller ones are much easier to mount inside a hot-shoe flash.
")
Sheet Metal – Cheap mild steel with the same thickness as the lens of the flash, available at most hardware stores. Can be substituted for other rigid sheet materials as long as it can be drilled, cut, and can withstand the heat generated by the flash and the tube.
")
Pop-Rivets – Small enough to hold the tube socket to the sheet metal. Can be substituted for screws or nuts and bolts.
")
Semi-Gloss Black Spray Paint – Keeps the sheet metal from rusting and makes everything look better (matches well with the plastic parts of the flash). Could try using white or silver paint instead to try to act as a reflector to project more light forward (I haven’t gotten around to trying this yet for myself so I don’t know how effective it would be).
Step 1 – Open The Strobe
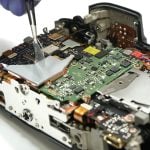
The first step in this is going to be opening the flash and gaining access to the head of the flash. The batteries should have been removed already, and you will need to safely discharge the capacitor inside the flash (by way of proper resistor, light bulb, or discharge tool) before proceeding.
After, verifying that the capacitor has been drained completely, you will have to remove the following components: the lens of the flash, the reflector, the original flash tube (cut the three wires that connect to the tube as close as possible to the tube itself and remember where they were connected, you will need to reconnect them later), the zoom mechanism (if present), and the trigger transformer (you will need to reuse this later as well).
")
Step 2 – Mounting Plate
You will now need to create a mounting plate for the new flash tube/socket. I usually use the lens element as a template and cut out a piece of sheet metal to the exact size and shape of the lens. You can use a variety of different things for this such as plastic sheeting, blank circuit board, acrylic/lexan, or even the original lens itself (if it is robust enough to securely hold the new tube and if it can be drilled without breaking, which the LP160 lens cannot). Just make sure to use something that is strong, flat, can be drilled/cut, and has the same relative thickness as the original lens in order to fit where the lens used to be. I just happen to have plenty of tools and experience for working with sheet metal, so that is what I use.
")
Next, you will need to make it so that you can attach the socket to the new mounting plate. The easiest way to do this is by drilling appropriately sized holes in the plate and then simply attaching the socket to it. You will need three holes: one large one that the socket will go through, and two smaller ones that will line up to the socket’s mounting bracket. I use a hole-saw, drill, and dremel for cutting the holes out, and then use pop-rivets to mount the socket. You can use regular screws or nuts and bolts instead or rivets if you choose. Also, if you want to paint or finish your mounting plate in an way, you should do it after you drilled out your holes and before you mount the socket in place.
")
")
Step 3 – Re-Wire
You now have a way to mount you new flash tube to your flash, and all that is left is to connect it to the existing circuitry of your flash. First, look at the new flash tube and socket and figure out which pins of the socket need to be hooked up. You will notice that although there are four pins, only three of them are attached to the actual tube itself (two to opposite ends of the tube, and one that wraps around the middle of the tube). You will need to find the original wires that went to the ends of the old flash tube, and connect them to the pins at the ends of the new flash tube (I recommend soldering the wires directly to the socket’s pins). The wire that goes to the positive end of the main storage capacitor will be connected to the anode of the flash tube, while the one going to the negative of the capacitor will be going to the cathode end of the tube. Although this is ideal, with the particular flash tubes that I have been using, I have not been able to identify a definite anode/cathode due to both ends of the tube looking identical. I actually ended up just taking the end with the larger pin and making that the cathode, and have yet to notice any problems with the tube being hooked up this way.
")
The last wire that needs to be connected is going to be from the trigger transformer to the pin that goes to the wire that wraps around the tube. You should try to keep this connection as short as possible, and it should be soldered to prevent any added resistance. I try to solder the wire coming out of the transformer directly to the pin and mount the transformer as close as physically possible to it without having it short out to anything else. From all of the testing I have done, with this particular type of flash tube, you will need at least a 5kv trigger and very little resistance to make it work reliably (yours may need to be changed to make it work). In fact, if you have any problems with inconsistent triggering or the flash not triggering at all, this is the first place I would start troubleshooting.
")
At this point, you could pop in your flash tube and some batteries to test it out and make sure everything is working. Or, you can go the safer route and wait until everything is closed up before testing. The choice is up to you, but you should remember that if you test it before you finish putting everything back together, you will need to remove the batteries and safely discharge the main capacitor again before it is safe for you to mess with and put together again.
After you finish putting everything back together and are confident that you have everything working properly, you are pretty much done. Congratulations. Go and have fun with it. In addition, you may want to sell your sto-fens, fongs, and other fake bare bulb simulating tupperware devices; It will help you afford some of new things that you all of a sudden think you need to go with your new bare bulb flash.
About The Author
Ryan Mangondaya is an electronic uber brains and a photographer based in Houston, TX

Udi Tirosh
Udi Tirosh is an entrepreneur, photography inventor, journalist, educator, and writer based in Israel. With over 25 years of experience in the photo-video industry, Udi has built and sold several photography-related brands. Udi has a double degree in mass media communications and computer science.

Join the Discussion
DIYP Comment Policy
Be nice, be on-topic, no personal information or flames.
One response to “How To Really Void The Warranty On An LP160 Strobe (Extreme Bare Bulb Mod)”
Do you know if you can fit 2 or 3 flash tubes to a single flash unit?
E.G 3x 100Vs tubes to a 300 Vs studio flash.