


180 Degree Shutter Rule: The Secret to Cinematic Motion Blur in Video
Oct 29, 2025
Darlene Lleno
Darlene Lleno brings a unique perspective to DIY Photography as someone who grew up surrounded by camera gear but chose words over lenses. With five years of writing experience, she specializes in photography content that’s both technically informed and genuinely passionate. Growing up with a photographer twin brother meant camera talk was everyday conversation in her household. While he mastered capturing moments, Darlene discovered she preferred being the subject and the storyteller behind the scenes. As a travel enthusiast and mother of two, she understands the importance of preserving life’s precious moments. When not exploring new destinations or writing for DIY Photography, you’ll find her reading or tending to her garden. Her approach to photography writing is refreshingly authentic, she may not be behind the camera, but she knows exactly what it takes to help others capture the shots that matter most.
Share:
The 180 degree shutter rule has guided filmmakers for decades on creating motion blur. This traditional principle states you should set your shutter speed to double your frame rate. Shooting at 24fps means using 1/48 shutter speed, while 30fps requires 1/60.
But here’s the truth. The rule works well for typical situations but breaks down in many real-world scenarios. Understanding both when it works and when it fails makes you a better filmmaker.
180 Degree Shutter Rule Basics
The 180 degree shutter rule comes from old film cameras with rotating shutters. These mechanical shutters had a circular disc with a section cut out. The opening determined how long each frame got exposed to light.
A 180 degree opening meant the shutter stayed open for half of each frame cycle. The remaining 180 degrees kept the shutter closed while film advanced. This created a specific amount of motion blur that looked natural to audiences.
Modern digital cameras don’t use rotating shutters anymore. But filmmakers kept using the terminology and principle. The math translates to shutter speed settings on today’s cameras.
Shutter Angle vs Shutter Speed Explained
Cinema cameras often display shutter angle instead of shutter speed. A 180 degree angle equals 50% of the frame time exposed. A 360 degree angle would expose the entire frame duration at 100%.
Lower angles like 90 degrees give you 25% exposure time per frame. This creates less motion blur and sharper individual frames. Higher angles increase blur by keeping the shutter open longer.
Photography cameras stick with shutter speed measurements like 1/50 or 1/120. These numbers show the actual fraction of a second the sensor captures light. The top number is always 1, while the bottom number gets higher as exposure gets shorter.
Here’s the key difference. Shutter angle changes automatically when you adjust frame rate. If you set 180 degrees and switch from 24fps to 60fps, your exposure time changes. Shutter speed stays constant no matter what frame rate you pick.
Converting Between Angle and Speed
You can convert shutter angle to speed with basic math. Divide your angle by 360 to get a percentage. Then divide your frame rate by that percentage to get shutter speed.
At 24fps with a 180 degree shutter, calculate 180/360 which equals 0.5. Divide 1 by 0.5 to get 2, then multiply 24 by 2. This gives you 1/48 shutter speed.
Here’s how common frame rates convert with the 180 degree shutter rule:
- 24fps = 1/48 shutter speed (usually set to 1/50)
- 25fps = 1/50 shutter speed
- 30fps = 1/60 shutter speed
- 60fps = 1/120 shutter speed
- 120fps = 1/240 shutter speed
Most cameras don’t offer 1/48 exactly, so you use 1/50 instead. The tiny difference doesn’t show up on screen at all.
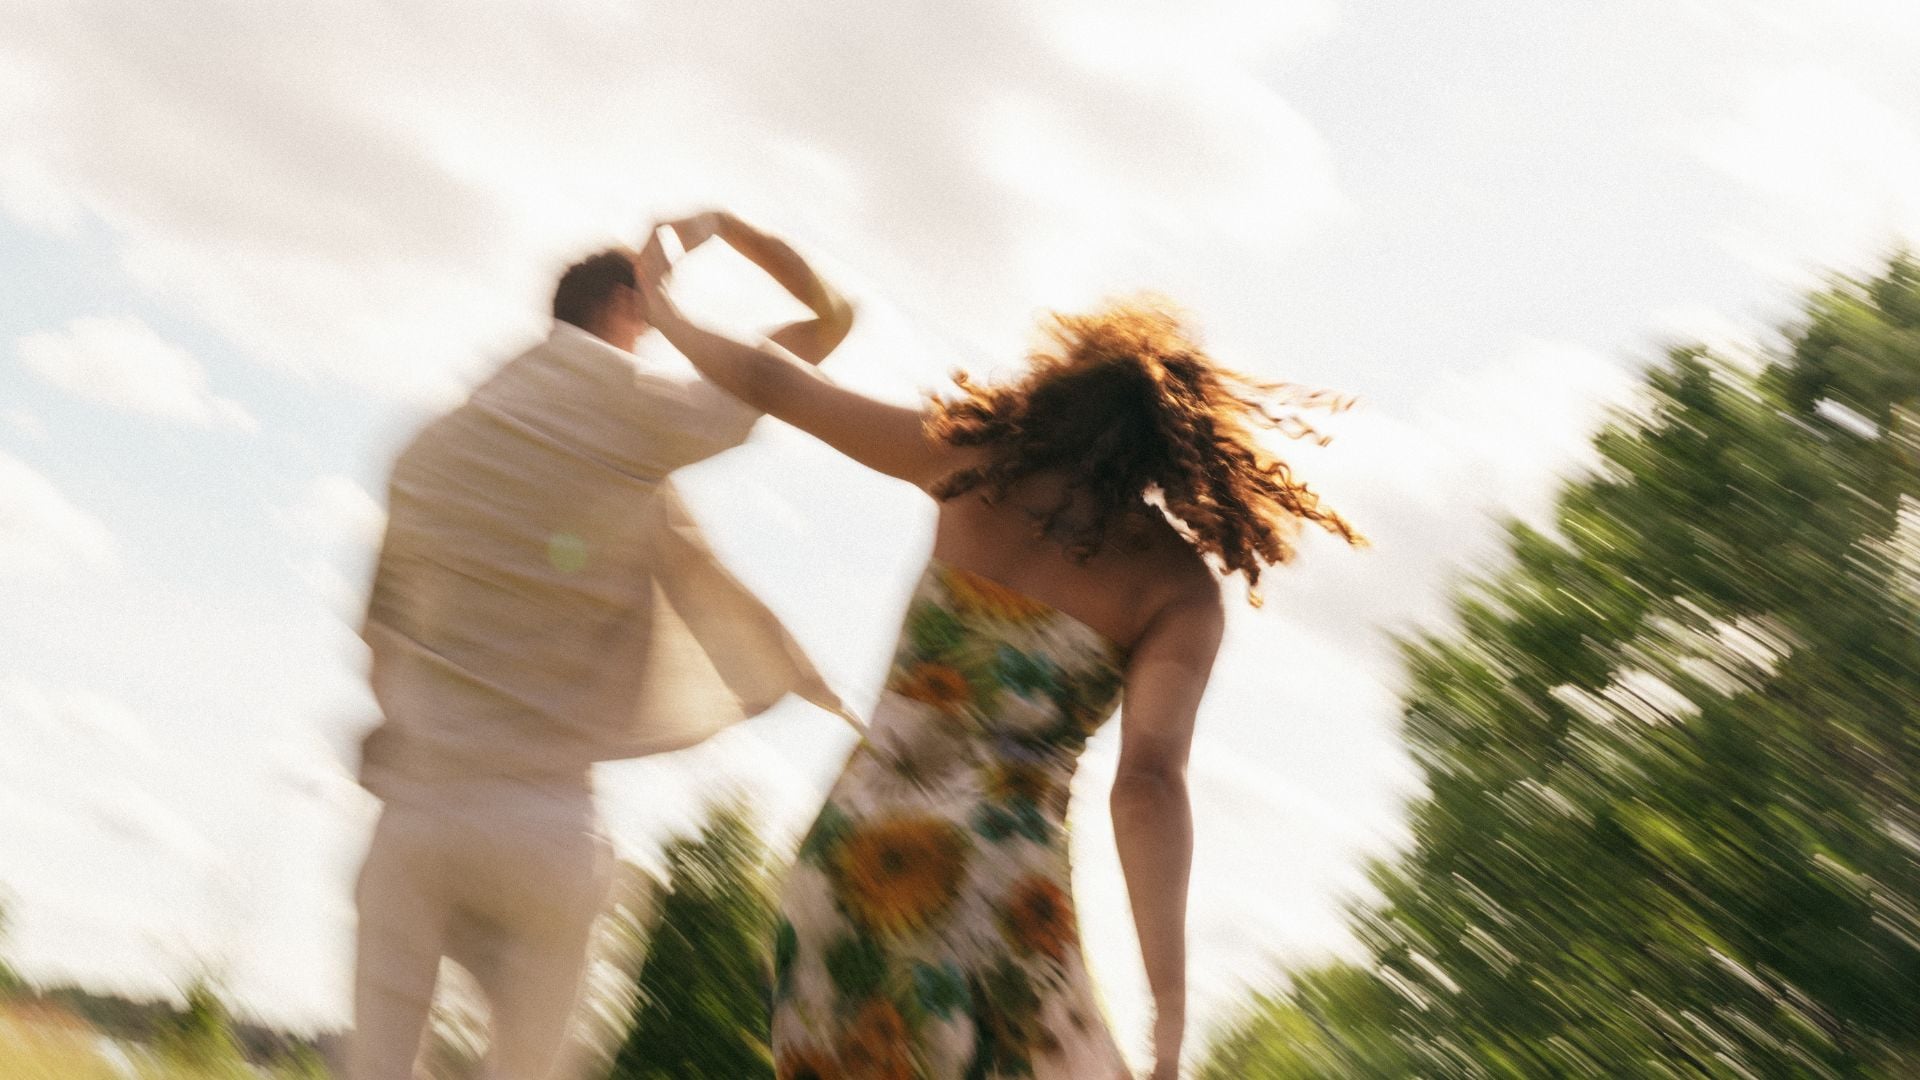
Why Motion Blur Matters at Normal Frame Rates
Our eyes and brain process movement with a certain amount of blur built in. Wave your hand quickly in front of your face right now. You see a slight blur trail, not perfectly sharp positions.
Video without proper motion blur can look choppy and unnatural. Each frame appears too sharp and disconnected from the next one. This happens when you use shutter speeds that are way too fast.
At normal frame rates around 24 to 30fps, the 180 degree shutter rule creates motion blur that looks natural. Moving subjects leave appropriate blur trails as they cross the frame. Camera pans feel smooth instead of stuttering.
How Different Shutter Speeds Change the Look
Faster shutter speeds with smaller angles create a totally different feel. Action movies like Saving Private Ryan used very short exposures around 1/192. This made battle scenes feel chaotic and immediate to viewers.
Slower shutters with bigger angles increase blur dramatically in your footage. This creates dreamy, flowing movement but can look unrealistic for normal scenes. Most professional work sticks closer to the 180 degree standard.
Phone footage often uses very fast shutter speeds outdoors without ND filters. This creates that choppy look people associate with amateur video. The lack of motion blur feels unnatural compared to cinema.
The Psychology Behind Motion Blur
Film and video show a series of still images really fast. Your brain fills in gaps between frames to create smooth motion. Motion blur helps this process work much better.
Without blur, your brain notices the jumps between individual frames more. Movement can look mechanical instead of natural and fluid. The right blur amount bridges these gaps effectively.
Too much blur makes everything mushy and hard to see clearly. Finding the sweet spot matters for professional looking results. At 24 to 30fps with normal speed subjects, the 180 degree rule hits this balance.
Where the 180 Degree Shutter Rule Actually Breaks Down
The 180 degree shutter rule only works reliably at certain frame rates. It assumes you’re shooting normal speed subjects at normal frame rates. Step outside these parameters and the rule starts falling apart fast.
Higher frame rates expose the rule’s biggest weakness. Shooting at 90fps for immersive video with a 180 degree shutter gives you 1/180. But if your subjects are moving at normal speeds, this freezes motion completely. There’s no benefit to going that fast with shutter speed.
The rule also fails with very fast moving subjects regardless of frame rate. A hummingbird’s wings won’t show “just the right blur” at 1/48. The wings move so fast you need much higher shutter speeds for any detail.
The Truth About High Frame Rate Shooting
Here’s something most guides won’t tell you about high frame rate shooting. If you’re filming people doing normal things at 90fps, you don’t need 1/180 shutter speed. A 1/90 shutter speed works perfectly fine.
Motion blur depends on how fast your subject moves during the exposure time. If 1/90 already freezes the motion completely, going to 1/180 achieves nothing. You’re just losing light for no reason.
Immersive filmmakers routinely shoot at 90fps with a 360 degree shutter angle. That’s 1/90 exposure time for normal speed subjects. The footage looks natural because the motion is already frozen at that speed.
The 180 degree rule made sense when frame rates matched subject speeds. At higher frame rates with slower subjects, it becomes meaningless. Subject speed should determine your shutter speed, not frame rate alone.
When Artificial Lighting Takes Priority
Fluorescent and LED lights flicker at frequencies matching local power standards. North America uses 60Hz power while Europe and many other regions use 50Hz. Your shutter speed needs to sync with these frequencies.
Shooting at 25fps, the 180 degree rule gives you 1/50 shutter speed. This matches 50Hz lighting perfectly with no flicker problems. But at 24fps, the rule gives you 1/48 which can cause visible flicker.
The solution is simple. Use 1/50 at 24fps when shooting under 50Hz lights. Use 1/60 at 25fps or 24fps under 60Hz lights. Matching your lighting frequency matters more than following the 180 degree rule.
Many filmmakers shoot conferences and presentations at 25fps with 1/60 shutter speed. The speakers stand next to 60Hz projection screens that light them. This prevents flicker even though it breaks the traditional rule.

Setting Up Your Camera for Better Motion Blur
Most cameras let you adjust shutter speed in the menu or with a physical dial. Cinema cameras may show shutter angle instead of speed. Check your manual to find these settings on your specific model.
Start by choosing your frame rate based on your final delivery format. Common options include 24fps for film look or 30fps for broadcast standards. But don’t let frame rate automatically dictate your shutter speed.
Think about your lighting conditions first. Are you under 50Hz or 60Hz artificial lights? Match those frequencies with 1/50 or 1/60 shutter speeds. This prevents flicker problems that ruin footage.
Dealing with Bright Outdoor Light
Bright outdoor lighting creates problems for using slower shutter speeds. Your camera needs faster shutters to avoid overexposure in direct sunlight. This is where phone footage gets that choppy look.
Neutral density filters solve this problem by reducing light entering your lens. Think of them like sunglasses for your camera sensor. They let you use slower shutters even in bright conditions.
Variable ND filters adjust light reduction by rotating the filter ring. Fixed ND filters work great when you know your lighting situation ahead. Either option helps you maintain proper exposure settings with natural motion blur.
Phone cameras especially need ND filters for outdoor shooting. Their fixed apertures and small sensors force very fast shutter speeds otherwise. Clip-on ND filters for phones let you control motion blur properly.
Creating Camera Presets
Create camera presets that match your common shooting situations. Save one for indoor 50Hz lighting at 1/50. Save another for 60Hz lighting at 1/60. This prevents fumbling with settings during shoots.
Lock your shutter speed and adjust exposure with aperture and ISO instead. This keeps your motion blur consistent throughout footage. Auto exposure modes will mess with shutter speed and ruin consistency.
Some cameras let you set minimum shutter speed limits in auto modes. This prevents the camera from going too fast accidentally. But manual mode gives you the most reliable control overall.
When Faster Shutter Speeds Make More Sense
Very fast moving subjects need fast shutter speeds no matter what frame rate you’re using. Sports, wildlife in motion, and rapid action require speeds like 1/500 or 1/1000. The 180 degree rule simply doesn’t apply here.
A hummingbird’s wings beat so fast you need extremely short exposures for any detail. Following the 180 degree rule would give you a complete blur. Crank the shutter speed way up instead.
Action sequences often benefit from faster shutters to capture clear motion. Fight scenes, chase sequences, and explosive moments need sharper frames. The reduced blur actually helps viewers track what’s happening.
Filming Computer Screens and Displays
Computer monitors and TV screens refresh at specific rates like 60Hz or 120Hz. Your shutter speed should match or be an even multiple of this rate. Otherwise you get annoying rolling bars across the screen.
Filming a 60Hz screen works best at 1/60, 1/120, or 1/240 shutter speeds. These sync perfectly with the display refresh cycle. The 180 degree rule becomes irrelevant for this technical requirement.
Some cameras offer synchro scan features for precise shutter adjustment. These tools help match display refresh rates exactly. Use them when filming gaming, presentations, or any screen content.
Slow Motion Shooting Considerations
Slow motion requires shooting at higher frame rates than your playback rate. Recording at 120fps and playing at 24fps creates 5x slow motion. But how should you set your shutter speed?
If you follow the 180 degree rule at 120fps, you get 1/240 shutter speed. This works fine for maintaining consistent blur levels across all your footage. The reduced blur per frame looks good when played back slowly.
But you could also use a slower shutter like 1/120 at 120fps instead. This maintains more motion blur in each frame for a different look. Test both approaches with your subjects to see what works better.
The key insight is that subject speed matters more than frame rate. Normal speed subjects don’t need super fast shutters even at high frame rates. The motion is already frozen at 1/120 or even 1/90.
Real World Shooting Scenarios
Wedding videographers face mixed lighting conditions constantly during events. Reception halls might use 60Hz lights while natural window light comes in too. Matching the artificial light frequency prevents flicker in those areas.
Documentary work often happens under whatever lighting exists on location. Fluorescent office lights, LED practicals, and daylight all mix together. Setting 1/50 or 1/60 based on the dominant light source works better than blindly following the 180 degree rule.
Commercial productions have more control over lighting but still face challenges. Product shots might need faster shutters to freeze small movements. Talking head interviews can use standard settings without issues.
Music Videos and Creative Projects
Music videos break the 180 degree rule constantly for creative effect. Fast cuts with varying motion blur create energy and visual interest. Some shots might use 1/1000 for frozen action while others use 1/30 for dreamy blur.
Dance videos sometimes need faster shutters to capture intricate footwork clearly. Other times slower shutters create flowing, artistic motion that matches the music. Your creative vision should guide technical choices here.
Experimental work gives you total freedom to try unconventional settings. Test extreme shutter speeds to create unique visual styles. Rules exist as starting points, not absolute restrictions on creativity.
Corporate and Broadcast Video
Corporate video usually sticks with standard shutter speeds for consistency. Clients expect professional looking footage without technical distractions. Using 1/50 or 1/60 based on your region works reliably.
Broadcast television varies by genre and production style overall. Dramas typically use slower shutters for cinematic motion blur. News and documentary work might go slightly faster for sharper action.
Sports broadcasts definitely break the 180 degree rule for clear action. Faster shutters help viewers track fast moving athletes and balls. The choppy motion blur matters less than capturing clear moments.
Building a Practical Shutter Speed Workflow
Start every project by checking your lighting conditions and subject movement. These factors should determine your shutter speed more than frame rate alone. The 180 degree rule provides a starting point but not the final answer.
For most indoor work under artificial lights, match the power frequency first. Use 1/50 for 50Hz regions or 1/60 for 60Hz areas. This prevents flicker and gives you decent motion blur.
Go faster when your subjects move quickly or you need sharper action. Go slower if you want extra blur for creative effect. But avoid going so slow that you can’t hold the camera steady.
A Better Rule for Modern Shooting
Instead of blindly following “shutter speed equals double your frame rate,” try this approach. Match your lights at 1/50 or 1/60 as your baseline. Then go faster if your subject’s speed demands it.
This works better across different frame rates and shooting situations. You’re not locked into specific shutter speeds that might not fit. Your lighting and subject speed guide your technical decisions instead.
Record test footage at the start of each shoot day to verify settings. Film someone walking at normal speed and check for natural motion blur. Pan across detailed scenes to test for smooth movement.
Communicating with Your Team
Make sure everyone on your camera team understands the shutter speed plan. Second camera operators need to match settings for consistency. Write your choices in daily camera reports for the editing team.
Explain why you’re breaking the 180 degree rule when you do. “We’re using 1/60 at 24fps to match the stage lighting” makes sense. Your team needs to understand the reasoning behind technical choices.
Share test footage with directors and producers early in production. Confirm everyone agrees on the motion blur aesthetic before shooting starts. Making changes after you’ve shot footage wastes time and money.
Checking Your Motion Blur Results
Review footage on a larger monitor rather than just your camera screen. The small display hides subtle problems with motion blur and stuttering. Always check clips at full playback speed too.
Pan shots provide excellent tests for proper shutter speed choices. Smooth camera movement should create even blur across the frame. Stuttering or juddering means something’s wrong with your settings.
Pay attention to subjects moving at different speeds in the same frame. Slow moving people might look fine while fast moving cars look choppy. This tells you whether faster shutter speeds would help.
Common Motion Blur Problems
Excessive blur makes everything look soft and unclear to viewers. This usually comes from too slow a shutter speed for your subject’s movement. Try going faster even if it means breaking the 180 degree rule.
Choppy motion with too little blur looks unnatural and amateurish. Phone footage shot outdoors often has this problem without ND filters. The super fast shutter speeds create disconnected frames.
Flickering under lights means your shutter doesn’t match the power frequency. Switch to 1/50 or 1/60 to sync with the electrical system. This fixes flicker instantly regardless of what frame rate you’re using.
Master Motion Blur Through Understanding
The 180 degree shutter rule provides a useful starting point for filmmakers. At typical frame rates with average subject speeds, doubling frame rate for shutter speed works fine. Your footage will have natural looking motion blur.
But understanding when the rule breaks down makes you more skilled. Artificial lighting flicker, screen recording, high frame rates, and fast subjects all need different approaches. Let your shooting situation guide technical decisions.
Practice evaluating motion blur in different scenarios to develop your judgment. Test various shutter speeds with your subjects and lighting conditions. The rule serves as a foundation, but your experience creates truly cinematic footage.

Darlene Lleno
Darlene Lleno brings a unique perspective to DIY Photography as someone who grew up surrounded by camera gear but chose words over lenses. With five years of writing experience, she specializes in photography content that’s both technically informed and genuinely passionate. Growing up with a photographer twin brother meant camera talk was everyday conversation in her household. While he mastered capturing moments, Darlene discovered she preferred being the subject and the storyteller behind the scenes. As a travel enthusiast and mother of two, she understands the importance of preserving life’s precious moments. When not exploring new destinations or writing for DIY Photography, you’ll find her reading or tending to her garden. Her approach to photography writing is refreshingly authentic, she may not be behind the camera, but she knows exactly what it takes to help others capture the shots that matter most.


Join the Discussion
DIYP Comment Policy
Be nice, be on-topic, no personal information or flames.