


12 Essential Photoshop Skills Every Photographer Should Know (With Video)
Jul 18, 2014
Jeff Guyer
Jeff Guyer is a commercial/portrait photographer based in Atlanta, GA. Still an avid street photographer and film shooter, Jeff also launched a kids photography class three years ago, where rumor has it he learns more from the kids than they learn from him.
Share:

“…If you’re saying in your head, ‘Oh, I’ll just fix that later in Photoshop,” stop what you’re doing and slap yourself as hard as you can.” –Zack Arias
If you’ve been reading my stuff for a while, you know that I’m a huge proponent of getting it right in the camera. Exposure, lighting, composition– all of it. As I tell my students, Photoshop is a tool, not a crutch. A bad photo is a bad photo, and no amount of post processing is going to miraculously turn it into a good photo. A good photo can very often be improved with a few well-placed tweaks and adjustments, but it’s just as easy to kill a perfectly fine photograph by going overboard in Photoshop. Still, though, photo editing is a fact of life and I think there are certain essential Photoshop skills that every photographer should know.
One of the beautiful things about Photoshop is that there seem to be at least five or six different ways of accomplishing just about everything. What I have listed below is just a matter of opinion and personal preference. I’ve been using Photoshop since Version 5, so I’ve had a little bit of time to work out the kinks in my workflow. Your “essentials” may be different. These are my mine, in no particular order.
Cropping
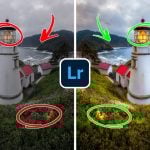
While most of us think about cropping only in terms of preparing an image for print or web display, the truth is that the crop tool can be invaluable when it comes to either correcting or creating an entirely new composition. The crop tool went through a major overhaul in CS6, giving the user the option of either dragging the image itself through the crop box or switching back to “Classic Mode” in the tool settings. In either case, saving presets for size and resolution is a great way to get a more accurate look at how your image will appear when printed or posted on line. I prefer using the crop tool in Classic Mode. It may be just because it’s what I’m used to, but dragging the crop box around the image (rather than the other way around) feels like a more intuitive approach to me.
Brightness & Contrast
Brightness and contrast adjustments can be a valuable tool in finding and correcting flaws in exposure. Remember that it is very easy to take these adjustments too far, so apply them carefully. While I think it’s important to be comfortable with these tools in Photoshop, I do think they are adjustments much better suited to RAW files in Lightroom. Remember that RAW files contain much more information than JPEGS and processing those files in Lightroom is non-destructive. Still, though, being able to adjust brightness and contrast in Photoshop is a basic skill that often comes in handy.
https://www.youtube.com/watch?v=uVqksEZx5hg
Curves & Levels
As long as we’re on the subject, curves and levels are basically a more advanced approach to brightness and contrast. While the brightness and contrast sliders apply global changes to the image, curves and levels allow you to make much more targeted, finely tuned adjustments. Each, for instances, allows you to precisely pick black, white, and gray points within the image and make adjustments based on those selections. Curves can be a little intimidating at first, but once you get a handle on it, you’ll wonder how you ever got along without it.
Saturation
Just like adjustments to brightness and contrast (regardless of method), be careful when adjusting the saturation. It’s very easy to bump it just a little too much and be left with a result that seems to defy the laws of nature. If you are going to make adjustments to either hue or saturation, I strongly suggest clicking the drop-down menu in the dialog box and switching from Master to whichever of the color selection options is mot likely to yield the result you’re looking for. One of the most common uses of this tool in my workflow is for adjusting skin tones. More often than not, a slight reduction in the reds is all that it takes.
https://www.youtube.com/watch?v=39kmP4rxFjs
Working With Layers
Coming to an understanding of layers was like hearing angels singing as clouds parted before my eyes. The concept itself is pretty basic. Each layer contains data. How much of that data is visible is based on each layer’s opacity and blending mode. Think about an actual printed photo for just a moment. Now think about placing a sheet of paper directly on top of it. We know there is a photo underneath the paper layer, but we can’t see it right away. As we remove bits of paper, parts of the photo below begin to emerge. Now think of the top layer as an exact copy of the original beneath it. By making changes to the opacity of the top layer, as well as to the blending mode (how the layers interact with each other), we can make specific, targeted changes to parts of the image, rather than global changes that may go too far. Another benefit to mastering layers is that it allows you to make each image adjustment on its own layer, preserving the original and creating a finer sense of control over the edits.
Sharpening
This is another one of those Photoshop skills that takes practice and a light hand. You’re walking a fine line here between “sharp” and “what the hell happened?” When you apply sharpening, you are basically increasing edge contrast. This means that small/fine features stand out more. Using the Unsharp Mask option lets you fine-tune the application a bit better than general, global sharpening, but either option is best applied on its own layer. As with adjustments to brightness and contrast, sharpening is a step that is probably best applied in Lightroom. Either way, however, it should always be your last edit. When it comes to my own workflow, I only apply sharpening after I have already cropped the image to its “final” size and resolution. I do this last because you require a different amount of sharpening for print than for web, etc.
Cloning and Healing
The clone stamp and healing brush are two of your most important friends when it comes to removing unwanted elements from your image. This can be anything from spots on your sensor to stray hairs and facial blemishes. The clone stamp allows you to sample from specific areas within the image in order to blend your corrections as seamlessly as possible. This is particularly important when working on faces. The spot healing brush samples from the pixels immediately surrounding the area you wish to correct. Varying the size and hardness of the brushes will help you avoid the telltale brush strokes and artifacts that some photographers leave behind.
Content Aware Fill
The first time I saw what content aware fill could do I was speechless. First introduced in PS CS5, content aware fill is basically the clone stamp on steroids. After drawing a selection on larger unwanted elements within the frame, content aware fill “reads” the surrounding area of the image and (usually) seamlessly removes those unwanted elements. As miraculous as content aware fill might be, however, you do have to be careful when using it because it doesn’t work perfectly with every photo, particularly when it comes to busy backgrounds.
Color Balance
Whereas saturation adjustments address how much color is present, color balance addresses how the existing colors interact with each other. Curves and levels adjustments do a great job of dealing with the contrast between mid-tones and highlights, for example, but being able to target how colors appear in those same mid-tones or highlights can help you make subtle changes to the overall feel of the image, particularly when it comes to color temperature.
https://www.youtube.com/watch?v=wBWSUVjvQtI
Wrap-Up
So, there you have it. Twelve Photoshop skills every photographer should know. Like I said at the beginning, this is all a matter of opinion and personal preference, but I think these skills together form a solid foundation for almost any photo editing or processing that might come your way. Yes, almost all of these adjustments are available in Lightroom, so if most of your workflow is conducted in Lightroom, you should definitely put these on your “must learn” list if you haven’t already.
Everything on this list originated in the darkroom. Cropping used to be done with an enlarger. Brightness and contrast were products of how long the paper was exposed and how long it spent in the chemicals. It all started under the warm, red glow of darkroom safety lights. These were time-consuming tasks back then, but they still formed a solid foundation for any photographer serious about his output– just like Photoshop and Lightroom do today.
Got a favorite Photoshop or Lightroom technique? Tell us about it.

Jeff Guyer
Jeff Guyer is a commercial/portrait photographer based in Atlanta, GA. Still an avid street photographer and film shooter, Jeff also launched a kids photography class three years ago, where rumor has it he learns more from the kids than they learn from him.


Join the Discussion
DIYP Comment Policy
Be nice, be on-topic, no personal information or flames.
11 responses to “12 Essential Photoshop Skills Every Photographer Should Know (With Video)”
No liquidfy?
While the liquify tool can come in handy from time to time, I don’t really see it as essential– at least in terms of my own workflow.
Why does a photographer to know photoshop skills? Just take the photo as you would like to have it!
Because a good photo isn’t just a record of what you saw, but a way to communicate. Speak to just about any good traditional photographer using film, and you’ll find that what you see on their print is not just what came out of the camera, but is modified in some way to better convey the feeling they wanted to communicate. Photography is the art of creating a beautiful image with a message, it is not the art of using a camera.
The negative— what was captured by the camera— is just a capture of the basic information. It is the rough draft to the story, or the musical score for the orchestra. All the information is there, but it doesn’t move you (read a good musical score lately?).
Even back in film days, the process of capturing an image and post processing were always separate. Ansel Adams even wrote a three volume masterwork of instruction that are divided that way: The Camera, The Negative, The Print.
By and large, straight out of camera has always been a myth. There has always been a degree of interpretation and style between pressing the shutter button and the final product on a piece of paper/computer screen. (full disclosure: I understand the story behind the story when someone says “this is an SOC picture” but I hear reasonably experienced photographers… saying this to other reasonably experienced photographers.)
If you learn about different techniques for developing film, and all the bag of tricks available with an enlarger, you’ll find that a lot of the tools have a legacy from the darkroom. Shoot… if you got clever you could even clone stamp on the enlarger.
Push processing, flashing the film, holding back skies, filtering, long exposure, multiple exposure, variables to chemical baths…
These would all produce a SOOC negative back in the film days. You’re right, it’s always been a myth.
Action or sports photography might be a good example here. Unlike a landscape or portrait, you (often) don’t have time to perfect your composition — though your instincts should get better with time. Sometimes the “moment” happens in an unexpected direction, where the light is different and all you have time to do is whip the camera around and click. Cropping can save these images. White balance can save them. Levels/curves can save them.
But even in a more time-relaxed scenario there are great examples too. I once shot some senior portraits. The best pose/smile/composition had a housefly near the girl’s face — in perfect focus, which no one saw at the shoot, but I saw later when selecting images. She would not have bought that photo. I cloned out the fly. Presto; she bought the photo.
if only my clients would agree. Apparently some people get upset about wrinkles and grey hair. Go figure
lol
why develop film photos?
Excellent points, everyone. Thanks for joining the conversation.