


Shooting Paintings for My Mother in Law
Feb 17, 2008
Udi Tirosh
Udi Tirosh is an entrepreneur, photography inventor, journalist, educator, and writer based in Israel. With over 25 years of experience in the photo-video industry, Udi has built and sold several photography-related brands. Udi has a double degree in mass media communications and computer science.
Share:
I love my mother in law. I know this is not a popular statement, but it may explain the following tutorial and experience I am about to share with you.
My mother in law is an artist. She paints pictures, and lovely ones, if you’ll listen to my un-bribed opinion. Last week she asked me to make a video clip from some of her shots so she can share her art. The video is also to be used as a pilot for distributing her catalog in video form.
In the following article I will describe the process of making the promotional DVD, including the setup and lighting, the post processing and the creation of the slideshow. (And of course the “thank you” note I got from my mother in law – priceless).
Setup and Lighting
 It was late in the afternoon when my wife and I were wrapping up a nice visit at my in-laws when she asked me to create the promotional slideshow. Luckily, I as after a shooting session had some of my gear around. (see how I made the diagram)
For this setup I used two Nikon SBs mounted on swivels and shoot-through umbrellas. Knowing I will have to take pictures of small paintings (around 30cm X 30cm) I wished I had a long zoom. Sadly, I only had the Nikon Kit lens the 18-70, and this is what I used for the shoot. If I could have used a different lens I would have used a longer zoom.
Since I know I only need low res and I had no other alternative for making the shots in the following two week, I settled. Knowing that it will cost me in post processing crops and resolution.
Following the great advice from Light Science and Magic I placed the lights outside the family of angles created by the camera and the largest painting. Now let me talk a little about that.
As a general rule when a light source hits a surface, it bounces back in the same angle in which it hit the surface. The area in which the flash reflection is “seen” by the camera is called “The Family of Angles”. You can easily create the family of angles by making an imaginary line that goes from the lens to the edge of the painting and bounces back as if the painting was a mirror. So flashes – outside the family of angles. The camera was set on a tripod to try and be a horizontal as I can.
The next step was taking the pictures. I shot at ISO 200 with aperture of f/5.6 and a medium shutter speed. Just before I took the first shot I made a test: shoot with no flash. The picture was night black. Good. No ambient light was getting in the way. I took a focus read, and placed the focus on manual so it will not change during the shoot.
We had a workflow going on. My wife placed the painting on the wall; I checked to see if it was leveled and took a shot.
After 71 painting we were done for the day.
Post processing
 The first step in the post processing flow was to align the color with the true color of the painting. Using one of the paintings as a live model, I matched the white balance and contrast setting in Lightroom. Exposure was dead on the spot.
Now I went through each of the images and made sure it was not tilted. Although my wife and I did a great job of mounting the images, some were slightly tilted. I used the straighten tool to fix all tilting issues.
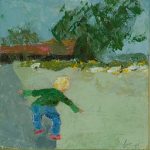
Lastly I had to apply a crop to each of the images. In the picture above you can see the ratio between the images taken and the final size of the image. A waste of almost half of the frame. Sad, but no other choice at the time of the shoot.
The last step was to export the cropped and adjusted images to jpegs.
The Slideshow
 To create the slideshow I used ProShow Gold, my favorite software to create slide presentations.
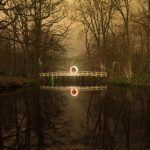
The first step was to create a new slideshow. After that I imported all the images to the new slideshow. We decided to go by theme and create three different presentations: Views for landscape; Portraits for people and Home for interiors. The slideshow at the top is the Views slideshow.
After importing the images, I loaded the great Ain’t No Sunshine by Bill Withers into the show and selected Sync Show to Audio (Ctrl+Y) to make sure the show and the song were aligned. I also selected all slides and chose Fit to Safe Zone (Alt+9) to create a black framing around each of the slides.
Last step was to export as a video file and load to YouTube. Happy viewing.
If you are into art, which I am sure you are if you got to the bottom of this post, you’d be most interested to know that Brian Auer and six other great photographers have lunched the Fine Art Photoblog – A unique website dedicated to collectors and admirers of fine art photography.

Udi Tirosh
Udi Tirosh is an entrepreneur, photography inventor, journalist, educator, and writer based in Israel. With over 25 years of experience in the photo-video industry, Udi has built and sold several photography-related brands. Udi has a double degree in mass media communications and computer science.


Join the Discussion
DIYP Comment Policy
Be nice, be on-topic, no personal information or flames.