


Understanding Lens Compression: Why Your Portrait Backgrounds Look Flat
Oct 21, 2025
Darlene Lleno
Darlene Lleno brings a unique perspective to DIY Photography as someone who grew up surrounded by camera gear but chose words over lenses. With five years of writing experience, she specializes in photography content that’s both technically informed and genuinely passionate. Growing up with a photographer twin brother meant camera talk was everyday conversation in her household. While he mastered capturing moments, Darlene discovered she preferred being the subject and the storyteller behind the scenes. As a travel enthusiast and mother of two, she understands the importance of preserving life’s precious moments. When not exploring new destinations or writing for DIY Photography, you’ll find her reading or tending to her garden. Her approach to photography writing is refreshingly authentic, she may not be behind the camera, but she knows exactly what it takes to help others capture the shots that matter most.
Share:
Lens compression photography totally changes how your portraits turn out. Some shots make backgrounds look super close to your subject. Others show tons of space between them. That flattened look isn’t some kind of magic. You don’t need expensive gear either. It’s just distance and focal length working together.
Most photographers think their lens creates flat backgrounds. That’s not really true. Where you stand matters way more than your glass. Move back and zoom in to get that compressed look. Step closer with a wide angle and everything spreads out.
What Lens Compression Photography Actually Means
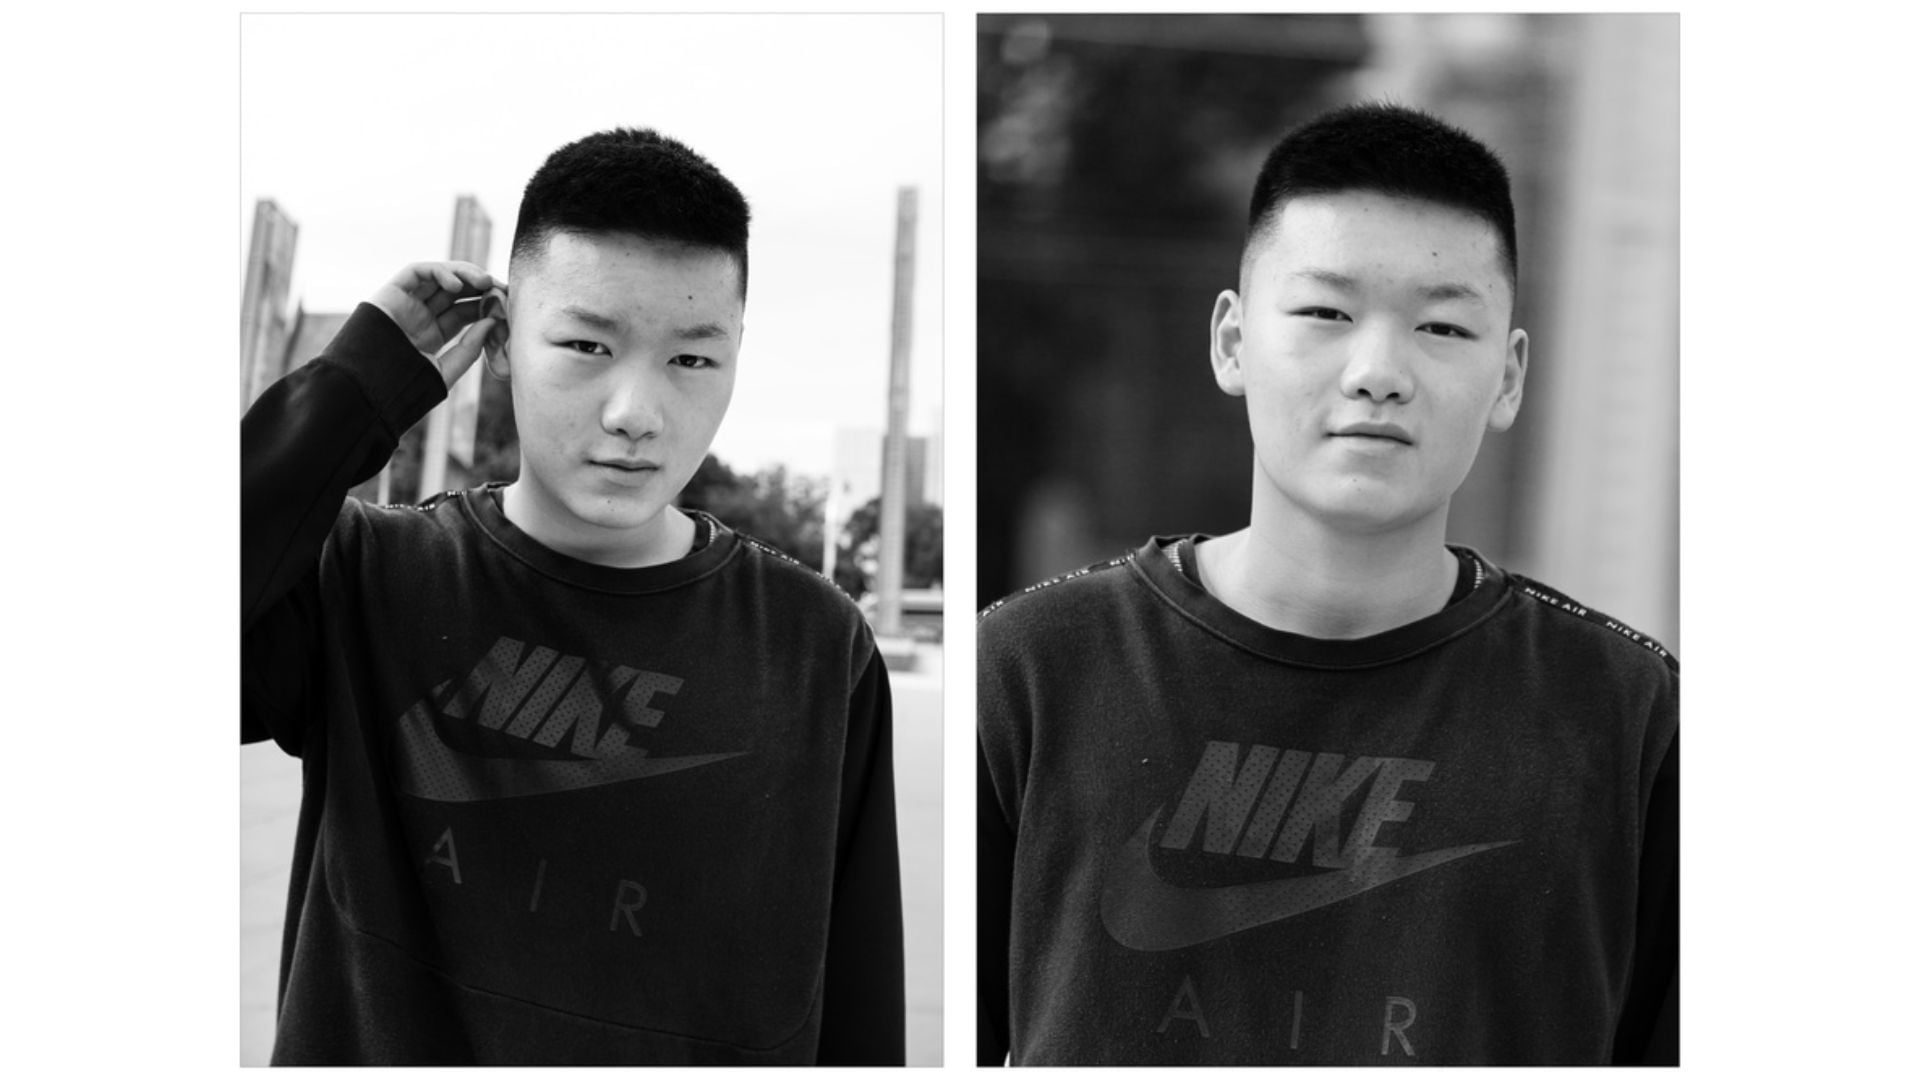
Lens compression photography happens when you back away from your subject. You also need to use longer focal lengths. The background looks larger and closer than reality. Mountains appear right behind your subject. City buildings stack on top of each other.
Here’s the thing about “compression.” The name kind of lies to you. Lenses don’t squeeze anything together. Your viewing angle changes. Your distance from the subject changes too. A telephoto lens at 200mm shows a narrow slice. Background elements look bigger compared to your subject.
How Your Distance Creates the Effect
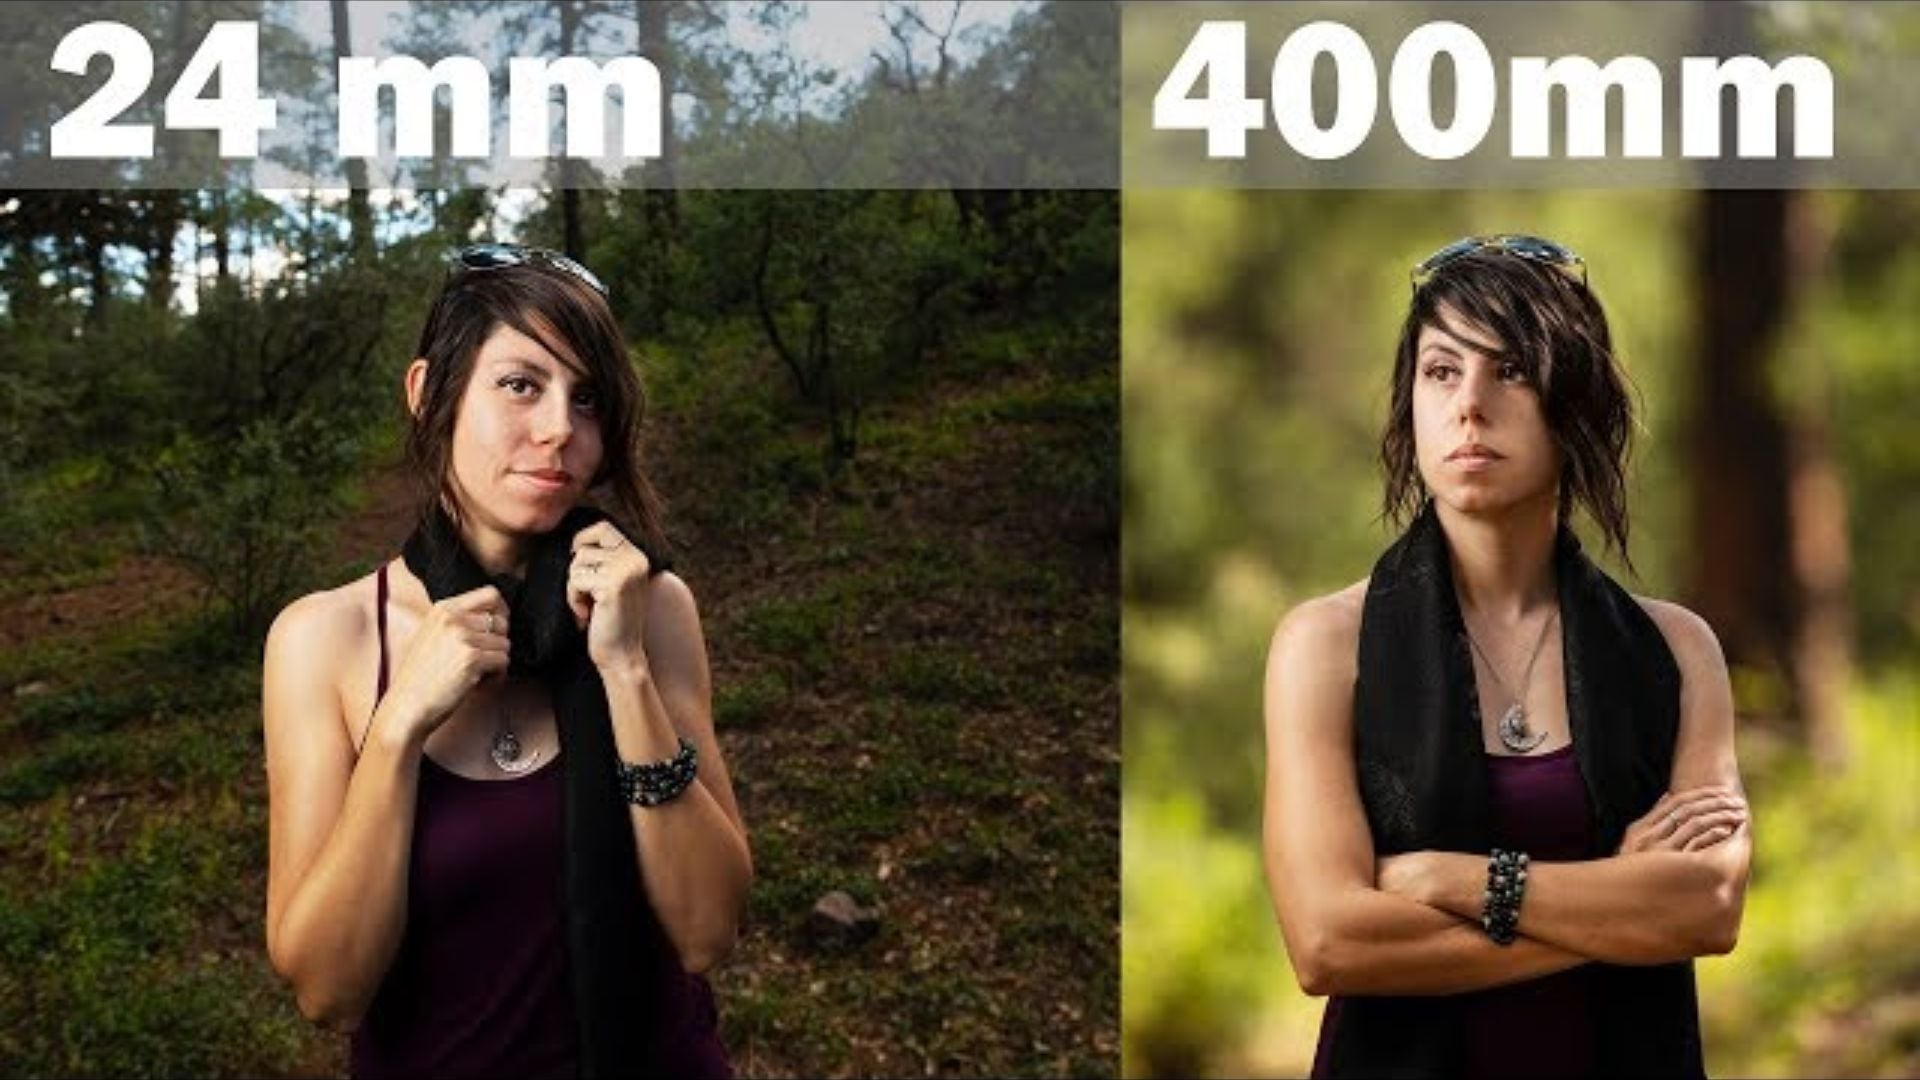
Where you stand matters more than anything else. Your physical distance controls the whole look. Try this experiment. Stand five feet from someone with a 50mm lens. Now back up to 20 feet and zoom to 200mm. Keep your subject the same size in both shots. The background will look totally different.
Shot two makes the background look way larger. It also appears much closer. You moved further from your subject. The background stayed in the same spot. Those extra 15 feet barely changed how the background looks. But they made a huge difference to your subject’s size.
Wide angle lenses need you close. Shoot at 24mm or 35mm from 3 to 5 feet away. This close position makes backgrounds tiny and far. Portrait photographers know this well. Longer glass works opposite.
Telephoto work means standing far back. Use 135mm or 200mm from 15 to 30 feet. This creates that compressed, flat look. Your subject stays sharp. Mountains or buildings behind them stack together.
Why Focal Length Changes Background Appearance
Focal length controls how much the scene fits in your frame. A 24mm lens grabs a super wide view. A 200mm shows a narrow slice. This field of view affects backgrounds directly.
Longer focal lengths magnify the whole scene equally. Your subject gets bigger. The background gets bigger too. Back up to keep your subject sized right. The background stays magnified. This makes it look closer and larger.
Shorter focal lengths work backward. They shrink background stuff and push it away. A 28mm makes mountain ranges tiny and distant. Switch to 200mm from further back. Those peaks suddenly dominate your frame.
You get compression with any focal length above 85mm. Pros often use 135mm to 200mm for max impact. Wildlife shooters with 400mm or 600mm see extreme effects. Birds appear right against distant backgrounds.
How to Control Lens Compression Photography
Creating compression needs some planning. You can’t just zoom in and expect magic. The technique requires specific positions and subject placement. Here’s what works best.
Pick Your Background First
Choose something interesting that’s far away. Mountains work great. City skylines do too. Forest backdrops also create nice effects. The further your background sits, the better it works.
Position Your Subject Carefully
Put your subject between you and that background. Leave plenty of space behind them. At least 20 to 30 feet works well. This gap makes compression possible.
Step Back and Zoom In
Move away from your subject. Use a telephoto between 85mm and 200mm. Frame your subject to fill the space. The background will now look larger and closer.
Choose Your Aperture Wisely
Stop down to f/5.6 or f/8 for recognizable backgrounds. Shoot wide at f/2.8 for softer looks. Both work depending on your vision. Understanding aperture helps you make better choices.
Mistakes That Kill Your Compression Shots
New photographers mess up lens compression photography in predictable ways. Avoid these common problems to get better results fast.
Standing Too Close to Your Subject
This ruins compression no matter what lens you use. A 200mm from 6 feet away won’t work. You need real distance. Back up to at least 15 feet or more.
Using Too Much Background Blur
Aperture at f/1.4 or f/2 makes backgrounds unrecognizable. They turn into blobs of color. The compression effect needs visible backgrounds. Try f/5.6 or f/8 instead. Your backgrounds stay clear while keeping good separation.
Forgetting About the Foreground
Compression affects everything in your frame. Objects between you and your subject also look larger. Keep your foreground clean. Or use it on purpose in your composition.
Expecting Compression from Wide Angles
This won’t happen. Physics doesn’t work that way. Wide angle lenses spread things out. Telephoto lenses stack them together. You can’t fight basic science.
Best Focal Lengths for Lens Compression Photography
Different focal lengths create different compression levels. Each range offers specific benefits and practical uses. Here’s what works for various situations.
85mm to 135mm Range
This gives subtle compression. Great for environmental portraits where context matters. You don’t need to stand super far away. Working distance stays comfortable at 10 to 20 feet.
135mm to 200mm Range
This creates strong compression. It’s the sweet spot for dramatic portraits. Backgrounds look noticeably larger. They don’t look completely flat though. Most pros work in this range.
200mm to 400mm Super Telephoto
This creates extreme compression. Everything looks stacked on top of each other. Landscape shooters use these to make distant mountains huge. Wildlife photographers rely on this for habitat shots.
Prime vs Zoom Lenses
Prime lenses often perform better for compression. A sharp 135mm f/2 gives cleaner backgrounds. A 200mm f/2.8 prime works great too. Zoom lenses like 70-200mm offer flexibility. They may sacrifice some sharpness though.

Using Compression Beyond Portrait Work
Lens compression photography isn’t just for shooting people. Other genres benefit from this technique too. Here’s how different photographers apply compression effects.
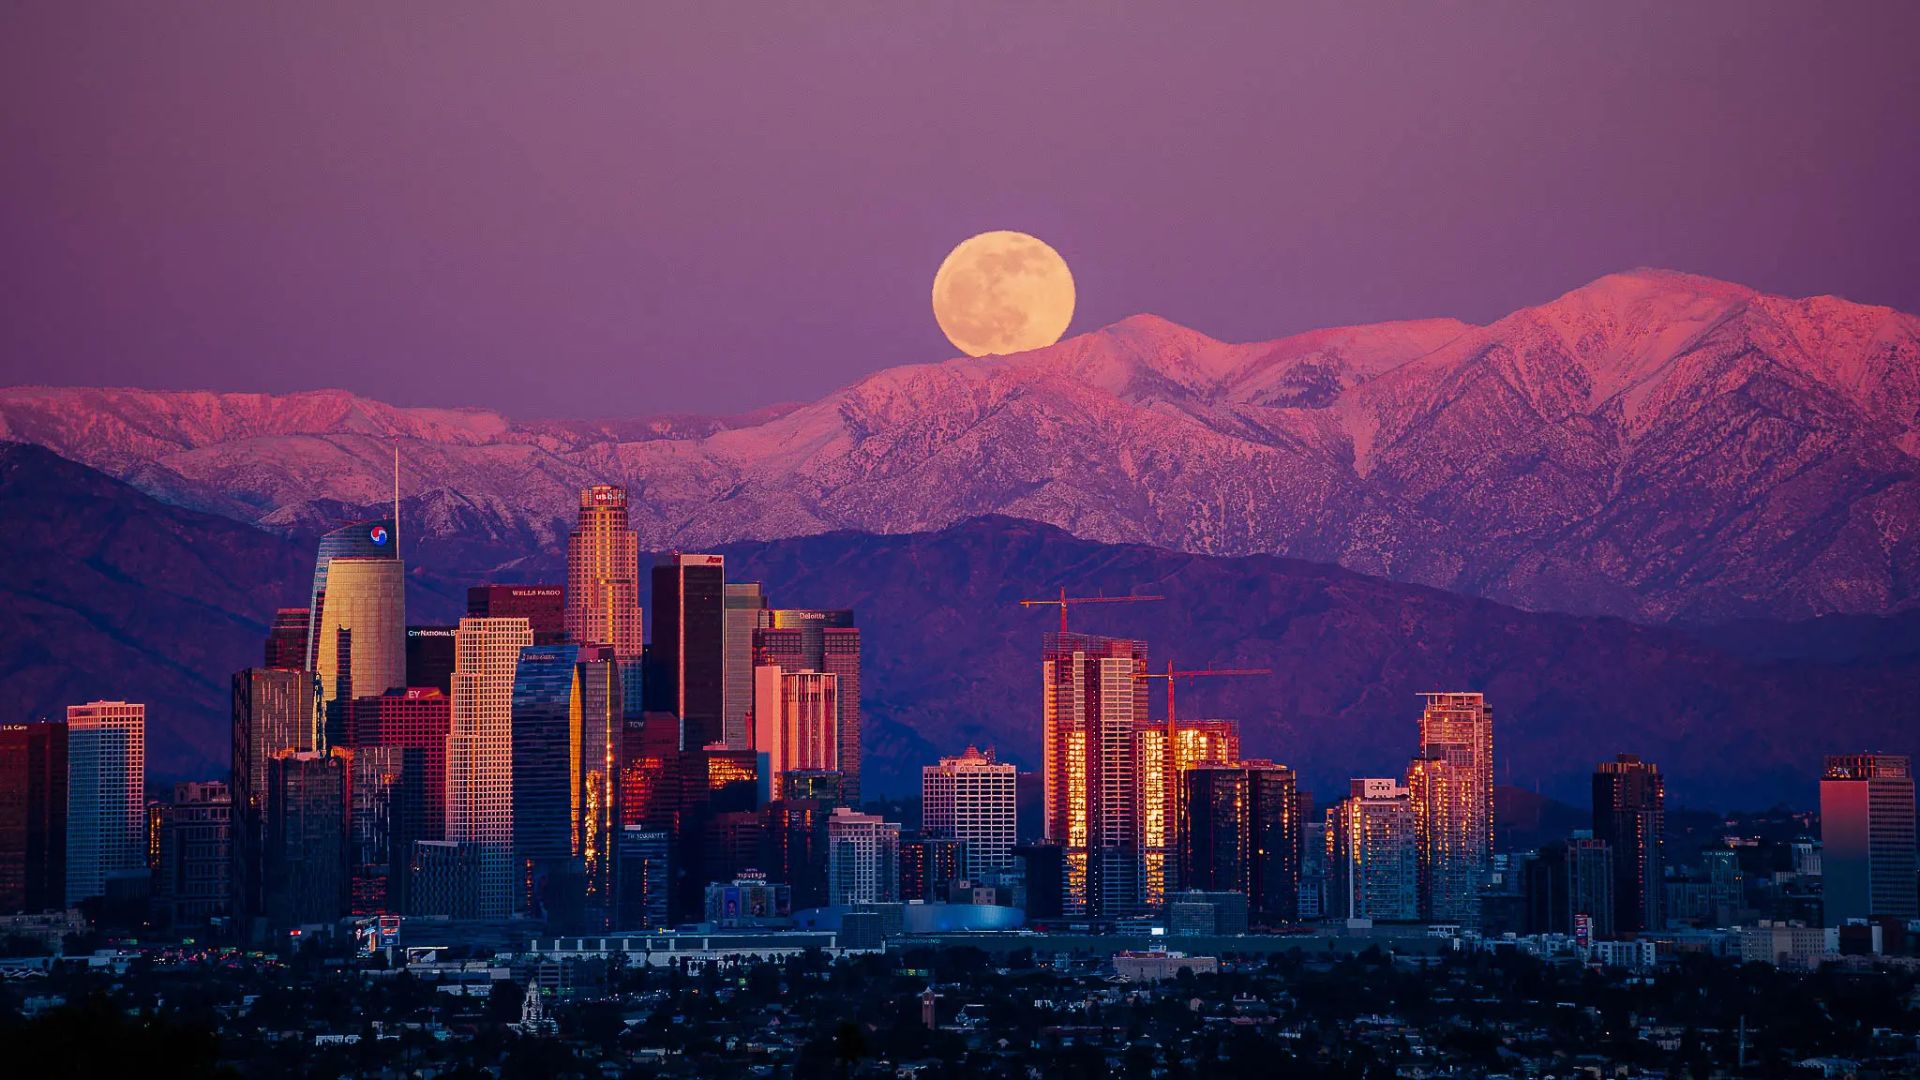
Landscape Photography Applications
Compression creates drama with distant peaks. A 200mm lens makes mountain ranges look massive. Each ridge appears to sit right behind the next. Layers stack beautifully.
Street Photography Benefits
Long lenses stack buildings, people, and cars together. This creates classic urban density looks. Cities feel crowded and busy. A 135mm lens from across the street works perfectly.
Wildlife Photography Uses
A 400mm lens brings distant backgrounds forward. Birds look like they sit against mountain ranges. The effect adds context. Your animal stays the clear subject though.
Sports Photography Applications
Compression eliminates distracting backgrounds. A 300mm from the sideline compresses fields and crowds. This isolates athletes against uniform backgrounds. Action shots look cleaner.
Architecture Photography Methods
Telephoto lenses from a distance flatten perspective lines. This reduces distortion. Shows how structures relate to surroundings. The compressed view often looks more accurate.
Camera Settings for Lens Compression Photography
Getting compression right needs more than distance and focal length. Your camera settings have to support the technique. Here’s what matters most for success.
Shutter Speed Requirements
Use the old 1/focal length rule as your minimum. A 200mm lens needs 1/200s or faster. This prevents camera shake from ruining shots. Image stabilization helps but doesn’t replace good technique. According to proper camera handling and fast shutter speeds are essential for telephoto work.
ISO Adjustments
Longer lenses often have smaller max apertures. A 70-200mm f/4 needs more light than a 50mm f/1.8. Push ISO to 800 or 1600 without worry. Maintain those fast shutter speeds.
Focus Mode Choices
Continuous autofocus tracks moving subjects. Single point focus works better for static portraits. Modern cameras offer eye detection. This helps keep focus sharp on your subject’s eyes.
White Balance Settings
Daylight or cloudy presets work for most outdoor work. Auto white balance struggles with backlit situations. Compression effects often shine in these conditions.
Exposure Compensation Tips
Bright backgrounds need adjustment. Compression often places subjects against sky or bright surfaces. Dial in +1/3 to +2/3 stops. This prevents underexposed faces.
Understanding Perspective vs Lens Compression
Photographers mix up perspective and compression all the time. These concepts relate to each other. But they’re different things. Perspective comes from your camera position only. Compression results from combining distance with focal length.
Take two photos from the exact same spot. Use a 50mm for one. Use a 200mm for the other. Crop the 50mm to match the 200mm framing. The perspective stays identical. Both show the same relationship between elements.
The difference shows up when you move. Step back with the 200mm. Keep your subject the same size. Now perspective changes because your position changed. The telephoto maintains subject size. It shows this new perspective though.
This explains why “zooming with your feet” misleads people. Moving changes perspective completely. Zooming just crops the scene. Pros understand this. They use it creatively.
Wide angles from close up exaggerate perspective. Things near the lens look huge. Distant stuff shrinks down. Telephoto from far away compresses perspective. Near and far elements appear closer in size.
Picking Locations for Compression Photography
Location scouting makes or breaks your lens compression photography. You need specific features to make it work. Here’s what to look for when finding spots.
Clear Sightlines Matter Most
You need distance between shooting position, subject, and background. Parks work great. Fields do too. Open spaces beat crowded areas. Being able to move 30 to 50 feet back is key.
Elevated Backgrounds Create Drama
Mountains work perfectly. Hills do too. Tall buildings in the distance also work well. These large elements become more impressive when compressed. Flat backgrounds like walls show less effect.
Busy Backgrounds Benefit Most
A forest of trees looks better stacked together. City streets with multiple buildings create layers. Empty backgrounds like sky waste the effect.
Time of Day for Lighting
Early morning or late afternoon sun adds dimension. Side lighting creates shadows. These help separate foreground from background. Midday sun often flattens everything.
Weather Conditions Impact
Hazy or foggy days reduce background contrast. This can soften compression effects. Clear days with good visibility maximize impact. Distant backgrounds show up better.
Real Examples of Lens Compression Photography
Theory helps you understand the basics. Real examples make lens compression photography click though. Professional work shows how different setups create specific looks.
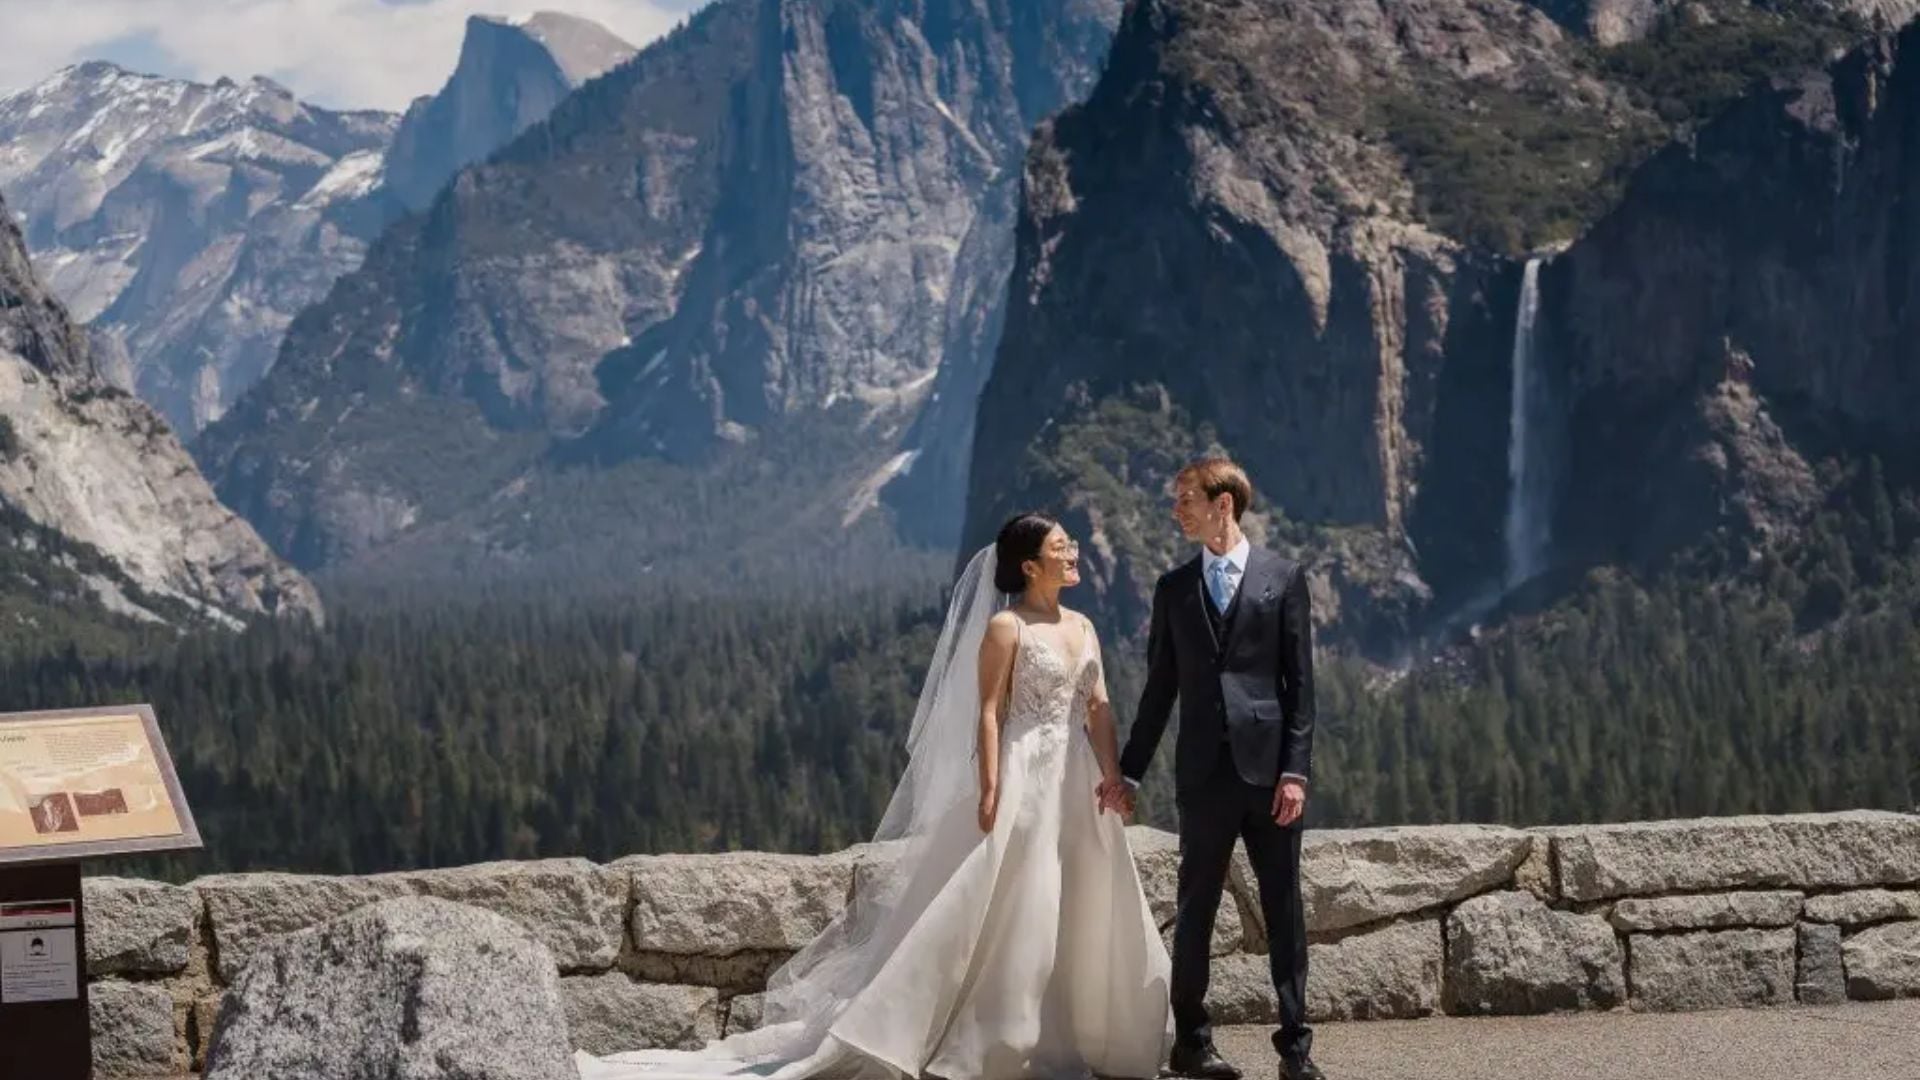
Wedding Photography Examples
Wedding shooters often use 135mm lenses for ceremony shots. Standing 25 to 30 feet back compresses the venue. Churches or outdoor settings appear grand. The couple stays prominent though. This adds context without overwhelming the main subjects.
Fashion Photography Applications
Fashion work relies on 85mm to 200mm compression regularly. Models shot from proper distances show flattering proportions. Backgrounds compress into soft color fields. Recognizable locations don’t compete for attention.
Outdoor Portrait Sessions
Natural elements work great with compression. Put a subject 20 feet from a tree line. Shoot from 40 feet back at 200mm. Trees stack closely together. This creates a lush background from sparse woodland.
DIY Portrait Success
You don’t need pro gear for this. A basic 55-200mm zoom works fine. Find a local park with some distance. Position your subject 30 feet from background trees. Stand back another 30 feet. Zoom to 200mm. The compression shows up clearly.
Street Photography Techniques
Shooting down city streets from a block away works great. Use 135mm or 200mm. Buildings and people stack together. This creates that dense city feel. Everything appears packed together. The technique turns ordinary streets into geometric compositions.
Fixing Common Compression Problems
Even experienced shooters hit snags with lens compression photography. Most problems have simple fixes. You just need to identify them first.
Blurry Backgrounds Issue
This plagues many compression attempts. Usually means shooting too wide open. An f/1.8 or f/2 aperture creates too much blur. Compression effects disappear. Try f/5.6 or f/8 instead. Backgrounds stay recognizable. Separation remains good.
Subject Isolation Problems
This happens without enough distance. Your subject stands 10 feet from the background. Compression won’t look dramatic. Move them 30 feet away from the background. Then step back yourself to reframe.
Camera Shake Issues
This ruins telephoto shots regularly. Even 1/200s can show blur with a 200mm. Your technique might be poor. Use faster speeds around 1/400s or 1/500s. Image stabilization helps. Proper hand holding matters more though.
Flat Looking Images
Poor lighting often causes this. Front lighting removes dimension from compressed scenes. Move so light hits from the side or back. This creates shadows and highlights. Shows depth despite compressed perspective.
Distracting Foregrounds
Objects between you and your subject get compressed too. Scout your position for clean foreground space. Move left or right. Avoid poles, branches, or other obstacles.
Advanced Compression Techniques
Once you nail basic lens compression photography, advanced techniques open up new possibilities. These approaches push the effect further. They combine it with other skills too.
The Brenizer Method Approach
This uses compression with panoramic stitching. Shoot multiple compressed portraits at wide apertures. Stitch them together later. You get an impossibly wide field of view. Shallow depth of field stays throughout. This creates a look that mimics medium format cameras.
Multiple Exposure Compression
Stack different moments in the same compressed space. Shoot your subject in various poses. Use the same telephoto position each time. Combine exposures in post processing. The compressed background stays consistent. Your subjects multiply for surreal effects.
Intentional Camera Movement
Use this with compression for abstract effects. Try slower shutter speeds around 1/15s or 1/30s. Pan or tilt during exposure. Shoot compressed scenes this way. Background compression makes blur patterns more interesting.
Focus Stacking with Compression
Bring everything sharp this way. Shoot multiple frames at different focus distances. Stack them in post processing. Front to back sharpness happens. Works great for compressed landscape layers. Every element comes out crisp.
Compression with Backlighting
Create dramatic silhouettes this way. Position subjects between you and a bright background. A setting sun behind mountains gets compressed closer. This makes powerful silhouette portraits. Spectacular backgrounds complete the look.
Your Next Steps with Lens Compression
Lens compression photography transforms ordinary portraits into striking images. The technique depends on understanding distance and focal length. They work together to create the effect.
Practice makes all the difference with this approach. Start with an 85mm or longer lens. Find locations with interesting distant backgrounds. Position subjects far from those backgrounds. Step back and zoom in. The effect appears when you nail the distances.
Your portraits will never look the same again. Backgrounds that once felt distant suddenly appear close. Mountains stack behind your subjects. City buildings compress together. All without expensive gear or complicated setups. Just smart positioning and proper focal length choices.

Darlene Lleno
Darlene Lleno brings a unique perspective to DIY Photography as someone who grew up surrounded by camera gear but chose words over lenses. With five years of writing experience, she specializes in photography content that’s both technically informed and genuinely passionate. Growing up with a photographer twin brother meant camera talk was everyday conversation in her household. While he mastered capturing moments, Darlene discovered she preferred being the subject and the storyteller behind the scenes. As a travel enthusiast and mother of two, she understands the importance of preserving life’s precious moments. When not exploring new destinations or writing for DIY Photography, you’ll find her reading or tending to her garden. Her approach to photography writing is refreshingly authentic, she may not be behind the camera, but she knows exactly what it takes to help others capture the shots that matter most.


Join the Discussion
DIYP Comment Policy
Be nice, be on-topic, no personal information or flames.