


How To Make A Soft DIY LCD Hood
Jun 9, 2013
Guest Author
We love it when our readers get in touch with us to share their stories. This article was contributed to DIYP by a member of our community. If you would like to contribute an article, please contact us here.
Share:
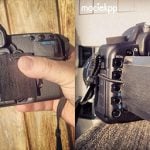
This is Chiara Sciarone’s take on a DIY LCD Hood:

I was inspired by the previous LCD-hood with camcorder eye-piece. But I didn’t have an eye-piece. Nor I liked the fact that it stayed on the camera. (I always lose my gear that way). So I made me one from a foamy!
Things That I Used…
So I took some foam, black electrical-tape, (cardboard and black duct-tape will do just as well, but foam is more flexible), I took a magnifying glass (mine came from old binoculars) and a slit pen.
I also used a pen that doesn’t write and a measuring lint.
The Way It Was Built
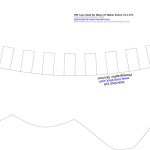
First we take some measurements. Measure the sides of your LCD screen. Have both height and width. From the bottom left corner of the foamy measure height+width+height. make a mark after each and cut after the last height marking. From each of the marks (you should have two of them) draw a line upwards.
To get the height of the hood over the LCD follow this procedure. Take your glass and look through it on your screen. The location where you have a sharp image, is where it should end up. With mine I had a large sharp-field, so I didn’t need to use millimeters, but the more persice you get, the better. Mine ended up 5 cm above the screen. This is where you should mark the first horizontal line.

Your middle square needs to be as large as your lcd-screen, so the second horizontal line ends up a short-side-screen above the first.
The total height of the foamey should be glass height+screen height + glass height.
Make an X on the two squares on the sides of the foamey. You’re now done with the pen.
Here is a ste by step folding example:


Cut a small square in the middle of the foamy. Make sure the gap in isn’t too big for your glass, else it falls through.


If you want to make this self locking, use velcro stickers


There is an optional eye cover you can make


I save it in my pocket, when I don’t use it. But I only fold the length-folds. Completely folded, I find it too thick for my pocket.


Guest Author
We love it when our readers get in touch with us to share their stories. This article was contributed to DIYP by a member of our community. If you would like to contribute an article, please contact us here.


Join the Discussion
DIYP Comment Policy
Be nice, be on-topic, no personal information or flames.
One response to “How To Make A Soft DIY LCD Hood”
Magnifiers and sun don’t mix very well, I do recommend the the cover over the magnifier!