


A Big, Cheap, Solid And Foldable DIY Softbox
Feb 14, 2014
Guest Author
We love it when our readers get in touch with us to share their stories. This article was contributed to DIYP by a member of our community. If you would like to contribute an article, please contact us here.
Share:

Many people have asked me about the DIY softbox I made a year or so ago — lovingly nicknamed “the ghettobox” — so here it is, finally: The ultimate guide to making your own 30” softbox (that’s about 76cm, you could make it even bigger, though!), that — very important — is solid and portable. Yes, you heard right, you can fold it flat but it’s still solid. Plus: As a bonus you can also hang it from somewhere to save floor space.
In summary:
- foam board based 30” DIY softbox
- deeper form than most DIY designs (therefore a more beautiful quality of light)
- materials cost: cheap
- solid
- big, but can be made flat and transported
- possibility to hang it somewhere
- optional: you can make a grid for it
- difficulty level: easy
The design is essentially based around the one you can find here: DIY 30? Soft Box that folds flat for travel
I liked the shape of it, which is deeper than other designs, and foam board is definitely a more beautiful and light material than cardboard. It also is more sturdy.
However, when I was looking at these plans, I had a feeling the box wouldn’t be solid enough, especially considering it is transported around, which is one of the big advantages of this one over other designs out there, after all. Another weak spot I identified is the part where you mount your light stand or tripod to. It has to support the weight of the whole softbox and is not supported enough in the original design, nor is the balancing point at the right place.
That’s why I redesigned how the single pieces of the softbox are held together, simplified the main box to only 2 separate pieces instead of 4, coated the inside with aluminium foil to make it more light effective and for more WHAM!, improved the mounting area and on top of that constructed a grid for the box.
But let’s get started!
What you need
- foam board, about 5mm thick, in this case 30×20”; if available with one side adhesive
- diffuser material, e.g. white polyester fabric
- thread and needle (better: sewing machine)
- aluminium foil
- velcro tape, male and female side
- duct or gaffers adhesive tape, the stronger the better
- metal bars, different screws, nuts and washers, small T-bars (see images)
- Tools: sharp knife, ruler, pen, screwdriver, …
Picture-heavy step-by-step instruction

Some of the sketches I used to plan this project. I changed many of these first ideas on the go.
Step 1 – Cut 4 foam board pieces

How to cut the foam board.
I took the graphic from Andrew’s blog and colorized it. What you need is 4 of these red parts. First transfer the lines to your boards, then use a super sharp knife to cut along the outer lines (A and B, don’t cut the center line or the score line yet).
Tip: Use less pressure, but cut several times in the same line until you’re through.

I cut the whole thing using just a short plastic ruler, like you can see here in this photograph. Of course, if you have a longer one it’s better to use that one. Use whatever you have at hand! Also, in this photo you can see that foam board is made of a hard foam inside, with layers of thick paper outside. What I used is a foam board with one side normal white paper, and one side with adhesive foil. All you have to do is pull the wax paper away and it’s sticky all over. This will come in handy when covering the inside of the box with aluminium foil and for connecting 2 pieces each with thick plastic “hinges” — but you can also use spray glue instead.
Lastly, as indicated in the illustration above, you need to score the foam board at line C — the front part or “flaps” of the box. To score it, all you have to do is to cut the outer layer of paper (on the side that will be the outside of the box later) and then gently fold it inside as much as you need. Don’t cut too deep.
Step 2 – Connect the 4 pieces
Okay, to give you an idea what we’re aiming at, look at this photograph:

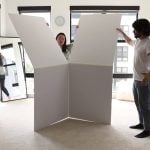
Doesn’t look promising, huh? But stay with me and it will all make sense. These are the two foldable halves you want to make. In the end, to build the softbox up, all you have to do is to connect these two parts. But one step after the other.
First of all, here are the metal parts and screws and so on that you are going to need:

Now, you could buy exactly what you see here, or you can buy something different that does the same job, or just use whatever you have at home already. It’s really no rocket science and will become clear on the following photographs.

Again, this is what we want to build first. Please pay attention to the two components:
1) the metal parts that are fixed permanently on one half of the softbox, and can be screwed removably to the other half. If you look again at the picture before this one, which shows both halves separated, you’ll notice that they are separated at precisely these metal connectors.
2) What you can see at the bottom/front of this photo, and unfortunately a bit blurred out, is merely a tough plastic foil that is glued to two each of the 4 foam board pieces, and forms a permanent connection — a “hinge” if you want. This is the inseparable connection where the halves will be folded together later. All I will say about this step is: simply lay two pieces of the cut board flat precisely next to each other so that the sides in question line up, then either 1) use strong glue to attach the strip of foil, or 2) cut a part of the wax paper away and use the adhesive on the board to hold the plastic. Alternatively, 3) simply use a broad strip of adhesive tape. The side where you glue it on is going to be the inside of the soft box. Fold it together flat, and then stick the sides together from the other side with a broad piece of gaffers tape or some other textile band. Fold it back open.
Check the photo here to see the assembled hinge (I used grey tape outside and glued an extra, optional, thin piece of foam board along each edge for stabilization):

As for the removable connection using metal connectors:

You can use T-bars like I did and flex them to the angle you need. Now, what angle do you need to flex them to, so that the softbox comes together beautifully in the end? Good question! I’ll make it easy for you: Go have a look at the sketch in the beginning that shows how to cut the foam board — you’ll see the angle indicated there with an arrow. Now, don’t measure it! (although you could…) — no matter what the dimensions of your box, it is always going to be the angle of that piece, so just take the rest of the board that you cut away in the beginning, and hold it next to the T-bar to see how far you have to bend it. Do the fine adjusting later.
General advice: When screwing metal parts to the foam board, always use a washer under the nut on the opposite side. Never tighten it too much. Once you crush the hard foam inside the board, it becomes unstable. Tighten it just so much that you feel a bit of tension. That’s enough.

The removable part will be fixed later with screws that have a “grip” and wing nuts. The washers are glued to the opposite side for convenience’s sake — of course you don’t have to do that. (but, believe me, it is convenient, haha).
Here’s a detail photo of the combination of screw and wing nuts I used for fixing the removable parts:

From the other side (= outside), the connection will look like this:

I used two screws for each of the two metal connectors, but one screw for each connector is probably enough for a stable connection. Saves you half the screwing-together time later. Only the wing nuts will be removed to separate the two softbox halves — the three normal nuts stay there. Of course you can fix the angled metal T-bar to the board any other way that works, and is more beautiful from the outside, e.g. strong glue or tape. I found this way here to be easy, cheap, and very stable.
Step 3 – Stabilize the mounting side with metal bars
Next, we have to stabilize one side with metal bars, to build sufficient support that later carries the weight of the box on a stand, or when it is hung somewhere. Unfortunately I don’t have a photo on which you can see this support on the “naked” box, but have a look at this photograph:

Besides from seeing how the two halves are connected in the end, this photograph also shows the stabilizer metal bars.
Basically you have to make a cross and fix it to one of the 4 sides of the box in the indicated way with screws, washers and nuts, just as before. I found it best to use a long metal bar only inside on the center line from the small opening where the strobe will be straight to the front, and a short metal bar only outside at a 90 degree angle to the long one. This way the foam board is “sandwiched” between the metal bars.
Look at the outside of the assembled softbox on this photo:

Also notice, that the long bar inside is long enough to come through the small opening. Bend it back and voila — this is where we will fix our strobe later.
The trickier part ist the mount for the lightstand/tripod:

This shows a detail of how I did it, but be creative. I took a short metal bar, bent a “U” in it and attached it opposite the long metal bar, the one inside the box, the open side of the U showing up. Then I took another short metal bar and bent a really tight O shape in the middle of it.This is attached over the short bar outside of the box and connected to the “U”-bar as shown. This “O” part was not planned, but I found it necessary to give the mount the necessary stability. If you use stronger metal, you can probably leave it away. I fixed the “U”-bar directly to a ball head, using a wing nut.
Trying to explain all of this in words makes it sound more complicated than it really is, so I hope the photos make everything clear. The metal bars I used are made of aluminium and really light and easy to bend, so if you have access to more solid bars and the tools to bend them, I would recommend to do that. If you do it the way I did it here, though, the whole box is supported very nicely and quite solid.
Step 4 – Coat the inside with aluminium foil
I recommend using the milky side of the foil. Again, this is no rocket science and creases and stuff like that is perfectly fine.
Step 5 – Connect the outer “flaps” with velcro

You still have to connect the front part of the softbox, the “flaps”, with each other at their edges. I found velcro, as suggested in the original plan to build this softbox, work very well for this. And you only need one connection for each of the four corners. Glue two pieces of the “male” side of the velcro on opposite sides of the flaps, and connect them with a short strip of the “female” side.
Important: Notice that there is still some of the male velcro side exposed left and right. This is necessary to fix the diffuser material to the box later.
Step 6 – Make and attach the diffuser
How to sew the diffuser together is very nicely described here — just two notes from my side: 1) I don’t use the inner diffuser because the spread of light is even enough without it, and 2) I used 100% white polyester. Happy sewing!
The square diffuser is attached from the outside using velcro: Glue pieces of female velcro to the appropriate part on the diffuser material — three along each edge: one in the middle and two close to each corner, opposite of the velcro pieces you already attached to fix the “flaps”. Don’t forget to glue a piece of “male” velcro to the outside of the soft box in the middle of each side.
Step 7 – Attach something to hold the strobe
Almost done! Now you need to attach your strobe to the short metal part that comes out of the small opening of our DIY softbox. There’s different ways to do that, I used rubber bands at first, then used yet another metal bar with a cold shoe:

I also attached three strings to hang the box from a boom or hook, which I found very useful. You can adjust the angle of the box easily and you have no light stands or tripods get in your way.
There you are — that’s all!
Here are some more photos:

Softbox standing

Softbox hanging. Tilt as well as direction is adjustable.

Complete softbox folded together — view from top.

Complete softbox folded together — view from side.

That’s how I carry the softbox somewhere.
The grid I made for the box. Not foldable, but easily attachable/removable:

DIY Softbox grid

DIY Softbox grid detail
Some example photos I took with this softbox as only light:


from “Portraits: Act 1?

Using the grid. From “Portraits: Act 1?
So, be honest: how good is it really?
There are some DIY softbox instructions out there that make you believe that what you get with your selfmade softbox is just as good a light modifier as what you otherwise have to buy for hundreds of bucks. Don’t be a fool, that’s just not going to happen with a DIY design. However, the major differences are durability and versatility, rather than light quality. Even a foldable but still solid design like this here is still heavier and more cumbersome than, say, an umbrella or otherwise foldable softbox made from fabric — and although it is cheaper to make, the margin is in fact not so big compared to some cheap no-name products. When you work professionally and need to transport your equipment all the time, set it up quick, give it some rough love… well, don’t expect to get much joy out of this.
Still, for those of us who derive pleasure from making things with their hands, this softbox is a project worth considering. If you have the luxury of taking your time when making photographs, this is a cheap way to achieve fantastic light quality and get familiar with all the things you can do with this way of lighting. After all, it’s the light that makes the photograph, and in the end no-one will care what modifier you used to achieve an awesome result. It also makes for a great second softbox, should you decide to get a commercially available one after all — and that is how I am still using this DIY softbox up to this day. And yes, it is holding up nice, even after some rough love — tested by time. I recommend to try build your own. And please, share your creations in the comments!!
About The author
Born in Germany, curently living Tokyo, Holger Feroudj is a fine art photographer.You can visit his site here, and follow him on twitter and Facebook. This post was originally published here.

Guest Author
We love it when our readers get in touch with us to share their stories. This article was contributed to DIYP by a member of our community. If you would like to contribute an article, please contact us here.


Join the Discussion
DIYP Comment Policy
Be nice, be on-topic, no personal information or flames.
12 responses to “A Big, Cheap, Solid And Foldable DIY Softbox”
great tutorial
Tutorial’s cute but, as the author states, don’t be a fool. A DIY design is not going to give you near the quality of the real thing. Particularly in this case, the costs of the materials are close to that of the great Phottix Easy-Up Umbrella Softboxes, for instance.
It’s a great DIY exercise, but a 60×60 phottix softobox is about 50/60 Euros these days… is all this worth the hassle?
I’m the author and probably wouldn’t build it again, if it wasn’t for the fun of building something with your own hands the way you planned it until it works. That said, I don’t regret building it either, it works great for what I use it for.
the metal brackets are over-design. Tape and velcro for a tenth the price.
I like the diy style. In the beginning of each photography carer money is not available, exceptional photography, requires exceptional ingenuity. Nice stuff.
sssssshit. whats the fuck is this? Please, purchase an authentic softbox in amazon.com fool!
Its really poor and the tutorial es impossible to reply. The cord is ‘amazing’ but I don’t really never risc my super strobist with this cord!
Consider rare earth magnets (You can get a dozen for a pound from ebay) instead of velcro – faster setup / takedown.
Thin walled Styrofoam cooler cut dwon the seams with a hot knife, and then Velcro used to assemble/re-assemble with a hole in the back.. Job Done. If you HAD TO DO IT.
Most designs start out in some crude prototype. Some people are gifted with great designs from the beginning. Well God Bless them. Others may or may not start out with earth shattering ideas from the beginning. This a normal. Most people are not Leonardo DeVinci.
Some times, I think people need to sh!t all over other people’s achievements and ideas simply because they didn’t think of the design simplicity themselves.
I simply loved your design. It’s people like you and your designs that makes the world, just that much better. And what’re you do, don’t stop! You could be the next Leonardo DeVinci!
Thank you!
Most designs start out in some crude prototype. Some people are gifted with great designs from the beginning. Well God Bless them. Others may or may not start out with earth shattering ideas from the beginning. This a normal. Most people are not Leonardo DeVinci.
Some times, I think people need to sh!t all over other people’s achievements and ideas simply because they didn’t think of the design simplicity themselves.
I simply loved your design. It’s people like you and your designs that make the world, just that much better. And what ever you do, don’t stop! You could be the next Leonardo DeVinci!
Thank You!