


A Shotgun Camera Tripod – Mounting A Camera Next To The Driver’s Seat
Jul 25, 2011
Udi Tirosh
Udi Tirosh is an entrepreneur, photography inventor, journalist, educator, and writer based in Israel. With over 25 years of experience in the photo-video industry, Udi has built and sold several photography-related brands. Udi has a double degree in mass media communications and computer science.
Share:
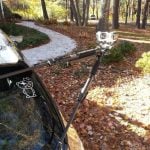
 Sometimes you’d wanna mount a camera next to the driver. This gives you a great POV as the shotgun passenger.
For stills you may wanna do this if you want to catch the dial going up to 88 MHP without breaking the law or shopping the speed in.
But I find this technique to be more relevant for videographers that want to use the shotgun POV as part of their storytelling.
While a Gorillapod may be an option for smaller cameras, big cameras need more support. In this tutorial, Boris Georgiev is going to show us how to build a very simple and cheap shotgun mount.
Materials
- Tripod head
- 40x8x3 cm board (or bigger if your camera is really heavy!)
- 3 x 6×115 mm bolts
- 3 x 6 mm screws
- 3 x 6 mm washer
- 1/4 or 3/8 60 mm bolt
- 1/4 or 3/8 screw
- 1/4 or 3/8 washer
- A washer from a inner bicycle tube.
- A small rubber sheet


Instructions
OK, we’ll be doing a bit of use-whats-already-there in this tutorial and we are going to use the two metal rails that hold the tripod as our mounting point.
If you don’t know how to get the head rest off to reveal those, ask your 6 years old son to take a look. From my experience there are masters in screwing up the head rest.
Once you have that done, use the diagram below as a guide for the rest of the steps

First measure the distance between the metal poles on your head rest (from center to center). This is going to be your (A) in the diagram. (In my case it is 150mm or 15cm)

Next measure the thickness of the poles.

This is going to be (B), We’ll discuss (B) later on. In my case it is 14mm.
The panel I used was 40x8x3 cm, depending on your camera you may want to use a bigger board (or use solid wood).
First, drill 3 6mm holes on the 3cm side. We are going to use those holes to apply pressure so mount stays horizontal. It’s a long board, I know – If your drill is too short – don’t worry! We’ll fix that later.
Cut the holes as far as you can for now, make them from the side where you gonna cut the small piece of board. (the holes must be at least 4cm deep).


Next you have to cut a small piece from the board (the blue dash on the diagram). While this is a small project, it is worth mentioning what my carpenter dad told me just before he left mom and me: “Measure twice, cut once!”. Ok, he didn’t really tell me that, nor was he a carpenter (and he defiantly did not leave mom and me), still, the moral stands.


If you drill was too short before, now is the time to continue cutting the holes through the whole board.

Now you have to make a hole for the bolt that will hold your tripod head (the hole size depends on the bolt that you are going to use! You can use 3/8 or 1/4 and 1/4 to 3/8 converter).


For improved looks, you can make the outside edges rounded.
Next you have to make the holes for the headrest poles in board.


Make sure that the holes are not as deep as (B) since you’d wanna apply pressure. Also made sure that the holes are roughly as wide as (B)!
Cut the rubber to match the bottom of your tripod head.
Put the rubber under the tripod head and use the bolt to screw them together.. Use the nut to tighten the head so it don’t move. (I am using a modified metric bolt with 1/4 to 3/8 converter)


Install it to the head rest using the three long bolts.

Mount your camera, grab your remote control and start the engine!


Udi Tirosh
Udi Tirosh is an entrepreneur, photography inventor, journalist, educator, and writer based in Israel. With over 25 years of experience in the photo-video industry, Udi has built and sold several photography-related brands. Udi has a double degree in mass media communications and computer science.


Join the Discussion
DIYP Comment Policy
Be nice, be on-topic, no personal information or flames.