


How To Build a Portable DIY Travel Jib / Shoulder Rig
Jan 25, 2013
Udi Tirosh
Udi Tirosh is an entrepreneur, photography inventor, journalist, educator, and writer based in Israel. With over 25 years of experience in the photo-video industry, Udi has built and sold several photography-related brands. Udi has a double degree in mass media communications and computer science.
Share:
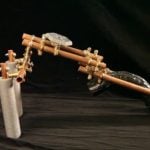
A few days ago we shared a quick sneak peak at the RotoRig – A light weight jib that resembles Light Craft’s trapezist, Zolinger’s ZP1800 and DSLR devices MK4. It’s the kind of jib (or crane) that lets you do amazing Hollywood style sweeping shots. But, in some aspects it is even better. If you are a solo shooter and have to carry your gear alone, the RotoRig saves you from having to carry multiple rigs. It doubles as a video shoulder rig and triples as a hand held jib. We also shared a shot flick shot entirely with the rig in its three positions, and the fact that it can so easily transforms really makes me sad that they did not have a movie autobot back in the days.
The response has been overwhelming and basically everyone said the same thing? How do you build one? In fact, Amazon’s stock of the monopods was nuked.

Well, Chad Bredahl is not the guy to keep you waiting and he put up a video showing how the rig was built. He also shared a complete parts list (as noted below). So everyone who grabbed the monopods off Amazon before the price went up can go ahead and complete the build. For the rest of you, Walmart has them for $9.99.
Here is the complete parts list:
- Monopods – Targus Digital TG-MP6710 67-Inch x2 or almost any monopds = $19.98
- Flower Box Metal Wall Bracket (2-Pack) (Homedepot sku 277-870) x1 = $4.96
- Small Designer Shelf Brackets (Menards Black sku 211-3630 single x2) or (homedepot White 2 pack sku 222-484 x1) = approx. $7
- Ground clamps (Homedepot sku 621-708) x7 = $11
- 1/4″ nylon washers 4 pack (Homedepot sku 595-058) x4 = $2.56
- 1/4″-20 1″ Round head Phillps bolts (Menards sku 233-8686) x3 = $2.46
- 12 lock nuts (Menards sku 232-9734) x1 = $.89
- 2 fender washers (Menards sku 201-1194) x1 = $.49
- 6 pack 1/4″ wing nuts (Menards sku 233-9148) x1 = $.89
- 1 inch x 6 ft pipe foam (homedepot sku 419-949) x1 = $1.28
- Scrap material (I used neoprene from beer cooler)
- Rubber non slip material (I used a scrap non-slip rubber dish mat)
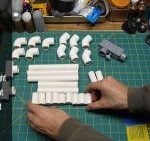
And here is the drilling digram (click for a larger version)

If you are still not sure what the RotoRig does, here is the preview which explains it all
[How to Build the RotoRig – Camera Jib and Shoulder Rig in ONE!]

Udi Tirosh
Udi Tirosh is an entrepreneur, photography inventor, journalist, educator, and writer based in Israel. With over 25 years of experience in the photo-video industry, Udi has built and sold several photography-related brands. Udi has a double degree in mass media communications and computer science.


Join the Discussion
DIYP Comment Policy
Be nice, be on-topic, no personal information or flames.
3 responses to “How To Build a Portable DIY Travel Jib / Shoulder Rig”
I am having the hardest time finding the Vinyl washers. Home depot, Truevalue and ace hardware don’t carry them here in Los Angeles.
I love this design… I do have two questions though… 1) how long is the extension (how far from the tripod can you get the camera… 2) how much weight can it hold at maximum extension… thanks d:-)
Hi Chad,
I recently built your travel jib and came across some odd problems
that I hoped you might be able to answer. Whenever I move the jib
upside down, the screws on the two shelf brackets start to become loose
and eventually come out, even though it appears that they aren’t coming
undone as it moves. I have put a couple of washers on three of the four
screws of the brackets. Do you think the washers are part of this
problem?
Thank you so much.