


Liftoff 360º Shows Si-Fi 3D Light Paintings
Mar 10, 2013
Udi Tirosh
Udi Tirosh is an entrepreneur, photography inventor, journalist, educator, and writer based in Israel. With over 25 years of experience in the photo-video industry, Udi has built and sold several photography-related brands. Udi has a double degree in mass media communications and computer science.
Share:
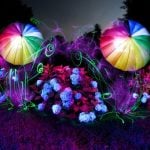
Today on the blog we are hosting master light painter Patrick Rochon who collaborated with Eric Pare on a 360 light painting project. That means that unlike “regular” light painting which are 2D, the 360 light paintings can be rotated and viewed from any angle.

This part of the project is called Liftoff Liftoff 360º and is summed in the video below. More info, awesome light painting and gear satisfaction after the jump.
Recently I had the chance to meet artists/programmers from Montreal who set up their own 360 degree Bullet Time rig with 24 Canon cameras. They kindly invited me to join them and play with their new techno-toy. We gave it a shot and did some very cool 360 light paintings.
The project is called 24×360 and it was well received by the community and friends around. To get an idea of what this project is, I asked Eric to share the recipe behind the project with the DIYP community.
Building an array of cameras like this requires 3 lines of connections
- Power – Thing batteries
- Data – think image transfer
- Remote control – think triggering
While everything can be wireless/battery powered, wireless and batteries are less reliable and require more trouble shooting and maintenance during the shoot.
In previous projects, we did some setups with less cables, but for 24×360, everything is tied together. For the USB connections, we simply used hubs and cables connected to a single laptop. Having multiple cameras sending data means it is not an instant transfer – it takes 12 seconds to receive data from all 24 cameras @ full jpg resolution.
This means we have to be careful not to be shooting too fast, as the buffer in the cameras gets full, and some frames will get lost. (Technically speaking, we could simply split the cameras into multiple computers, but it hasn’t been an issue for this current project, and we used a single computer).
The camera triggering is done via a custom cable that we Daisy chained from one camera to the other. The end of the loop is connected to a pocketwizard, so we can take the pictures wirelessly.
In the final setup, we only have one cable going out of the ring: The master power cable providing electricity for 24 cameras, 5 usb hubs and one computer . This is pretty clean and safe, as we’re in total darkness, and we don’t want to mess with cables running everywhere.
The software that we developed was the key for the project. We made it quick enough so it can provide us a full 360 degree rendering in 20 seconds. That was needed to quickly learn how to move, light the subject, and disappear in a 360 degree environment.
Preview is done through a web browser, so any device connected to our local network can review the shots.
This is also a big part of the experience for the model: the model is posing in the middle of the ring, we do a couple of shots, and then we take a monitor hidden under the curtain to validate the animated pictures.
The rendering is done by the same computer that handles the connection for the 24 cameras (yeah I know, it’s a bit heavy). So basically, the software waits for 24 jpgs. Once ready, a parallel process takes of resizing/sharpening the pictures for a quick preview, and stores the high resolutions files in a folder for post processing jobs.
Up to the 24×360 Project, we were not shooting in the dark, and at that time, we where using our software only as a console where we can monitor problems, and see the progress of what’s being processed. That changed when we started shooting in the dark, we had to turn off everything that was emitting light, so we lost that monitoring. Our solution was to add voice notifications. That’s pretty cool to hear “WE’RE GOOD” once a shot is fully processed.

I use a wide array of tools for my light painting. Some are “heavier” than others. While the heavier tool are a trade secret, there is quite a bit you can accomplish with small, easy-to-make tools based of flashlights and filters, that I’ll share below.

The Water Tool

Here is The water tool. I used a Klarus RS11 as the flashlight (They rock with 620 ANSI lumens, boom!) a few Lee color gels and some fine strips of chrome materials, a bit like are used on xmass trees. I taped it on the light
The Fire Tool

Now for the super fire, I used jumbo pipe cleaners, color gels and tape, it looks silly. Actually the first time I collaborated with Eric and the time-code Lab, I pulled out this one and everyone looked at me with a question mark?? When they saw the result, I got the “jaw drop” instead.
So Basically you can open new doors, create with anything the emits, reflect and filters light and have fun exploring.
Light Painting Basics Crash Course
Light painting can be done by anyone at any age. It’s easy and fun.
You need a tripod, a camera that can do a long exposure, I recommend at least 15 to 30 second and some small hand held lights. You shoot in total darkness, or at least 90% darkness, and move the lights in front of the camera during a long exposure.
Moving on from the mastering the basic technique to performing art is another story. It requires you to use your imagination, your intuition, to let go of control and become intuitive. For some of us, lot’s of practice is necessary and for others it’s a natural talent. No matter, the important is to have fun and do it often enough so it becomes a new part of yourself. It’ very similar to becoming a Jedi except instead of fighting darkness you use it to create light.
I recommend you to try it. Light is just like magic.
Further Reading
If you are interested in knowing more about Light Painting, here are some sites worth looking at:
- The Light Painting World Alliance – LPWA is the biggest collection of light painters and light paintings
- Light Painting Photography – A resource site with tutorials, tools, history and interviews.
- Klarus – My favorite light
- Lee filters – What I use for color
About The Author
Patrick Rochon is a self-thought master light painter since 1992 (before light painting tutorials were all over the web). You can follow his work here.

Udi Tirosh
Udi Tirosh is an entrepreneur, photography inventor, journalist, educator, and writer based in Israel. With over 25 years of experience in the photo-video industry, Udi has built and sold several photography-related brands. Udi has a double degree in mass media communications and computer science.


Join the Discussion
DIYP Comment Policy
Be nice, be on-topic, no personal information or flames.