The $10 DIY Foamcore Softbox
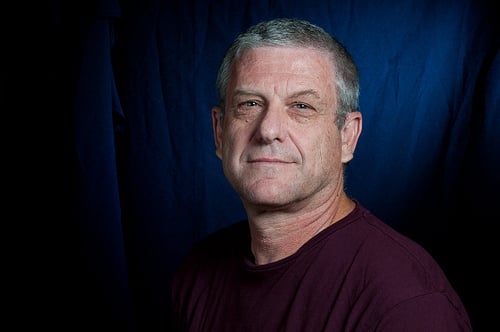
In this tutorial I will explain how I built the softbox used to take the image on the left. It is a 40cm X 40cm foamboard softbox that accepts a strobe. Kinda similar in size and effect to the Photoflex LiteDome XS which I use a lot out of the studio.
On the left image this softbox was used as key, see this lighting setup for another use of the softbox as fill.
It is a simple softbox to make and it takes about half an hour if you have mediocre cutting skills.
What You'll Need:
Here is a list of the materials, the entire thing should not cost more than 10-12 USD.
- 2 things of foamboard
- 3 1/4 20 nuts and bolts - you can get 'em cheaper than amazon on your local stores.
- 2 scrap pieces of Perspex or plywood (25cm X 5cm)
- Tape
- White silk or other translucent fabric
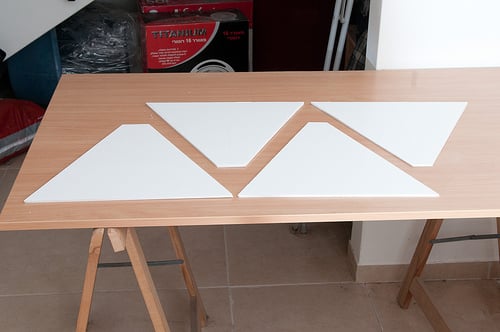
Step 1 - Cut The Foamboard
The first thing is to make 4 foam board trapezes. The front sides are easy they are all 40cm long. The strobe sides should be base side is easy - they are 40 cm each.
for the strobe side (an SB800) I did two parts of 4cm and two parts of 7cm. The height on all four is 35 cm.
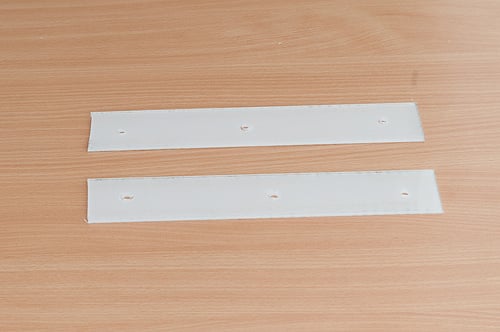
Step 2 - Add Sturdiness
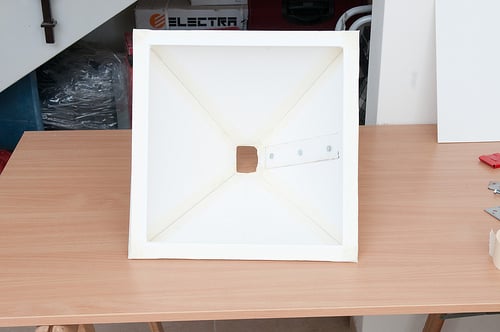
Once we assemble the box, we have no access to the interior, so we take one of the long sides and attach a mount. In the end, this will mount on a swivel stud. However, we need to reinforce the foamboard. I chose to use perspex to add some sturdiness to the bottom - plywood will work just as well.
Attach the two strips together using tape - This will help insuring that the holes are aligned.
Make three holes at 5, 12.5 and 20 cm. Since the two perspex pieces are bonded together, the holes will be perfectly aligned.
Place one of the Perspex stripes on the foam board and copy the three holes. Then drill them
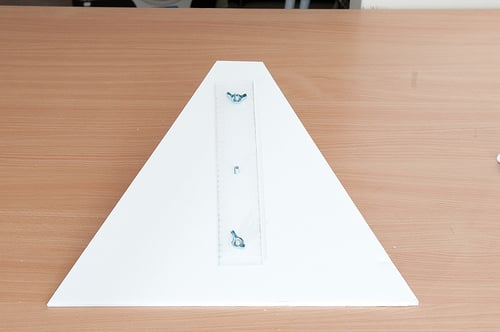
Step 3 - Assembly
The first thing is to do is to tighten the Perspex (or plywood) on the two sides of the foam core using two nuts and two bolts on the far ends. The bolt that goes in the middle does not get a nut - it will be screwed to the stud on a swivel (god, that last sentence sounds weird).
Now start taping - first a long side and a short side:
now add another short side (please pardon the mess)
and complete with the reinforced bottom to make a pyramid.
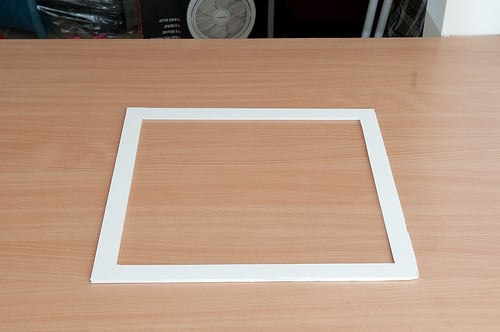
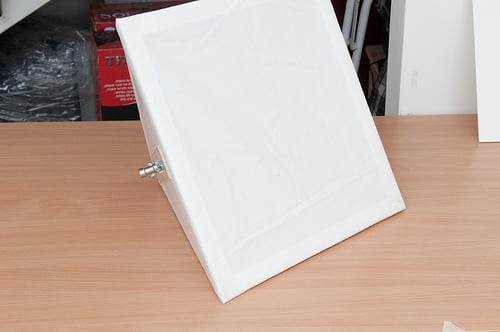
Step 4 - The diffusion screen
at this stage, you have a wobbly pyramid that kinda reminds a softbox. To give it the structural integrity it needs (to withstand Klingon attacks) you will need to add a frame.
Start by placing the pyramid on a foamboard and trace the external square. Make a second square 3 centimeters deep inside the first square and cut.
Tape the face to the "base" of the pyramid.
Cut a piece of silk slightly larger than the front square
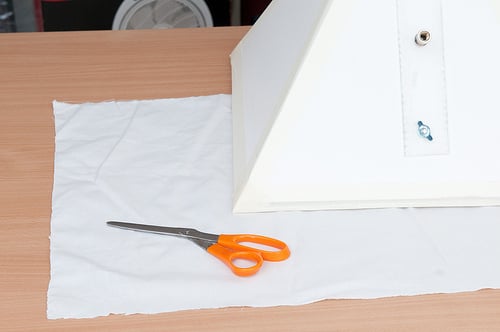
and tape it over the frame
On the image on the top you can already see the attached stud from the swivel used.
To finish off, here are the two boxes side by side - the Photoflex LiteDome XS and my DIYed box.
One thing to note about those DIY softboxes is that they do not spread light in an even way - If you take a close look at this portrait's catch-lights, you'll notice a hotspot on the left catch-light where the box was used as fill.
Setup And Notes
Here is the first portrait again just a bit bigger, and the setup that was used to take it.
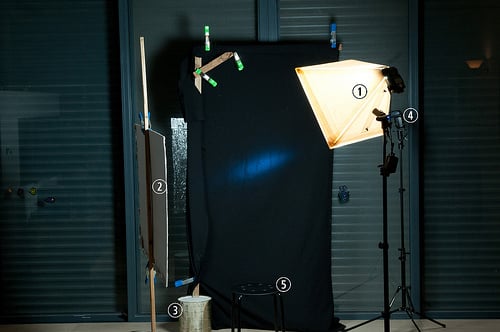
Setup Notes
1 - today's 40cm DIY softbox fitted with a strobe provides soft key light coming from the right
2 - A foamboard silver reflector mounted on a stick-in-a-can provides fill from the left side.
3 - A stick-in-a-can and some A clamps are used to hold a stretch of black fabric to act as backdrop
4 - A strobe fitted with blue gel and a coroplast gridspot is placed on the far right, casting a long light strip and provides some background separation
5 - IKEA chair is used as a posing stool
Featured Comment by Rick: I would recommend doing this project with white&black foam board (white on one side, black on the other). Construct it so the black is facing outward, then you'll have less spill contamination on the scene, which could be important if you are shooting in a lightly color room and want to make the non-lit subject areas pretty dark.
Get the DIYP greatness via RSS, newsletter and Twitter
Connect with the community: Facebook Page, Discussions
Share Ideas, Setups, Images and Projects on DIYP's Flickr, visit Readers Photos


Comments
inexpensive softbox
I always wondered how one of those styrofoam coolers would work...?
nice box - maybe a touch of color?
Great idea - love it. The collar/face is a really nice addition. I'm even thinking one could keep the box "open" and have an arsenal of cloths from the fabric store - you could really nicely control the color cast of the light and play with different swaths of fabric. They're cheap enough that you could have a bunch on hand and attach your choice to the box.
white&black foam board
I would recommend doing this project with white&black foam board (white on one side, black on the other). Construct it so the black is facing outward, then you'll have less spill contamination on the scene, which could be important if you are shooting in a lightly color room and want to make the non-lit subject areas pretty dark.
Also, how is your strobe mounted to the box? It looks from the picture that it is just placed in there, held by the grace of Hobby.
re: Black and White
Hi Rick,
the B&W is a great idea. I tried looking for some in our local art store and they had none. I guess the next best option is to use stock card on the outer side.
If you know where to get them, please share here.
The strobe is held by the Grace Of Hobby (caps ;) and lots friction/stress - this is how the measures were taken.
I'm almost certain I bought
I'm almost certain I bought some black on white at a local craft retailer (in the US) called Jo-Ann Fabric.
This looks like the same stuff and is the same dimensions if I remember correctly. Of course to have it shipped, you have to order in a 10-pack case.
too cool
If I only lived at the states, I'd feed of that board for months...
light loss
Would it make sense to coat the inside with, say aluminum foil to cut down on light leakage through the foam and direct more light out the business end?
Foil = Win
I have made a very similar softbox to this one using cardboard(just moved house so had it in abundance) and a roll of white paper as the diffuser, I lined the inner with aluminium foil with the shiny side away from the cardboard, and it makes for an extremely effective sftbox, with a very good distribution of light.
I intend to remake it with a lighter material such as foamboard as the cardboard is a little heavy and wants to sag. the perspex is a great idea though.
Hot Spot...
The hotspot on the perspex can probably be solved using another softening layer inside the box. Either a layer of white cloth inside (thin stuff like ripstop nylon I think), or use an old white plastic container/bowl (ice cream/butter/margarine), mounted midway between the flash and front, so the light bounces off the inside of it, back against the inside of the softbox, then out the front.
This is a great idea. 'll
This is a great idea. 'll Make one now.
Thanks Ricks
Great DIY
Thanks for the tutorial, well done. I think a Stofen diffuser that fits on the flash head will help spread the hot spot if you don't use a 2nd diffuser panel. Just remember each layer kills about 1 stop of light.
Great
Great idea - love it. The collar/face is a really nice addition.
Hi ! I'm doing nearly the
Hi !
I'm doing nearly the same one, with aluminium foil inside and scratch on the side to have a foldable version.
But I've got problems with dimensions, could you give yours ?
Thx ;)
re: sizes
Hi FS,
Of course, the sizes are on the first part of the post:
1. Make four rectangular shapes with 40 x 35 cm.
2. for top/bottom make a trapeze with the top size of 7 cm
3. for the sides make a trapeze with the top size 4 cm.
Would love to see the end result.
Getting rid of the hotspot
You can get rid of the hotspot altogether by mounting the flash more towards the front of the lightbox with the light aimed towards the back, instead of out the front. This might be a little more complex to build, and cuts the output by about a stop, but the light is much nicer.
Also, I got rid of the light leakage through the boards by just spray-painting the outside of the box silver. Black would work too. Spray very light, dry coats so as not to dissolve the tape or warp the boards.
Built this today!
I'm happy to report that I built v1 of this softbox today. I am very new to off-camera lighting and have been using a 2 umbrella system for a few weeks. I found this website and this tutorial this morning and since I only work a half day on Friday, I thought "why not!"
Here's what I ended up with. Keep in mind this is a self portrait, I just got home from the gym (I was letting the paint dry) and I look like hell.
http://www.dropbox.com/gallery/2209048/1/softbox?h=bf2f67
My flash bracket works pretty well. Ball bungee with the soft half of some velcro on the aluminum bracket. (just to keep it from scratching the flash) I have a westcott reflector to camera left in this shot.
So tell me, why do I need this over a small umbrella? :)
Great idea but what about this
Great Post, and great light. The cool thing about foamcore that some may not know is that it has a white balance just slightly warmer then the 5500 k we look for in balanced white points. I think a little warmer could be better since it can be cooled in post. But cooler source light reveals blue veins and cold red tones in the skin that separate more, making it harder to retouch in the end. My only thought on how to potently improve the box, for a bit more money would be to build it out of Black and white fun foam sheets spray glued together. This would eliminate the spill light coming out of the sides of the foamcore, and look very professional. I have built bounce cards out of the stuff, and I can say it also has a nice color temp.
Thanks for sharing,
Cody Conrad
Cody, I saw sheets of
Cody,
I saw sheets of black-on-one-side-white-on-the-other foamcore at Joann fabric. If I built another one of these I'd use that.
Great
I love this project. Using the foam boards (wich I often use as reflectors) make this DIY softbox more solid. I did an easy one here http://diyphotographystuff.info/97/diy-4040-softbox/, but yours looks more solid. Its also more white colored not like the {pale" white that I used.
Thanks, Moshe Samuel, Israel.
Not a softbox?
The box is constructed from rigid material so technically spoken this is not a softbox...
Almost there, but need help...
You say, "The bolt that goes in the middle does not get a nut - it will be screwed to the stud on a swivel". What the heck does that mean? I can't find anything in my hardware store that would help me with this. Could you provide a link to the HomeDepot or Loewes site that will direct us? Maybe a close up pic of the part? Something? Because right now I've got all the pieces but have no idea how this is going to connect to a tripod or other stand.
Thank you!
re: middle bolt
Hi Ric,
I added a note to this image that shows the middle bolt and stud.
Here is a link to the actual stud on amazon.
It is this stud that attaches to a swivel.
Very helpful, thank you.
Hope to finish this up and put it to use.
Heat issues
If you modified this to mount around a clamp light or halogen worklight, do you think there would be any issues with the foam board or fabric getting too hot?
re: heat
most likely,
It would probably give you a light equal to a huge fire in the house ;)
confirmed my hunch
That's what I figured. Just wanted to double checked. I hoped I would be wrong b/c this is a great design, easy and cheap. Thanks for the quick answer.
Not in Australia, apparently
I've seen several online articles referring to 'foamcore' or 'foamboard' but here in Australia I can't find it, and nobody I've spoken to has ever heard of it - and I've asked in hardware stores, craft shops, photography stores, everywhere I can think of.
So what exactly is this mysterious (and apparently mythical) 'foamcore'? Is it just styrofoam?
Wish I could think of a
Wish I could think of a better way to describe it, I've heard it called foam core board and just foam board. I'd go to amazon.com and search for foam board. Here's a link to what I'm talking about, although I would search for cheaper stuff. This is over priced. You could always try www.dickblick.com, it's a fairly reasonable online art supplies site.
http://www.amazon.com/gp/product/B0006VRTZM/ref=pd_lpo_k2_dp_sr_3?pf_rd_...
You can't beat a DIY and KISS
You can't beat a DIY and KISS combo! I would make the 'exit strengthening frame' a little different. I'd scribe the outside edges, move inwards some 3/8" and scribe those four lines and cut the hole out. Now (or before) scribe a square 1 1/2" outside the hole and now cut there to complete the frame. Tape the frame to the pyramid, inside and outside angle. Voila! You now have the clothespin design edge! You can simply clothespin on ripstop difusion cloth, collored cellophane, etc. When on a wine shoot, on my sof-box, I pinned black strips (paper'll do) a la jail cell door -- vary the width and spacing, use just verticals, or only horizontals, or both, and use the light/bar reflections for neat-o (read unique) results. Cut pattern in black poster board and use a point-light source (50W hi-intensity teeny bulb'll do) in the back for scrims and whoonoz.
For the best New Year ever, you gotta DIY, kid!
Post new comment