


How to set up a complete YouTube studio on a single desk
Oct 23, 2019
John Aldred
John Aldred is a photographer with over 25 years of experience in the portrait and commercial worlds. He is based in Scotland and has been an early adopter – and occasional beta tester – of almost every digital imaging technology in that time. As well as his creative visual work, John uses 3D printing, electronics and programming to create his own photography and filmmaking tools and consults for a number of brands across the industry.
Share:
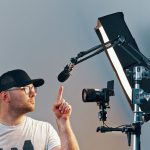
Recently, Caleb Pike showed us his studio on a stand. Now, he’s back with a new video, showing us how we can set up something a little more permanent for YouTube or other content creation by setting up a complete studio on a desk. If you’re regularly shooting at the same location, perhaps doing tutorials, or even just spoken pieces to camera, having a more permanent, efficient setup often makes more sense than one you can wheel around.
This setup might seem a little convoluted with various stands and arms, but it allows you to get things up and out of the way while still allowing you to have them mounted somewhere practical and useful. And the stands aren’t that expensive. Essentially it’s just a couple of repurposed desktop monitor mounts and a microphone arm. But here’s the complete list of hardware Caleb used in his setup.
- Extra tall desktop VESA monitor mount – $38
- Second VESA arm (for audio) – $18
- Third VESA arm (for lights) – $25
- Tripod screws – $5
- Tripod extension pole – $11
- Tripod head – $22.50
- Microphone Arm – $13
- Rode VideoMicro – $60
- 3.5mm extension cable – $8
- Mini ball head for microphone – $16
Total price for the above is around $220 or less if you shop around. You’ll also want some kind of HDMI capture device if you’re planning to record straight from your desktop. Personally, I use the Elgato Cam Link 4K for my HDMI capture needs. The advantage of recording on your desktop using something like OBS means that the recordings are already on your computer. There’s no need to mess around with memory cards and copying files. It’s just a case of loading up the software, hitting record, and you’re good to go.
You could, of course, just record in the camera and deal with copying over memory cards, too, if you wanted to. But capturing to the desktop also allows you to switch between your camera and your desktop during the recording itself. There’s no need to capture them separately and try to sync them up in post. Handy if you’re doing software tutorials.
You’ll also want to get lights if you don’t have any already, and some kind of permanent power supply for your camera. You don’t have to go with a power supply, but again, the goal of this setup is to be efficient. If you don’t need to worry about batteries dying in the middle of your shot, or having to make sure they’re charged up beforehand when you want to record, then it’s fewer headaches to deal with.
Make sure you’re using a strong desk if you’re doing something like this, and certainly don’t try this on a desk with a glass top.
This isn’t the only way to set up a desktop recording studio for YouTube or tutorials, but it does offer some great tips and ideas.

John Aldred
John Aldred is a photographer with over 25 years of experience in the portrait and commercial worlds. He is based in Scotland and has been an early adopter – and occasional beta tester – of almost every digital imaging technology in that time. As well as his creative visual work, John uses 3D printing, electronics and programming to create his own photography and filmmaking tools and consults for a number of brands across the industry.


Join the Discussion
DIYP Comment Policy
Be nice, be on-topic, no personal information or flames.