


How to build DIY color-changing LED wand light for $30
May 11, 2017
Dunja Đuđić
Dunja Djudjic is a multi-talented artist based in Novi Sad, Serbia. With 15 years of experience as a photographer, she specializes in capturing the beauty of nature, travel, concerts, and fine art. In addition to her photography, Dunja also expresses her creativity through writing, embroidery, and jewelry making.
Share:

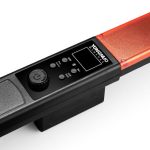
Ice lights give nice and soft light for photography and video, but they can cost quite a lot and only come in one color. Their cheaper version called wand light changes colors, but there’s a catch. Out of 360 LEDs on the wand, only 40 of them can change to various colors. So, Jordan Thornsburg from Macroscope Pictures shows you how to bring cheap, versatile and powerful together in this great DIY project.
In this video, you’ll learn how to build your own DIY wand light, which gives out powerful lighting and changes colors as well. You can use it both in photography and video, as a light source or for special effects. I imagine light painting with this would be quite awesome, too. The components cost around $30 altogether, but you can make it extra fancy for 15 more bucks and add a Wi-Fi enabled LED controller so you can control the light with your phone.
You will need


- A saw or a PVC cutter
- Metallic file
- Wrenches
- PVC or multi-purpose adhesive
- PVC pipe – 1/2’’ x 4’
- PVC pipe – 1.5’ x 2’
- PVC bushing 1.5’’ to 1/2’’
- PVC Couplers 2 x 1.5’’
- Threaded PVC bushing 1.5’’ to 1/2’’
- PVC cap 0.5’’
- 1/2’’ x 1/8’’ hex bushing
- a 3/8’’ to 1/4’’ 20 adapter (optional)
- Waterproof RGB 5050 LED strip (5m/15ft/300 LEDs)
- AA battery housing
- 9V battery clip 5.5mm x 21mm male DC barrel plug
- Foam/sponge/paper
- Tape
- WiFi Wireless LED Smart Controller (optional)
How to make
Start by filing out a notch on your 1/2’’ pipe and make sure there’s enough room to feed the wires of the LED strip when you add the bushing.
Take the 1.5’’ to 1/2’’ bushing and add it to the end, feeding the LED strip’s wires through the notch. Remove the paper backing over the adhesive on the strip and wrap it up.
Once the LED strip is wrapped around the pipe, cut the excess PVC pipe, but leave some space for the PVC cap. Then tape the end of the strip to the pipe, as it will prevent it from unraveling. When this is done, you have your light stick and now it’s time for the handle.
Take the 1.5’’ pipe and cut it to form the handle. Jordan doesn’t give the exact length of the handle in the video, but I guess it’s 15-20cm (6-8’’). Create a divot in the handle, and base its depth on the size of the PVC coupler and again, you should leave some room for the cable once you attach the coupler. Now it’s time to bring all the components together.
Add some adhesive to the top of the 0.5’’ pipe and add 1.5’’ to 1/2 ‘’ busing. Add adhesive to it as well, and put your 1.5’’ coupler onto there.
For the bottom, you’ll glue together 1.5’’ coupler and threaded 1.5’’ to1/2’’ bushing. Add the hex bushing in there and tighten it with a wrench. You can add a 3/8’’ to 1/4’’ 20 adapter and make it more universal and usable with most of the light stands.
Before you connect the blade to the handle, take the battery housing and attach the 9V battery clip. Feed them through the handle and stick the cable out the notch. Add the LED controller too, and again, stick the cable out. Connect the wires of the LED light to the battery and attach the handle to the light stick. Finally, add the part with the hex screw and the adapter, and close the handle. You can stick a piece of foam, paper or something like that to prevent the battery housing from rattling around. And you’re done with the basic version!
If you want to go for the smartphone-controllable version, you can add the Wi-Fi controller, and jam it inside the handle instead of the LED light controller. With an app called Magic Home, you’ll be able to control the color of light, brightness, create custom macros and so on. Jordan gives an extra tip – when you only have the red, green and blue light available, and not the other variants too, it means that the batteries age getting low.

What’s great about this build, except for the versatility and low price, is that anyone can make it. I’m far from a pro when it comes to electronics, yet even I could probably make this in the first attempt. I can see tons of uses for this light, as I mentioned in the introduction. Other than using it for photography and video as a light source, it could work for light painting as well. When you control it with the phone, it allows the lights to react to sound, so you can even use it as party light. And of course, what many Star Wars fans probably had in mind – you can pretend it’s a lightsaber. Either way, I’m definitely making this one. And you?
[MacroStick – DIY Wifi-Enabled Portable Photo/Film LED Light | Macroscope Pictures]

Dunja Đuđić
Dunja Djudjic is a multi-talented artist based in Novi Sad, Serbia. With 15 years of experience as a photographer, she specializes in capturing the beauty of nature, travel, concerts, and fine art. In addition to her photography, Dunja also expresses her creativity through writing, embroidery, and jewelry making.


Join the Discussion
DIYP Comment Policy
Be nice, be on-topic, no personal information or flames.
7 responses to “How to build DIY color-changing LED wand light for $30”
This is great! Love the idea. I will probably make one.
Me too! Share the results if you make one, I’m curious to see. :)
Great idea but two items alone cost more than $30
Check the link to the Amazon wish list of components.
I hate to sound stupid but… Where do you buy the LED strip, the wifi control and the other electronic parts?
There is a link to an amazon list in the video’s description.
Looking in the local plumbing department, the 1/2in pvc pipe seems really flexible, whippy even. Would 1/2in copper pipe not be better??