


How to enhance colors in sunset photos with a single layer, and get optimal results
Jun 30, 2017
Dunja Đuđić
Dunja Djudjic is a multi-talented artist based in Novi Sad, Serbia. With 15 years of experience as a photographer, she specializes in capturing the beauty of nature, travel, concerts, and fine art. In addition to her photography, Dunja also expresses her creativity through writing, embroidery, and jewelry making.
Share:

Even the magical light of the golden hour requires some enhancement in post-processing. There are a few ways to do it, and Denny Tang of Denny’s Tips suggest one of the simplest I’ve seen so far. He uses a single adjustment layer, and it’s the Channel Mixer. The whole editing process is pretty fast, yet gives natural-looking results on the photos taken during sunset (or sunrise).
Why the Channel Mixer?
With vibrance and saturation adjustments, the image will quickly begin to look over-processed. When you enhance the colors with Channel Mixer, the results will be more natural-looking and more details will remain preserved.
How to do it?
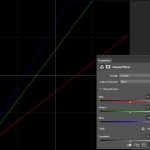
Open the image in Photoshop, and add a Channel Mixer adjustment layer.
First, select the Red channel and adjust it as follows: set the Green and the Blue to -50% and the Red to +200%.
Then, select the Blue channel, set the Red and Green to -50% and the Blue to +200%.
From here, the colors can still look too intensified and unnatural. So, you may need to decrease the layer opacity for optimal results.
You can save these settings as a preset for future editing. Go to the panel menu in the top right corner, choose “Save Preset” and give it a name. You will later be able to access it from the “Preset” drop-down menu.
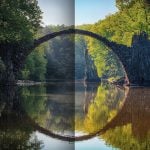
Here are some of the examples of color enhancement with Channel Mixer and Vibrance, so you can compare. I used 100% vibrance and 50% saturation with the Vibrance adjustment layer and reduced the opacity to around 50%. With the Channel Mixer, I followed the tutorial and reduced the opacity to 50-70%, depending on the image.


And here are some of Denny’s examples. He left the layer opacity 100% in all photos to show the impact of the channel mixer adjustments:


Have you used this method to enhance colors in the photos taken during golden hour? If not, what’s your preferred method for doing it?
[Quick Tip: How to INTENSIFY Sunset Photos in PHOTOSHOP (ONE Layer Only!) | Denny’s Tips]

Dunja Đuđić
Dunja Djudjic is a multi-talented artist based in Novi Sad, Serbia. With 15 years of experience as a photographer, she specializes in capturing the beauty of nature, travel, concerts, and fine art. In addition to her photography, Dunja also expresses her creativity through writing, embroidery, and jewelry making.

Join the Discussion
DIYP Comment Policy
Be nice, be on-topic, no personal information or flames.
5 responses to “How to enhance colors in sunset photos with a single layer, and get optimal results”
Oh wow “Even the magical light of the golden hour requires some enhancement in post-processing.”
I never knew that. Nobody ever told me that it is REQUIRED. Who do I pay my fines to for all these years?
Wow, pics are really great. Mine are pretty unnatural when I try to do that manually in Photoshop. I use Photolemur (https://photolemur.com) instead and sunsets look great too.
Note: This also works nicely in GIMP ;-)
They feel a bit overdone in some of the shots, but definitely a keeper for the duller/greyer ones.
Good to bring this under our attention once again. I had completely forgotten about is. But do hold back: several of the examples are way overdone!