


DIYP Reviews the Saramonic UwMic9 Dual Wireless Lavalier Microphone Kit
Dec 16, 2016
John Aldred
John Aldred is a photographer with over 25 years of experience in the portrait and commercial worlds. He is based in Scotland and has been an early adopter – and occasional beta tester – of almost every digital imaging technology in that time. As well as his creative visual work, John uses 3D printing, electronics and programming to create his own photography and filmmaking tools and consults for a number of brands across the industry.
Share:

Getting good quality audio is often the biggest challenge faced by DSLR & mirrorless video shooters. The microphones built into most cameras are notoriously bad. They hear all kinds of background noise and echo, they hiss, and pick up a lot of unwanted sound from the camera itself, like autofocus (or even manual focus adjustments).
The easiest solution, of course, is to use an external microphone. You can then plug this either straight into your camera or a separate portable field recorder. While there are many different types of microphone out there, sometimes a lavalier is your best choice. This is where there Saramonic UwMic9 dual wireless lav mic kit comes in.
The book being read in the second half of the above video is Understanding a Photograph by John Berger.
Lav mics are often used as backup microphones. On set, a directional shotgun mic boomed overhead is often going to provide a cleaner result. For interviews, a handheld mic is usually a lot more convenient, and allows for two subjects to have a conversation at similar volume levels.
Personally, I’ve been a big fan of boom mics over lavaliers for years. But sometimes, booms just aren’t practical. If you’re filming by yourself, for example, you can’t man the camera and boom a mic over your subject very easily. Even when you are working as part of a team, you might be shooting from multiple angles simultaneously with nowhere to put the boom so it can do its job while being out of every shot.
Lately, I’ve started to find myself in such situations more and more often. When I’m out filming on official DIYP business doing interviews at shows and such, I use the team’s Rode RodeLink FM Wireless Filmmaker Kit. And it’s a great piece of kit, but it’s often in use when I want to go and film my own stuff, where I don’t acess to the team’s gear box (we live in two separate continents)
So, I was on the hunt for my own system. When Saramonic offered us the UwMic9 dual wireless lav kit to see what we think, I jumped at the chance, as it’s one that had been on my shortlist of systems to check out.
Let’s start at the beginning with some of the specs.
- UHF Frequency range: 514-596 Mhz
- 96 selectable channels in 2 groups
- Operating range : 330ft (100m) in open space, 200ft (60m) with obstacles
- Easy to read LCD displays
- Audio output level -60dBV (mic level)
- Headphone output level : 30mw (16 ohm)
- Sensitivity: -95dBm
- Signal to noise ratio : 70 dB or more
- Voice delay: 12ms
- Frequency response: 40kz to 18kHz
- Distortion: 0.5% or less
- Spur suppression: -60dB
- Weight: 218.7g without batteries for each TX and RX
Out of the box first impressions
Upon opening the box, the first thing that hits you about these is how solid they feel. Built from a solid block of milled aluminium they’re definitely not going to break easily. I’ve tried a few other wireless lav mic systems in the past, and those ultra lightweight plastic transmitters you often find in low end kits are just awful.
This weight and build quality immediately filled me with some confidence. It’s not that I abuse my gear, but I don’t baby the equipment I use and wrap it up in cotton wool, either.
The other thing I was very thankful for is that all of the sockets contained on the transmitters and receiver for microhpones, headphones and cables out to the camera/recorder are all screwlock sockets. This means that once you’ve plugged them in, you turn a screw and they’re locked into place, so they’re not going to easily get tugged out.

You can, of course, just plug regular 3.5mm jack microphones, headphones and cables into them, too.
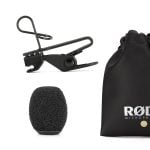
Along with the pair of transmitters and the receiver were belt clips for all three. Having a belt clip on the receiver is a nice touch, because I’ll often also have the Tascam clipped to my belt, too, if I’m just recording sound and somebody else is operating the camera. There’s also a clip-on plastic coldshoe there so you can mount the receiver onto your DSLR’s hotshoe and send a cable straight into the camera’s microphone input.
Also in the box are two lavalier microphones, with clips, as well as a couple of cables. One of these cables is a 3.5mm screwlock (this end goes into the receiver) to a standard stereo 3.5mm plug that goes into your DSLR’s microphone socket. The second cable (LM-XRC60) has the same 3.5mm screwlock plug on one end, and a single XLR plug on the other.
Saramonic do offer another cable, sold separately, which allows you to plug the receiver into your iPhone or iPad. This is the Saramonic SR-PMC1. I do not have this cable, so was unable to see how this sounds, but the option is there for those who might desire it. I kinda wish I did have it, as I shoot quite a lot of personal stuff and behind the scenes stuff with my iPhone.
The warranty card and a small instruction booklet complete the contents of the box.
First use impressions
Setting up the system was pretty easy. Each transmitter and the receiver takes a pair of AA batteries, and there’s labels on each socket to let you know where everything plugs in. Each unit also has an LCD display on the front on which you can see the status of the unit with several buttons to go through menus and browse or change the settings.
Initially, the receiver came in a mono state, with the second microphone option disabled. So, this was my first test. You might be wondering why you’d even want to disable the second microphone at the receiver level if you’re not using the second transmitter. Surely it’d still work as intended, and just not receive anything on the second channel right?
Well, in theory, yeah. But this is a UHF system, operating between 514MHz – 596MHz. There is the potential that the second channel could pick up some interference noise even if the transmitter is turned off. Also, running the second channel on the receiver when not transmitting drains the battery more quickly.
So, if you only need to use one microphone, either just for yourself or just for your subject, then it’s best to just disable the second channel for the sake of your batteries.
For my initial test, I used the XLR cable to go from the receiver to my Tascam DR-100 recorder. Turning on both of the transmitters, they identified themselves as group A and B. Then, I turned them both back off, plugged a microphone into transmitter A and turned it back on, along with the receiver.
Matching the two together was a breeze. Scroll through the transmitter’s display options with the + and – keys until I see the “Group A Auto scan” option, and long press the SET button. A regular second press of the SET button starts it scanning for the channel with the cleanest signal. This is a great feature that lets you quickly change the channel on the fly. Very useful if you use it in a bunch of different locations without knowing what interference you may run into. When it finds one, it will ask you to confirm by hitting the SET button again. After 20 or so seconds, it goes back to the regular screen.
Pairing up with the transmitter is also a pretty straightforward process. Again on the receiver, go through the menus until you see the “Group A settings Match with TX” option. Then on the transmitter, go through the menu options until you see “IR Match Match with RX”. Then, long press the SET button on both units, and then short press it again to confirm.
Pointing the infrared transmitter on the receiver and the infrared detector on the transmitter at each other should get them talking to each other in no time. “Match finished” comes up on the transmitter’s LCD when it complete.
Plug my headphones into the DR-100, start it recording, and we have sound! And it’s pretty good, too. It certainly stands up to the quality that the majority of us would need in a lav mic.
About the lav mics themselves
Now, one thing you have to bear in mind with lav mics is that they’re often omnidirectional. And those supplied with the UwMic9 are no different. This means that they pick up sound from all directions. On the one hand, this is great, because it means it doesn’t really matter which way you attach it to yourself or your subject. You can have it pointing at their face, sideways, or even away from them, and it’ll still pick them up quite well. It also makes it easier to hide within clothes.

Of course, this does come with a downside. It means that it can pick up other sounds in the environment, too. If you’ve tweaked your levels right, your subject’s voice will be loud enough that other sounds won’t matter in many circumstances. But, if there are loud noises around, they will be noticeable.
You can hear an example of this about a minute into this video I recently posted to YouTube. It was shot in a gym, and you can easily hear the boxers hitting the punching bags 20ft away. Of course, this noise is much quieter relative to my voice when compared to the sound captured by the iPhone a few feet away from me.
One thing about the mics supplied with this kit is that the capsules are quite large compared to some other lav mics. Here’s one side-by-side with a Rode smartLav+. This might make them a little more difficult to hide under a t-shirt or other clothing without being noticed.

The supplied audio cables
As mentioned above, the UwMic9 kit comes with two audio cables which each have a 3.5mm screwlock connector on one end. One cable has a 3.5mm stereo jack on the other which goes into your DSLR’s microphone socket (or to a recorder which has a 3.5mm mic socket). The other (the LM-XRC60) simply has a single mono XLR plug on it.

Now, the DSLRs I’m shooting with have really crappy preamps, that generate a lot of hiss, so that option was out. But if I want to use both lav mics, I’m forced to set the receiver to mono which mixes the two together into one signal. This means that they both record on the same channel on my DR-100. This is not ideal.
Often, if I’m recording a conversation, one subject will be louder than the other. Sometimes their voice is just naturally louder, or the placement of the microphone itself might make one subject louder or quieter than the other. So, I want to be able to record each microphone on a separate channel so I can bump each side up and down as necessary either while recording or in post.
Saramonic don’t appear to offer a cable that offers stereo XLR, but there are other options available online. I ended up buying a 3rd party cable, which has a stereo 3.5mm plug on one end, and two male XLR plugs on the other end. The only problem with this now is that I’ve lost my screwlock connector going into the receiver. This makes it a little more prone to falling out if I’m not careful.

It would be nice if Saramonic made an official stereo XLR cable with the 3.5mm screwlock plug on the other end (and much thicker cable than their supplied mono XLR cable). I’d definitely pick one up. It would be even nicer if this were included in the UwMic9 kit instead of the mono cable.
Even if using a just single microphone, using the replacement stereo XLR cable also offers another advantage. When using one microphone, if you set the receiver to mono, it will send the same signal to both left and right channels. Why this is such a great ability is because it means I can record them at different levels.
While the DR-100 does have a built in limiter to prevent clipping, it’s not foolproof. Being able to record the same audio on a second channel at a lower volume means I can account for unexpected loud noises. I’ve had subjects burst out laughing in the middle of a conversation or while telling a story before, completely clipping the audio. So, this lets me preserve that information and have the option of mixing audio from the lower level recording in post if necessary.
One thing I will say about the supplied cables that did impress me was that they’re silicone coated, not plastic coated. This means they’re far more durable and less prone to cracking over time. This also applies to the leads for the microphones themselves. This is important with something like a lav mic, when you’re moving around a lot.
The first big problem
The first time I went outside with this unit was to test how it might work as a vlogging microphone. I wanted to see how well it picked up the voice compared to the environment noise. I walked along the pavement of busy roads and through the city centre. To make sure I didn’t look like a complete lunatic talking to myself, I went out with a friend.
We talked as we would having a normal conversation. With the transmitters on our belts, and the mics clipped, we went on our way. The receiver, DR-100 and a pair of headphones went in my backpack, just left to record.
The only problem was, after walking for about 10 minutes, I checked inside my bag and noticed the receiver had switched itself off. This was with a brand new, fresh pair of Duracell Plus AA batteries that had only seen about 15-2o minutes of use. When I turned it back on, the battery indicated that it was still at about full strength, so I thought no more of it, and started the recording again.
Ten minutes later, I open up my bag, same problem. Check everything, start it recording again, put it back in my bag, ten minutes later, same again.
Upon listening to the sound files when I got home, it seemed to turn itself off only about 30 seconds to a minute into our walk each time. So, I tested again at home. No problem.
I thought maybe, perhaps, something was interfering with the signal and the receiver was shutting itself off to save battery because it couldn’t hear anything. I laid everything out on my desk, fired it all up, scanned the channels and matched everything up again. This time, no problem at all. It happily carried on recording for about 20 minutes, no issue.
So we went out again for our walk the next day. This time, we decided to walk along the river, away from traffic and buildings and anything that might provide interference. Again I noticed that every time I put the gear into my backpack and started walking, it would power itself down.
Then it hit me. It’s the movement.
It turned out that the springs inside the receiver weren’t sticking quite as far into the battery bay as those on the receiver. So, the batteries weren’t being held in with as much force. Any type of movement (such as rolling around in a backpack) could cause the batteries to momentarily disconnect and the unit to lose power.
Slotting a couple of pieces of thin card in between the batteries held them steady and solved the issue completely.

Now, I’m mentioning this because it’s what I experienced. This may be a design flaw in the receivers. It may also just be a completely one-off random issue that only affected me. I think the latter is more likely, because Googling to try and figure out why it was losing power was coming up with no useful results at all.
Both of the transmitters are fine, and don’t suffer from the same issue. Which is fortunate, seeing as how they’re generally more likely to see movement while recording than the receiver.
Problem solved
With the battery problem solved, all of my issues went away. And I could get on with using it and seeing what it’s like. The mics themselves did quite well. While walking along busy roads, they did pick up some noise of the cars driving past, horns beeping, and so on, but they weren’t so loud that they overpowered my voice. The supplied windshields also performed pretty flawlessly, with no discernible wind noise except in extremely windy conditions.
In each of the environments tested, the voice could be clearly heard over the noise of the environment. The environment noise wasn’t loud, but it was noticeable. It did really impress upon me the need to shoot in quiet locations unless the background noise was intended to be part of the recording itself. Say, for something like documentary style. It’s no worse than any other omnidirectional lav mic I’ve used, though.
One of the first things I wanted to test was the range. In practise, I’m probably never likely to be more than about 20-30ft (6-10m) away from the receiver. But, I wanted to know how far I could safely go, just in case I wanted to. The practical limitations of not wanting to leave my camera bag unattended from a great distance meant I managed to make it around 100ft (30m) away. There were no drops in audio at all, and no noticeable different in quality.
Whether recording myself on a single microphone or using both microphones together with somebody else, there seemed to be no interference between the two.
In short, they behaved perfectly.
The one issue I have run into, though, aside from the big one mentioned above, is that the belt clips do seem to come off quite easily sometimes. Ironically, when clipped to a belt, or the waistband of leggings, they hold just fine. But, when they’re in the bag, more often than not, when I pull them out, the clip has detached itself. Your mileage may vary with this, though, so keep that gaffer tape handy. just in case.
What I really liked
The biggest thing for me is that this is a dual channel receiver, capable of accepting two microphones at once. This is a pretty much unheard of feature at this price point. When I was looking around at the various lav mic sets, I’d been considering the Rode Rodelink Filmmaker Kit. But, if I want to add another mic to this setup for a second person, I have to buy a whole second kit.
Aside from this adding a lot of more to the cost, there’s also the problem of trying to feed them both into a single source for recording. Whether you’re going into a DSLR or a field recorder, it’s not an easy one to solve without a lot of adapters and hassle.
The UwMic9 comes as either a single mic or dual mic kit, with one or two transmitters, respectively. But the receiver is the same regardless. This means that if you do pick up the single kit, you can always add another microphone at a future point in time. Even if you do buy the two mic kit, you don’t have to use the lav as your second mic.

The receiver is also compatible with Saramonic’s HU9 handheld microphone with built in transmitter. This is more of a reporter interview style handheld microphone.

As well as this, there is the Saramonic TX-XLR9. This unit plugs into the end of a standard XLR microphone and has the option of supplying phantom power. This means that you can record your subject from a boomed wireless shotgun mic and a wireless lav simultaneously on separate channels.

The other great thing about this kit for me is the feedback the LCD provides. It shows me exactly which of the two groups is turned on or off at a glance as well as the signal strengths for each of those groups. It also provides me with a level indicator to let me know that it’s actually picking up sound.
Finally, of course, there’s the build quality. Like I said, I’m not particularly violent toward my gear. I’m not one of those temperamental types that throws gear across the room when something’s not working or not going my way. But, I use them. They’re production tools like everything else I use on a shoot, I and expect them to stand up to the rigours of (mostly) daily working life.
So far, they most definitely do. I’ve had this set a couple of months now, and other than the typical signs of wear you’d see on equipment, I can’t really fault them.
What I didn’t like
The biggest one for me is that they can chew through batteries pretty quickly, especially the receiver. If you’re using both microphones, that means it has to power both receivers at once. This is why I mentioned above that it’s probably a good idea to disable that second channel if you’re going to be recording a single microphone.
The transmitters can have their battery life extended simply by dropping RF power setting. By default, both of my transmitters were set to high. Dropping them down to low extends battery life by quite a bit, and doesn’t provide any issues with the sound if you’re working close to the receiver. So, now I keep mine on low and don’t worry about it unless a problem arises.
At worst, with both channels enabled, you’ll probably get about an hour’s worth of use from the receiver on a fresh set of Duracell Plus. Swapping out to higher capacity NiMH rechargeables will give you approximately double this. So, make sure you have spares handy if you plan to record for longer than this.
Besides this, and the lack of a 3.5mm screwlock to stereo XLR cable, as mentioned earlier, I really don’t have any other complaints. Both of these things can easily be resolved. One by purchasing a 3rd party cable, the other by simply bringing more spare rechargeable batteries.
Pros
- Fantastic price that will be difficult to beat
- Dual channel receiver
- Great LCD displays with useful information
- Solid build quality
- Very good sound quality
- Great range
- Compatible with their handheld mic and XLR transmitter options
- Silicone coated cables & mic leads
Cons
- The weird battery issue with the receiver (but that could just be me)
- The lack of 3.5mm screwlock to stereo XLR cable
- Belt clips could get easily lost if you’re not careful
- Battery life (but I can deal with it)
- The supplied lav mic capsules are a little on the large side
Final thoughts
Overall, I couldn’t really be happier with this system. It does have a tiny little bit more bass to the sound than on the Rode Rodelink Filmmaker Kit, but personally I prefer that. If it does bother you, you should be able to take care of it fairly easily inside Audition or similar software. It works great with my Tascam DR-100 recorder, so this will be my go-to solution now.

Functionally, it’s basically identical to Saramonic’s UwMic10 system. The only difference is the set of frequencies on which it runs. The UwMic10 was the first system to be released which runs at 614MHz – 696MHz. When this frequency range was sold off in the USA, it meant that the UwMic10 could no longer be used there. So, the UwMic9 was released to address this problem by using 514MHz – 596MHz instead.
Both sets still seem to be available for sale, though. So, depending on where you are in the world, you’ll probably want to pick one over the other. In other parts of the world, it may not matter which you go for if both of those frequency ranges are available for use. But, it’s worth bearing in mind and checking before you buy.
So, where does my setup go from here? Well, this solves my lav mic problem entirely. My shortlist is now a list of one. The UwMic9. I do have a couple of Rode and Sennheiser shotgun mics, though. So, I’m thinking a TX-XLR9 might be on the cards at some point in the near future.
The UwMic9 and all the associated extras are available to buy now.
- UwMic9 single wireless lav mic kit – $269.95
- UwMic9 dual wireless lav mic kit – $399.95
- SR-PMC1 iPhone/iPad audio cable – $19.95
- HU9 Handheld wireless microphone – $149.95
- TX-XLR9 Wireless XLR adapter with 48v phantom power – $149.95
I’m also listing the UwMic10 kit here. One thing to note is that there doesn’t seem to be an XLR adapter available for this system. So, it’s another thing to bear in mind, even if both systems are allowed where you live.
- UwMic10 single wireless lav mic kit – $269.95
- UwMic10 dual wireless lav mic kit – $399.95
- UwMic10 single wireless lav + HU10 handheld mic kit – $409.95
- SR-PMC1 iPhone/iPad audio cable – $19.95
- HU10 Handheld wireless microphone – $149.95
Have you been thinking about picking up wireless mics? Had Saramonic been in your list for consideration? Have you already taken the plunge and bought Saramonic gear? What do you think of it? Let us know in the comments.

John Aldred
John Aldred is a photographer with over 25 years of experience in the portrait and commercial worlds. He is based in Scotland and has been an early adopter – and occasional beta tester – of almost every digital imaging technology in that time. As well as his creative visual work, John uses 3D printing, electronics and programming to create his own photography and filmmaking tools and consults for a number of brands across the industry.


Join the Discussion
DIYP Comment Policy
Be nice, be on-topic, no personal information or flames.
16 responses to “DIYP Reviews the Saramonic UwMic9 Dual Wireless Lavalier Microphone Kit”
Boya BY-WM8 – cheaper
I actually wish I’d had one of those to do a straight up side-by-side comparison, but unfortunately I do not.
Yes, the Boya is cheaper, but from all of the sample recordings and clips I’ve seen, it sounds a lot cheaper, too. Whether that’s due to the Boya itself, or the ability & recording equipment of the person using them, I don’t know, but so far they haven’t impressed me.
I have the Boya WM6 (single channel) and they have too much hiss in the signal for interviews for me. And now after using them about 10-15 times, the transmitter won’t sync to the receiver any more, it just blinks. I won’t buy them again.
It looks to me like they resemble almost to a t of the sony lavs. Any connections there?
Thanks for the great post. I just bought this brand Uwmic10 and a little confused of managing two mic at once. Could you help me out with that? For instance, when I started record two mics once and one has not any issue with it but in the same way with another one is not like first one. One has a great quality of audio but another doesn’t. Why is that? What should I do? I don’t have a lot of experience. If you could guide in this case. I would be very grateful. Thanks.
I have read your review its really help full , I have one query, I have rode microphone newshooter can I use with TX-XLR9 wireless xlr adapter so that I can connect with Uwmic9 dual wirelesslav mic set.?
Does the saramonic-uwmic9 includ a preamp? Is it possible to obtain a decent audio recording directly in the camera?
i guess it does because i was able to record directly into my camera (a6500)
Why you use cloth/cotton between two AA battery?
One of the battery trays wasn’t quite tight enough to hold the batteries firm. So, they just act as shims to hold them steady and ensure continuous power. :)
Does the receiver have a limit of working with just two transmitters at one time or can it be expanded to work with more than two transmitters?
Hi John, I hope you could help me with the hissing noise or cutting sound ( speaking persons voice ) from the lavier microphone problem , I used both the Saramonic Lavier DwMic 9 and Saramonic UH9 wireless hand held microphone at the same time during the political rally held in Manila, Philippines. If I turn off either one them, hissing and noise interference disappear. I had to shut down the hand held microphone and just switch to mute , interference noise is still there. I tried to change the channel of Lavier microphone to Channel 2 or 3, in group A but the receiver wont receive the signal from the lavier, connected to the transmitter. I just set the handheld microphone to channel 1, and I knew it will be the same, even I changed it to a different channel. Thanks for your informative post.
Hi John, I had the same problem regarding the two inputs mixing down into one track but there is a way around this. SARAMONIC 2 mics seperate tracks
If you’re using two mics (2 x lav or 1 lav + 1 handheld) and everything is set to default the audio (both voices) will be mixed down into a single stereo track but most editors like each mic to be on a seperate audio track so they can adjust each speaker separately such as level or add individual effects or compressors etc.
The way to do this is to use the 3.5 mini jack connection from the receiver into the camera and make sure the receiver is set to stereo output tot he camera (or recording device) rather than mono (which is the default) and then each mic will be on a different track either left or right. You’ll also hear each mic come through only one side of your headphones if you’re monitoring it as well.
The editor will need to switch the audio in the edit from a combined stereo mix into dual mono to access each track separately but any editor with more than a few months experience should know this.
You can’t record like this using the XLR connection but the XLR connection is a good option if you’re only recording with one mic as you then have the option to record the mic on track one and duplicate it to track two at a lower volume for safety or record the camera mic / atmosphere on track two if for example you want to add some of the surrounding noise back into the mix in the edit.
On a side note, I use two mics for a live stream now and then and in that situation is it best to leave the receiver on mono and have both mics mixed down as one track on both left and right channels as there is no editing and if someone is watching live with headphones it might be distracting to hear voices coming though different ears. Hope this helps.
https://www.bhphotovideo.com/c/product/1443723-REG/saramonic_sr_um10_cc1_locking_3_5mm_male_to.html/reviews
Hi there
I’ve just bought the Saramonic twin kit & it seems that they have listened to people about the XLR cable as the one I have came with a stereo XLR lead.
“Thank you for the insightful review of the Saramonic UWmic9 Dual Wireless Lavalier Microphone Kit! As someone in the market for a reliable wireless microphone setup, your thorough examination of its features, performance, and usability is incredibly helpful. The ability to capture clear audio from two sources simultaneously is a game-changer for content creators like myself. Your firsthand experience and detailed analysis have certainly made my decision-making process much easier. Keep up the great work!”