


Build your own touchscreen photo booth with a Raspberry Pi
Jun 30, 2016
John Aldred
John Aldred is a photographer with over 25 years of experience in the portrait and commercial worlds. He is based in Scotland and has been an early adopter – and occasional beta tester – of almost every digital imaging technology in that time. As well as his creative visual work, John uses 3D printing, electronics and programming to create his own photography and filmmaking tools and consults for a number of brands across the industry.
Share:

It’s almost like you can’t go to an event these days without seeing a photo booth. Whether it’s a wedding, an office party, or just a weekend barbecue with family and friends, there seems to be a photo booth.
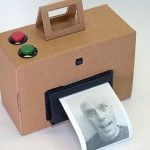
There are a million different ways to make photo booths, from super expensive RED powered slow-mo booths to 3D photo booths and a vintage selfie booth, and in this weekend project from Make, we’re shown how to make our own touch screen photo booth for very little cost based around a Raspberry Pi.
Using a Raspberry Pi to power a photo booth is not all that new, but usually they’re being used to control a DSLR, offering wi-fi or tethered shooting to a computer for immediate upload to the web or printing.
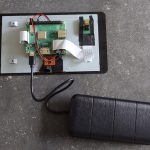
Using the new Raspberry Pi 3 with built in wi-fi and the latest 8MP Camera Module, we can now keep the whole thing self contained. Sure 8MP isn’t going to give you huge prints, but this is a photo booth. It’s not like most parties are going to be producing masterpieces.
Let’s have a look at the guts of it…
- Raspberry Pi 3 Model B – $37
- Raspberry Pi Camera Module V2 – $26
- Official Raspberry Pi Foundation 7″ Touchscreen LCD – $72
Total price, around $135. You will obviously need to add some kind of USB power supply, or a beefy USB battery if you’re using this at a location without power, and you’ll need a microSD card, but most of us have those laying around already anyway.
As for the case. I intentionally didn’t want to try and price that up as there are so many different ways this can be done depending on how we you want it to look and what materials and technology you have available. Typically, cases are going to either be wooden or 3D printed, and you’ll have to figure that out on your own.
If a 7″ touchscreen monitor isn’t quite big enough for you, you could always go for something a little larger (although it may be more tricky to get to work with the Pi), and if you want to save every penny you can, then there are also some slightly cheaper 7″ touchscreen displays out there, too.

The software can take a little work to set up if you’ve never done anything like this before, but once it’s done and you don’t have to do it again. If the video above feels like it’s going a little too quickly for you, just hit the pause button after each step, or rewind and watch again.
It’s a neat little self-contained solution, and while the costs do add up, it’s still not overly expensive.
I already have a Pi and the touchscreen, so I might have to finally order a Pi camera and give this a go. It’d certainly make it a lot less hassle when people invite me to something and ask “Oh, by the way, can you bring your camera?”.
So, are you finally going to have a go at building up that photo booth you’ve always wanted? What other uses for the Raspberry Pi or Pi Camera Module have you found for your photography? Let us know in the comments.

John Aldred
John Aldred is a photographer with over 25 years of experience in the portrait and commercial worlds. He is based in Scotland and has been an early adopter – and occasional beta tester – of almost every digital imaging technology in that time. As well as his creative visual work, John uses 3D printing, electronics and programming to create his own photography and filmmaking tools and consults for a number of brands across the industry.

Join the Discussion
DIYP Comment Policy
Be nice, be on-topic, no personal information or flames.
One response to “Build your own touchscreen photo booth with a Raspberry Pi”
Hayley O’Hanlon Holly Thoms