


A beginner’s guide to focus stacking in Photoshop
Nov 18, 2020
Shreyas S. Yadav

We love it when our readers get in touch with us to share their stories. This article was contributed to DIYP by a member of our community. If you would like to contribute an article, please contact us here.
Share:

Want to create perfectly focused and sharp macro and landscape images?
Here is a step-by-step guide on focus stacking, it will help you create perfectly sharp images.
The steps described in the article will help you to photograph images for focus stacking. It will also help you to apply focus stacking using adobe Photoshop.
So, let’s dive right in.
Here are the steps you will learn in this post –
- How to photograph images for focus stacking
- How to apply focus stacking in Adobe Photoshop
To create a focus-stacked image, first photograph multiple sets of frames with different areas of image focus.
The second step is the post-processing of the multiple images in Adobe Photoshop to create a sharp image.
Let’s start with the first step.
1. How to photograph images for Focus Stacking
- For creating focus stacked images, photograph at least three frames.
- In one frame, the foreground should be in focus; in the second frame, the middle area should be in focus, and in the third frame, the background should be in focus.
- You can photograph multiple frames; however, I recommend to photograph at least three frames.
- Mount your camera/lens on the steady tripod. This is an essential step to photograph multiple frames.
- Switch to manual focus. The live view will be helpful for you.
- Adjust the desired exposure. Using a live view and manual focus, focus on the foreground and capture the first frame. Similarly, focus on the middle area and background. Photograph 2nd and 3rd frame for the middle area and background.
- Some cameras have features of focus bracketing. If your camera does have the focus bracketing feature, refer to the camera manual and use it.
- Now you have three frames- one with foreground sharp, second with middle area of the image sharp, and third with background sharp.
- Here is an example image. I have photographed three frames of beautiful Senecio flowers during the rainy season. In the first image, you can notice flowers in the foreground are focused. In the second image, the middle flowers are in focus. In the third image, flowers in the background are focused.


Images are photographed with Nikon D500, Nikon 80-200 f/2.8 lens, and Gitzo tripod.
Since we have three frames ready, now it’s time to apply focus stacking in Adobe Photoshop.
Let’s learn how to apply focus stacking in Adobe Photoshop.
2. How to apply focus stacking in adobe Photoshop
- If you are using Adobe Lightroom, import the multiple frames which you have photographed.
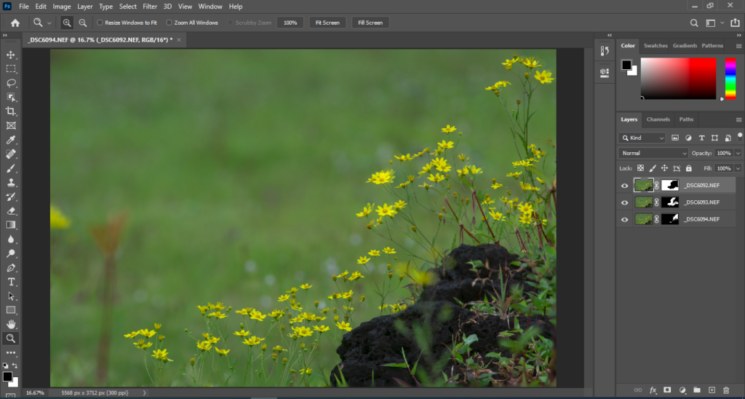
- Select the frames and > Right Click > Edit > Open As Layers in Photoshop

- Three images will be open in Adobe Photoshop as layers

- If you are directly opening the images in Adobe Photoshop, then, in the Adobe Photoshop, select Files > Scripts > Load Files into Stacks.
- Select and open the files as a Layer in Adobe Photoshop
- Once the files are opened as a layer, select Edit > Auto-Align layers.

- Under Auto-Align Layer Projection Option, select Auto. Uncheck Lens Correction options. Click Ok.

- Now, select Edit > Auto-Blend Layers

- Under Auto-Blend Layers Option, select Stack Images. Select Seamless Tones and Colors. Click Ok.

- Now you can see, Adobe Photoshop automatically blends the three frames. Photoshop blends the three layers so that areas from each frame that are focused are visible.
- Select Layers> Flatten Image

- Great! Your focus-stacked image is ready.

- Now use Adobe Photoshop, Adobe Camera raw (as a filter), or Adobe Lightroom for color and tonal adjustments. I use Adobe Lightroom for further Image adjustments.
Here is a step-by-step guide on post processing an images using adobe Lightroom
- Here is the final image. Notice how three frames are merged to create a single image where most of the flowers are sharp.

Here is one more example of focus stacking.
I have photographed beautiful Corynandraf with three images. In the first image, the front area of the flower is in focus.

In the second image, the middle area is in focus.

And, in the third image rear part of the flower is in focus.

Here is final Focus stacked image. You can see all the areas of a flower are in focus and sharp.

Note: – We may be tempted to increase the aperture to a value of f/16 or f/22 to get a correctly focused image. However, increasing the aperture number may not give perfect sharpness for your image.
If you want a perfectly focused and sharp image from foreground to the background, focus stacking is an excellent option.
The focus stacking technique will help you to create perfectly focused and sharp images of macro objects. You will find this technique extremely helpful in landscape images as well.
How do you focus-stack your images or any thoughts on this article?
Either way, let me know by leaving the comment below right now.
About the Author
Shreyas S. Yadav is an engineer, wildlife and nature photographer from India. He is also a writer and lifelong adventure explorer. Through his writings, he teaches about digital post-processing and nature photography. He shares field techniques about nature photography, post-processing, and wildlife photo stories on his website.
You can also follow Shreyas on social media: Instagram, Facebook, and 500px. This article was also published here and shared with permission.
We love it when our readers get in touch with us to share their stories. This article was contributed to DIYP by a member of our community. If you would like to contribute an article, please contact us here.


Join the Discussion
DIYP Comment Policy
Be nice, be on-topic, no personal information or flames.